EasyManua.ls Logo

DeWalt DCS367B - User Manual

DeWalt DCS367B
11 pages
Print Icon
To Next Page IconTo Next Page
Loading...
ENGLISH
1
English (original instructions)
Definitions: Safety Alert Symbols and Words
This instruction manual uses the following safety alert symbols and words to alert you to hazardous situations and your risk
of personal injury or property damage.
DANGER: Indicates an imminently hazardous situation which, if not avoided, will result in death or seriousinjury.
WARNING: Indicates a potentially hazardous situation which, if not avoided, could result in death or seriousinjury.
CAUTION: Indicates a potentially hazardous situation which, if not avoided, may result in minor or moderateinjury.
(Used without word) Indicates a safety related message.
NOTICE: Indicates a practice not related to personal injury which, if not avoided, may result in propertydamage.
WARNING! Read all safety warnings and all
instructions. Failure to follow the warnings and
instructions may result in electric shock, fire and/or
seriousinjury.
WARNING: To reduce the risk of injury, read the
instructionmanual.
If you have any questions or comments about this or
any
DeWALT
tool, call us toll free at:
1-800-4-
DeWALT
(1-800-433-9258).
1
Trigger switch
2
Lock-off button
3
Blade clamp release lever
4
Shoe
5
Hand grip
6
Battery pack
7
Battery release button
8
Main handle
Fig. A
12
3 45
6
7
8
Question and Answer IconNeed help?

Do you have a question about the DeWalt DCS367B and is the answer not in the manual?

Summary

General Power Tool Safety

Personal Safety Measures

Essential measures to protect the operator from injury.

Reciprocating Saw Specific Safety

Additional Specific Safety Rules

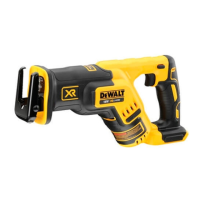
Specific safety advice for operating reciprocating saws.

General Safety Information

Important safety advice and precautions for tool users.

Battery and Charger Safety

Battery Tool Use and Care

Guidelines for safe use, charging, and storage of battery packs.

Important Safety Instructions for Battery Packs

Critical safety guidelines for handling and charging battery packs.

Important Safety Instructions for Battery Chargers

Essential safety instructions for operating battery chargers.

Tool Operation and Handling

Blade Installation and Removal

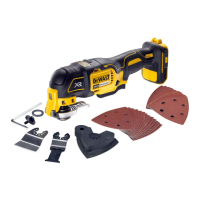
Instructions for installing and removing saw blades.

Cutting Techniques

General Cutting Safety

Essential safety precautions during cutting operations.

Overview

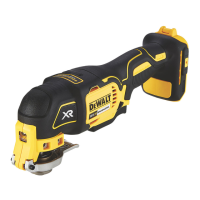
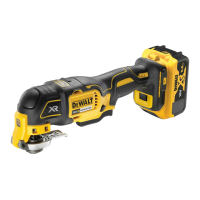
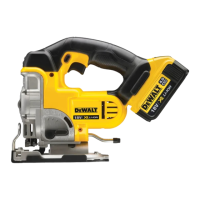
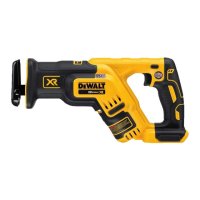
This document describes a professional reciprocating saw designed for various sawing applications. It is not intended for use under wet conditions or in the presence of flammable liquids or gases. Children should not come into contact with the tool, and supervision is required for inexperienced operators.

Function Description:

The reciprocating saw is a powerful tool used for cutting various materials. Its primary function is to saw through workpieces, with different blades available for specific applications, including metal cutting. The tool is equipped with a variable speed trigger switch, allowing the user to control the cutting speed by adjusting how far the trigger is depressed. A lock-off button is integrated to prevent unintentional starting, enhancing safety during storage and transport. The saw also features a worklight to illuminate the immediate work surface, which activates when the trigger switch is depressed and remains on for a short time after release.

Usage Features:

  • Variable Speed Trigger Switch: The saw offers variable speed control, providing versatility for different cutting tasks. Pressing the trigger further increases the speed. For beginning cuts, very slow speeds are recommended to avoid damage to the saw.
  • Lock-Off Button: To lock the trigger switch, press the lock-off button. This is crucial when carrying or storing the tool to prevent accidental activation. The button is colored red when in the unlocked position. To unlock, press the button and pull the trigger.
  • Battery Pack: The tool is powered by a DEWALT battery pack. For optimal performance, the battery pack should be fully charged before first use. To install, align the battery pack with the rails in the tool's handle and slide it in until it is firmly seated. To remove, press the release button and pull the battery pack out.
  • Blade Installation and Removal: Different blade lengths are available, and the appropriate blade should be chosen for the application. The blade must be longer than 3-1/2" (89 mm) and extend past the shoe and the thickness of the workpiece during the cut to prevent breakage and injury. Jigsaw blades should not be used with this tool. To install a blade, pull the blade clamp release lever up, insert the blade shank from the front, and then push the lever down. The blade can be installed in four positions. To remove, open the blade clamp release lever and pull out the blade.
  • Proper Hand Position: Always hold the saw firmly with both hands to anticipate sudden reactions and maintain control. One hand should be on the main handle and the other on the hand grip.
  • Cutting Operations: Before cutting, ensure the material is firmly anchored or clamped. Place the blade lightly against the workpiece, switch on the motor, and allow it to reach maximum speed before applying pressure. Whenever possible, the saw shoe should be held firmly against the material to prevent jumping, vibrating, and minimize blade breakage. Avoid cuts that put pressure on the blade, as this increases the potential for vibration, kickback, and breakage.
  • Flush-To Cutting: The saw's compact motor and spindle housing design allows for extremely close cutting to floors, corners, and other difficult areas.
  • Pocket/Plunge Cutting (Wood Only): For pocket cutting, first measure and mark the surface area. Use an appropriate blade that extends past the shoe and workpiece thickness. Tip the saw backward until the back edge of the shoe rests on the work surface and the blade clears it. Switch on the motor, allow it to come to speed, and then, gripping firmly with both hands, begin a slow, deliberate upward swing, keeping the bottom of the shoe firmly in contact with the workpiece. The blade will feed into the material. Ensure the blade is completely through the material before continuing the pocket cut. When blade visibility is limited, use the saw shoe as a guide, extending cut lines beyond the edge of the cut.
  • Metal Cutting: The saw has different metal cutting capacities depending on the blade type and metal. Use a finer blade for ferrous metals and a coarse blade for non-ferrous materials. For thin gauge sheet metals, clamp wood to both sides to ensure a clean cut and prevent vibration or tearing. Avoid forcing the cutting blade, as this reduces blade life and causes breakage. Spreading a thin film of oil or lubricant along the cut line is recommended for easier operation and longer blade life.
  • Horizontal Blade Clamp: The DCS367 model is equipped with a horizontal blade clamp, allowing the blade to be installed in a horizontal orientation. This feature enables cutting close to floors, walls, or ceilings where clearance is limited. Ensure the shoe is pressed against the framing to avoid kickback.

Maintenance Features:

  • Cleaning: To reduce the risk of serious personal injury, turn the unit off and remove the battery pack before making any adjustments or cleaning. Blow dirt and dust out of all air vents with clean, dry air at least once a week. Always wear ANSI Z87.1 approved eye protection when performing this. Never use solvents or harsh chemicals on non-metallic parts of the tool, as they can weaken plastic materials. Use a cloth dampened with water and mild soap. Do not allow any liquid inside the tool or immerse any part of the tool into a liquid.
  • Battery Pack Care: Do not charge or use the battery pack in explosive atmospheres. Never force the battery pack into the charger or modify it. Charge battery packs only in designated DEWALT chargers. Do not splash or immerse in water or other liquids. Store the tool and battery pack in a cool, dry location, away from temperatures exceeding 104 °F (40 °C). Do not store battery packs in a tool with the trigger switch locked on. Do not incinerate battery packs, even if severely damaged, as they can explode and release toxic fumes. If battery contents contact skin, wash immediately with soap and water; if in eyes, rinse with water for 15 minutes and seek medical help. Do not attempt to open the battery pack. If the case is cracked or damaged, do not insert it into the charger. Do not crush, drop, or damage the battery pack. Damaged battery packs should be returned to a service center for recycling.
  • Charger Care: Do not attempt to charge battery packs with chargers other than those specified in the manual. Do not expose the charger to rain or snow. Pull by the plug, not the cord, when disconnecting. Ensure the cord is located to prevent stepping on, tripping, or damage. Do not use an extension cord unless absolutely necessary. When operating outdoors, provide a dry location and use an outdoor-suitable extension cord. An extension cord must have adequate wire size. Do not place objects on top of the charger or on soft surfaces that block ventilation. Do not operate the charger with a damaged cord or plug, or if it has received a sharp blow or damage. Do not disassemble the charger; take it to an authorized service center for repair. Disconnect the charger from the outlet before cleaning. Never connect two chargers together. The charger is designed for standard 120V household electrical power.
  • Storage: Store the tool and battery pack in a cool, dry place, away from direct sunlight and excess heat or cold. For long storage, it is recommended to store a fully charged battery pack. Battery packs should not be stored completely depleted of charge.
  • Repairs: To ensure product safety and reliability, repairs, maintenance, and adjustments (including brush inspection and replacement) should be performed by a DEWALT factory service center or an authorized service center using identical replacement parts. The charger and battery pack are not serviceable.

DeWalt DCS367B Specifications

General IconGeneral
Quantity per pack1 pc(s)

Related product manuals