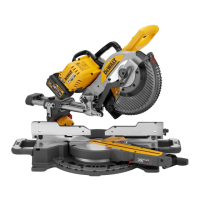
13
ENGLISH
Body and Hand Position
Proper positioning of your body and hands when operating the mitre saw
will make cutting easier, more accurate andsafer.
WARNING:
• Never place your hands near the cuttingarea.
• Place your hands no closer than 150mm from theblade.
• Hold the workpiece tightly to the table and the fence when cutting.
Keep your hands in position until the switch has been released and
the blade has completelystopped.
• Always make dry runs (without power) before finish
cuts so that you can check the path of theblade.
• Do not cross yourhands.
• Keep both feet firmly on the floor and maintain properbalance.
• As you move the saw arm left and right, follow it and stand slightly
to the side of the sawblade.
Basic Saw Cuts
Vertical straight cross cut (Fig. A, O)
NOTE: Use 250mm saw blades with 30mm arbor holes to obtain the
desired cuttingcapacities.
1. Slacken the mitre latch
13
and subsequently lift itup.
2. Engage the mitre latch
13
at the 0° position and fasten the mitrelatch.
3. Place the wood to be cut against the fence
16
.
4. Take hold of the carrying handle
3
and press the guard lock up release
lever
2
to release the guard. Extend head of the saw all the wayout.
5. Press the trigger switch
1
to start the motor.
6. Depress the head to allow the blade to cut through the timber and
enter the plastic kerfplate
11
.
7. When the head is fully depressed, slowly push it back across to
complete thecut.
8. After completing the cut, release the switch and wait for the saw blade
to come to a complete standstill before returning the head to its upper
restposition.
WARNING:
• The lower blade guard is designed to close quickly
when the lever
2
is released. If it does not close within
1 second, have the saw serviced by an authorized
repairagent.
Vertical mitre cross-cut (Fig. A, P)
1. Squeeze the mitre latch
13
. Move the arm left or right to the
requiredangle.
2. The mitre latch will automatically locate at 0°, 15°, 22.5°, 31.62°, 45° and
50° both left and right. If any intermediate angle is required hold the
head firmly and lock by fastening the mitrelatch.
3. Always ensure that the mitre lock lever is locked tightly beforecutting.
4. Proceed as for a vertical straight cross-cut.
WARNING: When mitring the end of a piece of wood
with a small off-cut, position the wood to ensure that the off-cut is to
the side of the blade with the greater angle to the fence, i.e.:
• left mitre, off-cut to the right
• right mitre, off-cut to the left
Performing a sliding cut (Fig. A, B, R)
1. Turn the saw head traverse lock
18
to loosen.
2. Push down the saw head
24
, pull out the lock-down button
22
and
let the saw head rise to it’s highest position.
3. Place the wood to be cut against the sliding fence
16
and secure it
with the material clamp
17
.
4. Lower the saw head then pull it to the end of its travel.
5. Press the guard lock-up release lever
2
to release the guard. Press the
trigger switch
1
to start the motor.
6. Totally depress the head to allow the blade to cut through the timber
and push the head back to complete the cut.
7. After completing the cut, release the switch and wait for the saw blade
to come to a complete standstill before returning the head to its upper
rest position.
WARNING: Remember to lock the saw head in the rear position when
the sliding cuts are finished.
Bevel cross-cuts (Fig. L, Q)
Bevel angles can be set from 0° to 48° to the left. Bevels up to 45° can be cut
with the mitre arm set between zero and a maximum of 45° mitre position
right orleft.
1. Loosen the bevel clamp handle
19
and set the bevel asdesired.
2. Set the override button
30
ifrequired.
3. Hold the head firmly and do not allow it tofall.
4. Tighten the bevel clamp handle
19
firmly.
5. Proceed as for a vertical straight cross-cut.
Quality of Cut
The smoothness of any cut depends on a number of variables, i.e. the
material being cut. When smoothest cuts are desired for moulding
andother precision work, a sharp (60-tooth carbide) blade and a slower,
even cutting rate will produce the desiredresults.
WARNING: Ensure that the material does not creep while cutting;
clamp it securely in place. Always let the blade come to a full stop
before raising the arm. If small fibres of wood still split out at the rear
of the workpiece, stick a piece of masking tape on the wood where
the cut will be made. Saw through the tape and carefully remove tape
whenfinished.
Cutting Non-Ferrous Metals
When cutting non-ferrous metals, the machine is only to be used to
perform vertical straight and mitre cross-cuts in the mitre saw mode.
We recommend that bevel and compound mitre cuts should not be
performed in non-ferrous metals. The machine is not to be used for cutting
ferrousmetals.
• Always use a material clamp when cutting non-ferrous metals. Make
sure that the workpiece is clamped securely.
• Only apply saw blades that are qualified for cutting non-ferrous metals.
• When using lubricants, only apply wax or separation spray. Do not use
emulsions or similar fluids.
Clamping the Workpiece (Fig.U)
WARNING: Always use a materialclamp.
For best results use the material clamp
17
made for use with yoursaw.
To Install clamp
1. Insert it into the hole behind the fence. The clamp
17
should be facing
toward the back of the mitre saw. Ensure the groove on the clamp rod
is fully inserted into the base of the mitre saw. If the groove is visible,
the clamp will not besecure.
2. Rotate the clamp 180º toward the front of the mitresaw.
3. Loosen the knob to adjust the clamp up or down, then use the fine
adjust knob to firmly clamp theworkpiece.
NOTE: Place the clamp on the right side of the base when beveling.
ALWAYS MAKE DRY RUNS (UNPOWERED) BEFORE FINISH CUTS TO CHECK
THE PATH OF THE BLADE. ENSURE THE CLAMP DOES NOT INTERFERE WITH
THE ACTION OF THE SAW ORGUARDS.
 Loading...