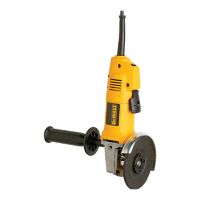
Auxiliary llandle
(FIG.
3l
An auxiliary handle
is fumished
with
your grinder
and can
be installed
on either
side of the
front housing, as shown
in Figure 3.
This handle
SHOULD BE USED
AT ALL
TIMES to maintain
complete control
of
the tool.
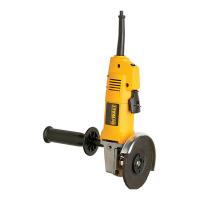
Spindle
Lock Button
(FtG.
3)
Turn off and unplug
grinder.
ln order to
prevent
the spindle
of the tool
lorm rotating
while installing
or
removing accessories,
a spindle
lock button
has been
provided
in
the
gear
head
of
the machine,
as shown
in Figure
4. To lock
the
spindle, depress
and
hold the lock button.
NEVER
DEPRESS
THE
LOCK BUTTON
WITH
THE TOOL
RUNNING OR COASTING.
Sanding
Discs
(FIG,
4)
NOTE:
The
guard
need
not be used
with sanding
discs.
TO INSTALL SANDING
DISCS:
Be sure that the
tool is unplugged.
Push the hub of the
clamp
washer
through the center oI
the sanding disc,
as far as
it will
go,
and also
through
ûre backing
disc.
Pr.i the
backing
hub
on
the tool spindle.
lnstall
the clamp
washer
on
the tool spindle
and thread the assembly
clockwise,
completeÿ
down on
the
spindle.
Engaç
the lock button.
When using a sanding
disc,
hold the tool so that an
angle of
10'to 15"
exists beùreen
the disc and
the work.
lf
onÿ
the outer edge
of the disc
is
used a rough crÎ surlace
will
result. lf the disc is
pressed
flat against
the
work the surface
will be inegular
and bumpy, and
the tool
will be difficult
to
control.
See
page
7 for a æmplete
descripüon
of usage and
mounüng altematives.
Removing
Disc
(FIG.
5l
Using
a cloth or
glove
to
protect your
hand, turn
the disc assembly
counterclockwise
to remove
it from the tool spindle.
Engage
lock button.
Depressed Center
Wheels
(FtG.
6t
Depressed center
wheels may be used lor
moderate metal removal on
flat or contoured surfaces.
CAUTION:
Never use depressed center
wheels without the
proper
guard.
TO INSTALL DEPRESSED CENTER
WHEELS:
1. Be sure tool is disconnected
from
power
supply and switch
is in
OFF
position.
2. Be sure the
guard
assembly
is securely attached to
the spindle
housing.
BACKING HUB
i;rry
SCREWS
FLARING
CUP
WHEEL
CLAMP
FIG.7
3.
Put
the backing
hub onto
the tool spindle.
4. Check
rated speed on depressed
center
wheel. Never use
wheel
with
rated speed lower
than the speed
in the'WARNING'
statement
on
the
nameplate of
the tool
5.
Place
the
depressed
center
wheel on
the tool spindle.
6.
Thread the clamp
washer on tool
spindle,
hold the tool spindle
by
engaging
the lock button,
and tighten
clamp
washer with
ppanner
wrench.
See
page
T lor a complete
description
ol usage
and
mounting alternatives.
When using a depressed
center
wheel,
hold the tool so
that an angle
of
approximately
30o exists
between
the wheel and
the work.
Wire Brushing
1. Disconnect tool
from
power
source.
Rest
grinder
on its back
with
spindle
facing up.
2. Thread wire cup brush onto
spindle and
tighten.
3. Common
applications
for wire cup brushes
include cleaning
welds,
angles, corners and
removal of
paint.
4. Always wear eye
protection
and appropriate
protective
clothing.
Flaring Cup
Wheels
(FIG.
fl
Use
flaring cup
wheels for smoothing
welds, casting
ridges, or
large
metal
areas, cutting
off studs, bolts,
rivets, etc.
A
5/8'
-
11
thread bushing
in the
wheel threads
directly on
the tool spindle.
Flaring Cup
Wheels should
only
be used
in
conjunction
with the correct size
adjustable skirt
guard.
Disconnect the tool
from the
power
supply.
Attach
guard
with the open
paft
of
the
guard
facing
away
from the operator.
Tighten mounting
screws
to sêcure
guard
in
place.
Hold down
the
spindle
lock button and
thread the flaring cup
wheel
onto
the spindle.
Be
sure
that the
wheel is
firmly
and completely
threaded onto
the spindle.
Loosen screws
holding the adjustable skirt
part
of the
guard
and slide
the skirt down
until about
1/4"
of
the llaring cup
wheel is exposed.
Tighten screws.
When using tool, tilt tool slightly-do
not
hold wheel
perfectly
flat
against the
work. Avoid bouncing
the wheel or
giving
it rough
treatment, since cracks
might develop
which would cause the
wheel
to fly apart. Always check
the wheel
for
cracks
before using
it,
and
always
use a wheel
guard.
Maintenance ol
Tool
Cleaning
Blowing dust and
grit
out oI the
motor housing using compressed
air is
a
necessary regular maintenance
procedure.
Dust and
grit
containing
metal
particles
often accumulate on
interior surfaces and
could create
an electrical shock hazard
if not frequently
cleaned
out.
CAUTION:
Never use solvenls or other
harsh
chemicals
for
cleaning
the
non-metallic
parts
of
the tool.
Use
clean, dry rag only.
Lubrication
DeWALT tools are
properly
lubricated at the
factory
and
are
ready for
use.
Tools should be
relubricated regularly every sixÿ days
to six
months,
depending on
usage.
(Tools
used constantly
on
production
or
heavy-duÿ
iobs
and
tools exposed to
heat may require more
frequent
lubrication.) This lubrication should only be attempted
by trained
power
tool repairpersons.
 Loading...