12
ENGLISH
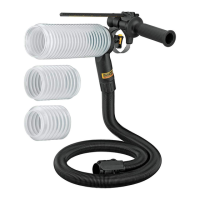
Package Contents
The package contains:
1 Dust extraction system
1 Side handle
1 Long tube
1 Short tube
1 Dust port plug
1 Wear ring
1 Dust hose
1 Adapter for rotary hammers
1 Adapter for hammer drills
1 Instruction manual
• Check for damage to the tool, parts or accessories which may
have occurred duringtransport.
• Take the time to thoroughly read and understand this manual
prior tooperation.
Markings on Dust Extraction System
The following pictograms are shown on the tool:
Read instruction manual beforeuse.
Description (Fig. A)
WARNING: Never modify the power tool or any part of it.
Damage or personal injury couldresult.
1
Side handle
2
Short tube
3
Long tube
4
Dust extraction connection
port
5
Wear ring
6
Dust hose
7
Adapter for rotary
hammers
8
Adapter for hammer drills
9
Dust port plug
Intended Use
The DWH201D dust extraction system has been designed
for the extraction of dust in professional hammer drilling in
masonry or concrete, and with solid drill bits mounted to
the power tool. This dust extraction attachment will fit most
corded and cordless SDSPLUS rotary hammers,
corded hammer drills and premium cordless drill/driver/
hammerdrills. For more information about D
WALT power
tools compatible with this attachment, please contact your local
dealer, refer to the addresses at the back of the manual or visit
www.dewalt.com.
DO NOT use under wet conditions or in the presence of
flammable liquids orgases.
The dust extraction system is an attachment for use with
professional powertools.
DO NOT let children come into contact with the tool.
Supervision is required when inexperienced operators use
thistool.
• Young children and the infirm. This appliance is not
intended for use by young children or infirm persons
withoutsupervision.
• This product is not intended for use by persons (including
children) suffering from diminished physical, sensory or
mental abilities; lack of experience, knowledge or skills
unless they are supervised by a person responsible for their
safety. Children should never be left alone with thisproduct.
SPECIFICATIONS
Short tube To be used with 150 mm overall length (100 mm useable) bits.
Long tube To be used with 250 mm overall length (200 mm useable) bits.
ASSEMBLY AND ADJUSTMENTS
WARNING: To reduce the risk of serious personal
injury, turn tool off and disconnect tool from power
source before making any adjustments or removing/
installing attachments or accessories. Be sure the
trigger switch is in the OFF position. An accidental start-up
can causeinjury.
Attaching and Removing the Dust Extraction
System
To Attach the Dust Extraction System (Fig.A–D)
1. Remove the bit prior toassembling.
2. Remove the side handle and the depth adjustment rod, if
attached to thetool.
3. Widen the ring opening
17
by rotating the side handle
1
anti-clockwise.
4. Slide the assembly onto the nose of the tool, through the
ring opening
17
and onto the collar
10
, past the chisel
holder andsleeve. If an adaptor is needed refer to Attaching
the Dust Extraction System with anAdapter.
5. Rotate the dust extraction system to the desired position.
6. Lock the assembly in place by securely tightening the side
handle
1
, rotating the grip clockwise so that the assembly
will notrotate.
7. Insert the dust hose
6
into the dust extraction connection
port
4
and a dust extractor (notshown).
NOTE: The dust exrecation system is compatible with or
without a dust extractor. The tool can be used with the
plug
9
inserted in the dust extraction connection port
4
. If
you are using the plug, it is recommended you remove the
dust from the tube after drilling eachhole.
Attaching the Dust Extraction System with an Adaptor
(Fig.A, D)
If the diameter of the tool's collar
10
is less than 43mm, an
adaptor is needed to properly mount the dust extractionsystem.
Your dust extraction system comes with two adaptors, a
toothed adaptor for rotary hammers
7
and a smooth adaptor
for hammer drills
8
.
1. Choose the correctadaptor.
2. Open correct adaptor and close onto the collar
10
.
NOTE: The adaptor will slide back and forth on thetool.
3. Widen the ring opening
17
by rotating the side handle
1
anti-clockwise.
4. Place the ring opening
17
ontotheadaptor.