13
ENGLISH
5. Complete steps 5–7 of To Attach the Dust
ExtractionSystem.
FITMENT GUIDE
No adaptor collar needed
D25333, D25263, DCH263, DCH273,
D25323, DCH253, DCH213, D25223,
D25213, D25123, DCH283, DCH323,
DCH333, DCH334, D25333, D25334,
DCH243, D25263, D25313, D25324
Toothed adaptor needed
DCH133, D25133, D25260, D25052,
D25012, D25023, DWD525, DWD520,
DCH033, D25032, D25033, D25134
Smooth adaptor needed
DCD997, DCD996, DCD995, DCD985,
DCD970, DCD950
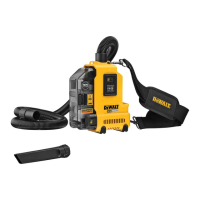
Removing the Dust Extraction System (Fig. A)
1. Remove the dust hose
6
from the dust extraction
connection port
4
.
2. Remove bit from SDS PLUS tool holder or drillchuck.
3. Turn side handle
1
to loosen and slide from nose oftool.
4. If adaptor was used, open and remove adaptor from nose
oftool.
AirLock Compatible (Fig. A, E)
Your D
WALT dust extractor is compatible with the D
WALT
AirLock connection system. The AirLock allows for a fast, secure
connection between the dust hose
6
and power tool. The
AirLock connector
11
connects directly to D
WALT compatable
tools or through the use of an AirLock adaptor
12
(available
from your local D
WALTsupplier).
NOTE: If using an adaptor, ensure it is firmly attached to the tool
outlet before following the stepsbelow.
1. Ensure the collar on the AirLock connector is in the unlock
position. (Refer to FigureE.) Align notches
13
on collar and
AirLock connector as shown for unlock and lockpositions.
2. Push the AirLock connector onto the adaptor
connectorpoint.
3. Rotate the collar to the lockedposition.
NOTE: The ball bearings inside collar lock into slot and
secure the connection.The power tool is now securely
connected to the dustextractor.
OPERATION
Instructions for Use
WARNING: Always observe the safety instructions and
applicableregulations.
WARNING: To reduce the risk of serious personal
injury, turn tool off and disconnect tool from power
source before making any adjustments or removing/
installing attachments or accessories. Be sure the
trigger switch is in the OFF position. An accidental start-up
can causeinjury.
Proper Hand Position (Fig. F)
WARNING: To reduce the risk of serious personal injury,
ALWAYS use proper hand position asshown.
WARNING: To reduce the risk of serious personal
injury, ALWAYS hold securely in anticipation of a
suddenreaction.
Proper hand position requires one hand on the main handle
14
of the hammer and one hand on the side handle
1
.
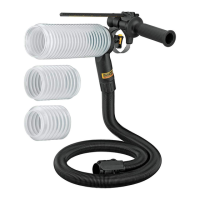
Attaching and Removing Tubes (Fig. A, G)
Your dust extraction system comes with a short tube
2
and
a long tube
3
. Refer to Specifications for proper usage for
eachtube.
Attaching the Tube
You can attach the tube with the bit either installed orremoved.
1. Push the tube onto the end of the dust extraction unit while
using a twisting motion until the tube issecure.
2. Place the wear ring
5
on the end of thetube.
Removing the Tube
To remove the tube, twist and pull the tube away from the dust
extractionunit.
MAINTENANCE
Your
dust extraction system has been designed
to operate over a long period of time with a minimum of
maintenance. Continuous satisfactory operation depends upon
proper tool care and regularcleaning.
WARNING: To reduce the risk of serious personal
injury, turn tool off and disconnect tool from power
source before making any adjustments or removing/
installing attachments or accessories. Be sure the
trigger switch is in the OFF position. An accidental start-up
can causeinjury.
WARNING: Use only
replacementparts.
Replacing the Dust Brush (Fig. H)
WARNING: Wear approved eye protection and approved
dust mask when performing thisprocedure.
The dust brush will wear during use and will need to
bereplaced.
1. To remove the dust brush
15
, pry it away from the four
small tabs
16
holding it inplace.
2. Insert the new dust brush making sure it is securely held by
the four smalltabs.
Optional Accessories
WARNING: Since accessories, other than those offered
by
, have not been tested with this product, use
of such accessories with this product could be hazardous.
To reduce the risk of injury, only
recommended
accessories should be used with thisproduct.
Consult your dealer for further information on the
appropriateaccessories.