12
ENGLISH
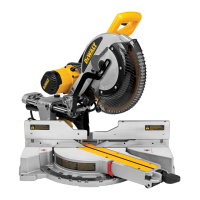
Basic Saw Cuts
Vertical Straight Cross-Cut (Fig.A,O)
NOTE: Use 216 mm saw blades with 30 mm arbour holes to obtain
the desired cuttingcapacities.
1. Raise the saw head
23
to its highest position by pushing down on the
saw head
23
and pulling out the lock-down button
21
. Release the
downward pressure and allow the saw head to rise to its fullheight.
2. Squeeze the mitre latch
12
then move the arm to the 0°position.
3. Release the mitrelatch.
4. Always ensure that the mitre latch is locked tightly beforecutting.
5. Place the wood to be cut against the sliding fence
15
and secure it
with the material clamp
16
.
6. Take hold of the operating handle and press the guard lock release
lever
2
to release the guard. Press the trigger switch
1
to start the
motor. It is recommended to start the cut near thefence.
7. Depress the head to allow the blade to cut through the timber and
enter the plastic kerf plate
10
.
8. After completing the cut, release the switch and wait for the saw blade
to come to a complete standstill before returning the head to its upper
restposition.
WARNING:
• For some types of plastic profiles, it is advisable to follow the
sequence in reverseorder.
9. The lower blade guard is designed to close quickly when the lever
2
is
released. If it does not, have the saw serviced by an authorized
repairagent.
Performing a Sliding Cut (Fig.A,B,O)
1. Turn the rail lock knob
17
toloosen.
2. Push down the saw head
23
, pull out the lock down button
21
and let
the saw head rise to it’s highestposition.
3. Place the wood to be cut against the sliding fence
15
and secure it
with the material clamp
16
.
4. Lower the saw head then pull it to the end of itstravel.
5. Press the guard lock-up release lever
2
to release the guard. Press the
trigger switch
1
to start themotor.
6. Totally depress the head to allow the blade to cut through the timber
and push the head back to complete thecut.
7. After completing the cut, release the switch and wait for the saw blade
to come to a complete standstill before returning the head to its upper
restposition.
WARNING: Remember to lock the saw head in the rear position when
the sliding cuts arefinished.
Vertical Mitre Cross-Cut (Fig.A,P)
1. Squeeze the mitre latch
12
. Move the arm left or right to the
requiredangle.
2. The mitre latch will automatically locate at 0°, 15°, 22.5°, 31.62°, 45° and
50° both left and right. If any intermediate angle is required hold the
head firmly and lock by fastening the mitrelatch.
3. Always ensure that the mitre lock lever is locked tightly beforecutting.
4. Proceed as for a vertical straight cross-cut.
WARNING: When mitring the end of a piece of wood
with a small off-cut, position the wood to ensure that the off-cut is to
the side of the blade with the greater angle to the fence, i.e.:
• left mitre, off-cut to the right
• right mitre, off-cut to the left
Bevel Cross-Cuts (Fig.L, Q)
Bevel angles can be set from 0° to 48° to the left. Bevels up to 45° can be cut
with the mitre arm set between zero and a maximum of 45° mitre position
right orleft.
OPERATION
Instructions for Use
WARNING: Always observe the safety instructions and
applicableregulations.
WARNING: To reduce the risk of serious personal injury, turn
tool off and disconnect tool from power source before making
any adjustments or removing/installing attachments or
accessories. Be sure the trigger switch is in the OFF position. An
accidental start-up can causeinjury.
Ensure the machine is placed to satisfy your ergonomic conditions in terms
of table height and stability. The machine site shall be chosen so that the
operator has a good overview and enough free surrounding space around
the machine that allows handling of the workpiece without anyrestrictions.
To reduce effects of increased vibration, make sure the environment is not
too cold, the machine and accessory are well maintained and the workpiece
size is suitable for thismachine.
Switching On and Off (Fig. A)
A hole
28
is provided in the on/off switch
1
for insertion of a padlock to
lock thetool.
1. To run the tool, press the on/off switch
1
.
2. To stop the tool, release theswitch.
Use of XPS LED Worklight System (Fig. A, N)
NOTE: The mitre saw must be connected to a powersource.
The XPS LED Worklight System is activated with a push button switch, fitted
on the handle under the guard lock release lever
2
. The XPS LED Worklight
System is independent of the mitre saw’s triggerswitch. A failure of XPS has
no effect on the intendedoperation.
To cut through an existing pencil line on a piece ofwood:
1. Push the black plastic lever, then pull down on the operating handle to
bring the saw blade
7
close to the wood. The shadow of the blade will
appear on thewood.
2. Align the pencil line with the edge of the blade’s shadow. You may
have to adjust the mitre or bevel angles in order to match the pencil
lineexactly.
Speed Control Dial (Fig. A)
DWS771 only
The speed control dial
27
can be used for advance setting of the required
range ofspeed.
Turn the speed control dial
27
to the desired range, which is indicated by
a number (1–5).
• Use high speeds for sawing soft materials such aswood.
• Use low speeds for sawinghardwood.
Body and Hand Position (Fig. O)
Proper positioning of your body and hands when operating the mitre saw
will make cutting easier, more accurate andsafer.
WARNING:
• Never place your hands near the cuttingarea.
• Place your hands no closer than 100mm from theblade.
• Hold the workpiece tightly to the table and the fence when cutting.
Keep your hands in position until the switch has been released and
the blade has completelystopped.
• Always make dry runs (without power) before finish
cuts so that you can check the path of theblade.
• Do not cross yourhands.
• Keep both feet firmly on the floor and maintain properbalance.
• As you move the saw arm left and right, follow it and stand slightly
to the side of the sawblade.
 Loading...