7
ENGLISH
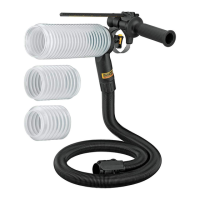
Wet Pick Up Applications (Fig.F)
WARNING: Plug vacuum into residual current device
(RCD) protected outlet when using the vacuum for wet
pickup.
WARNING: If foam or liquid escapes from the machine,
switch offimmediately.
CAUTION: Clean the water level limiting device regularly
and examine it for signs ofdamage.
NOTICE: DO NOT remove ball float
29
, doing so will
cause damage to the vacuum. The ball float keeps water
from entering themotor.
Before using the vacuum for wet pick up:
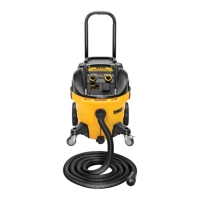
Parking Brake (Fig.I)
The parking brake will lock one wheel in place to prevent
vacuum fromrolling.
1. To engage parking brake, depress the brake
28
to snap the
brake into the lockedposition.
2. To disengage parking brake, depress the brake button and
brake will snap into the unlockedposition.
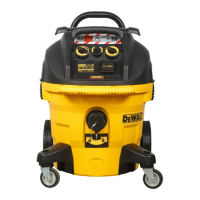
Automatic Filter Cleaning System
This vacuum has a highly effective filter cleaning system which
minimizes filter clogging. Every 30seconds, one of the two filters
gets automatically cleaned. The cleaning process alternates
between the filters and continues through the life of theunit.
NOTE: After starting the vacuum, both filters get cleaned within
the first 15seconds.
NOTE: It is normal to hear a clicking sound during thisprocess.
NOTE: After many hours of operation the automatic filter
cleaning system may not be effective. When this happens, see
clause Filter underMaintenance.
• Do not overheat the coin cell or throw it into fire. The coin cell
may leak, explode, catch fire and cause personal injury.
• Do not damage the coin cell and do not disassemble the
coin cell. The coin cell may leak, explode, catch fire and cause
personal injury.
• Do not allow damaged coin cells to come into contact with
water. Leaking lithium may mix with water to create hydrogen,
which could cause a fire, an explosion, or personal injury.
• Do not dispose of the button cell battery with normal
household waste. Contact your local waste disposal
department to dispose of the device/batteries in accordance
with applicable local laws and regulations.
• Remove and dispose of drained coin cell correctly. Drained
coin cell may leak and damage the product or cause personal
injury.
1. To open the housing remove the 4 screws
34
from the rear
panel with a T10 torx screwdriver.
2. Pull out sideways the discharged coin cell battery fom the
battery holder.
3. Insert sideways the new coin cell battery
35
into the
battery holder, pay attention to the orientation of the
battery in terms of polarity.
4. Replace the back cover, insert the screws and tighten.
Replacing the Coin Cell Battery in the
Remote Control(Fig.H)
DANGER: DO NOT INGEST BATTERY;
CHEMICAL BURN HAZARD.This product contains
a coin / button cell battery. If the coin / button cell
battery is swallowed, it can cause severe internal
burns in just 2 hours and can lead to death.
WARNING: KEEP NEW AND USED BATTERIES AWAY
FROM CHILDREN. If the battery compartment does not
close securely, stop using the product and keep it away
from children. If you think batteries might have been
swallowed or placed inside any part of the body, seek
immediate medical attention.
WARNING: WHEN REPLACING BATTERY, REPLACE
IT WITH THE SAME OR EQUIVALENT TYPE CR2032.
Observe correct polarity (+ and –) when replacing
batteries. Do not store or carry batteries so that metal
objects can contact exposed battery terminals.
WARNING: ENSURE THAT COIN CELL REPLACEMENT
IS CARRIED OUT PROPERLY. There is a risk of explosion.
• When replacing battery, replace it with the same or equivalent
type CR2032. Do not use any other coin cells or other forms of
electrical power supply.
• Do not attempt to recharge the coin cell battery and do not
short circuit the coin cell battery. The coin cell battery may
leak, explode, catch fire and cause personal injury.
equipped-tool, or press the remote button
27
on the Wireless
Tool Control™ remote
16
at the same time.
3. The LED above the Wireless Tool Control™ pairing button will
be steadily illuminated to indicate a successful pairing.
CAUTION: Do not activate the Wireless Tool Control at the
Tool if the dust extractor hose is not connected to the dust
extraction port of the tool.
NOTE: Only one transmitter can be paired to the DWV905 at a
time. If the unit is already paired the previous transmitter will be
overridden.
To Unpair with a Wireless Tool Control™ Tool
orRemote
1. Turn the on/off tool control switch to the
I
position and pull
the trigger on the Wireless Tool Control™ equipped tool or
press the button on the remote at the same time.
2. The LED above the Wireless Tool Control™ pairing button will
flash slowly to indicate a successful unpairing.
CAUTION: To prevent unintentional switch‑on after the end
of work Switch the On/Off switch
14
to the OFF (O) position.
or unpair the Wireless Tool Control of tool or remote.
LED FLASH PATTERN
In pairing mode
– – – – – – –
No device is paired
– – – –– – – –
Device is successfully paired
––––

 Loading...