12 13
to show the charge status of the battery as a percentage (%) of
full. Pressing the Voltage Button cycles through different charging
status views of the connected battery.
6. When disconnecting the battery charger, unplug the AC Power
Cord, remove the clamp from the vehicle chassis, and then remove
the clamp from the battery terminal.
Indications and Faults
LCD Screen Shows: Indication | Solution:
Temperature Compensation Activated: The “ ” Icon will appear if the surrounding ambient temperature
is higher than approximately 40°C. The “ ” Icon will appear if the surrounding ambient temperature is lower
than 0°C. This is not a fault code, but indicates that the unit’s temperature compensation feature is operating.
No user action is required.
Overheat Protection Activated: If the charger is overheated, the charging process automatically terminates.
The Fault Icon and the Overheat Alarm Icon flash. The (full) Battery Icon and Clamp Icons light solid.
Disconnect the connections and allow the charger to cool for several minutes. Make sure there is adequate
ventilation around the unit before attempting to charge again.
Battery Problem Detected: The charger automatically checks the battery condition 3 minutes after the
charging process starts. If the charger detects a problem with a battery, the charging process automatically
terminates. The Fault Icon and the (empty) Battery Icon flash. The Clamp Icons light solid.
Disconnect the connections. Have the battery checked by a qualified technician.
Possible Battery Problem Detected: If the battery is not fully charged after 18 hours of continuous charging,
the battery may have internal damage and will not accept a charge. After 18 hours, the charging process
automatically terminates. The Digital Display shows “F04”. The Fault Icon and the (empty) Battery Icon flash.
Disconnect the connections. Have the battery checked by a qualified technician.
Button once to show the charge status of the battery as a
percentage (%) of full. Pressing the Voltage Button cycles through
different standby status views of the connected battery.
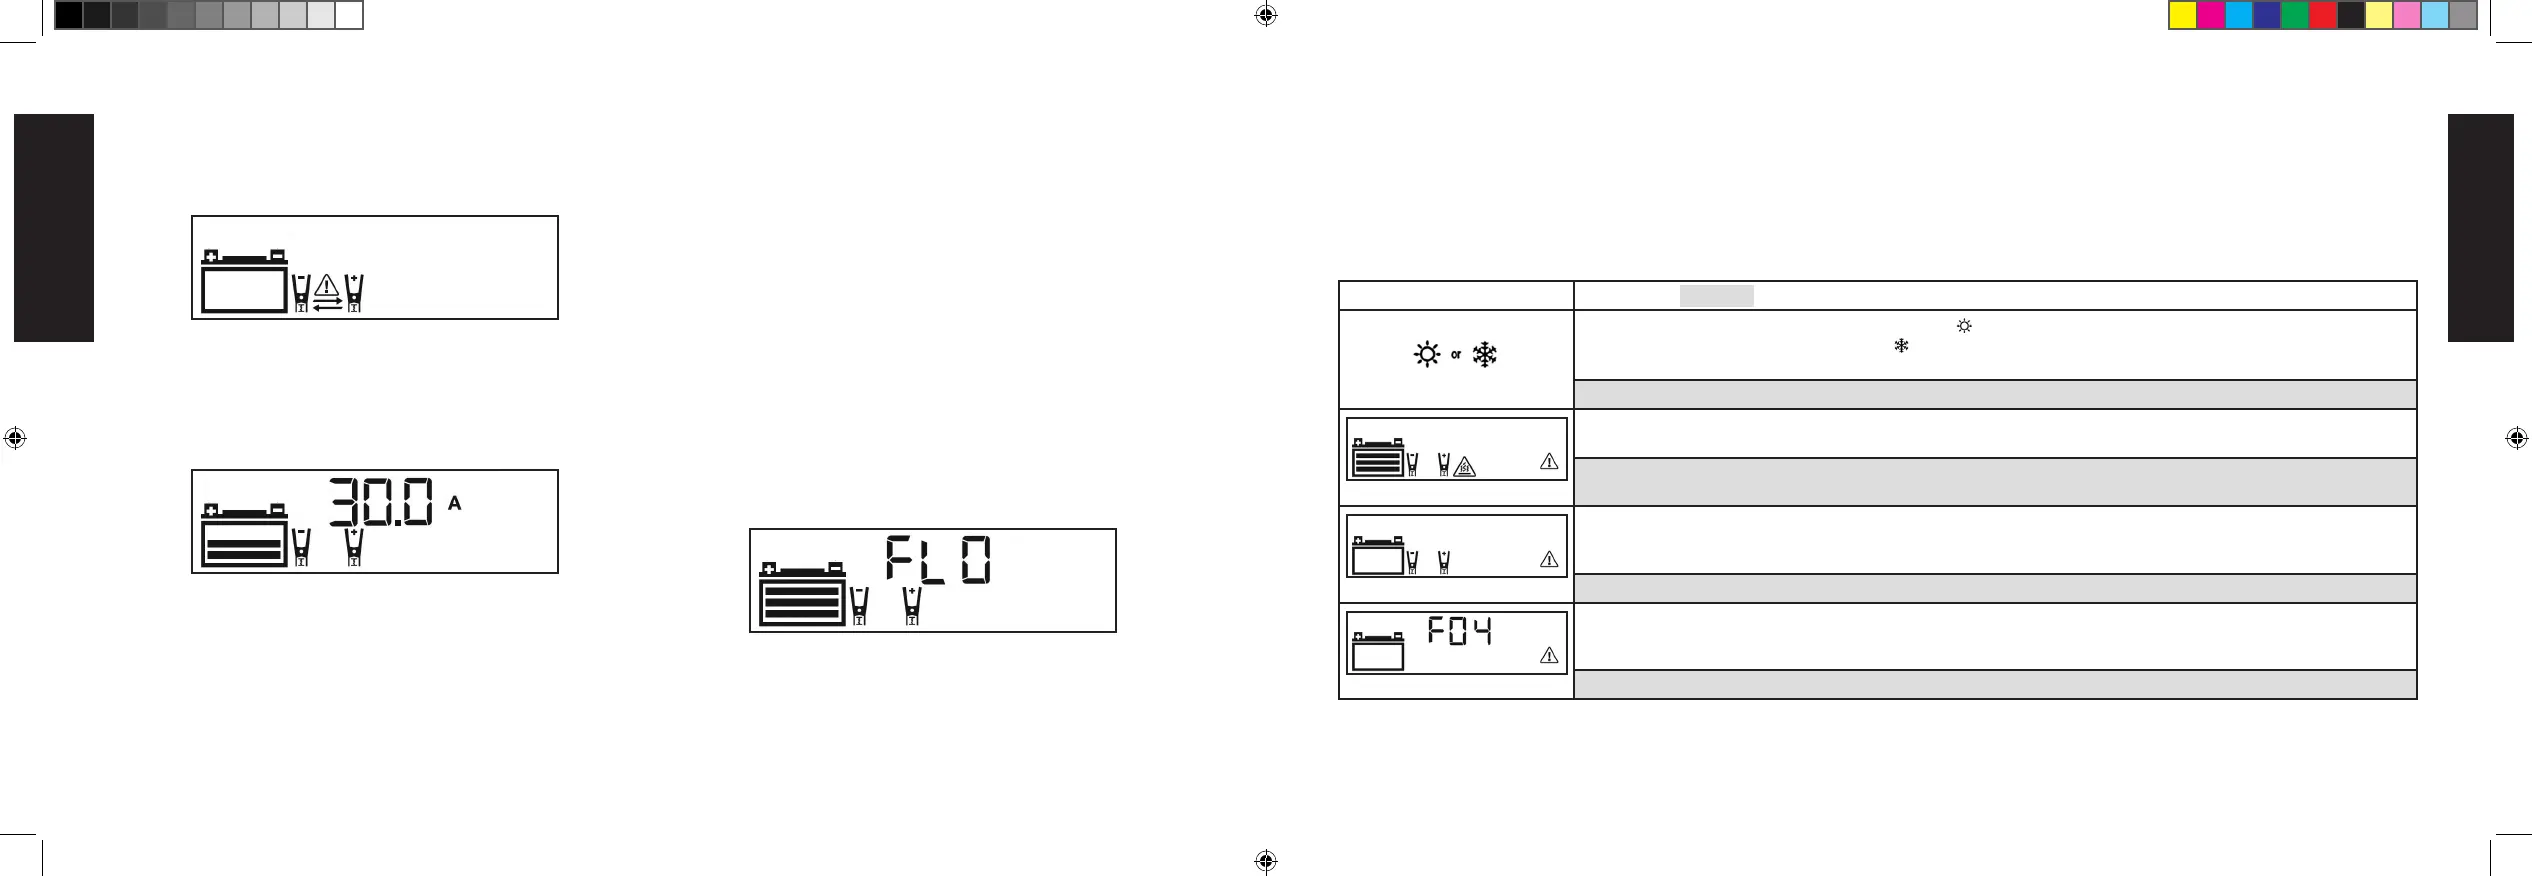
IMPORTANT: If the battery clamps are connected incorrectly
with regard to polarity, the LCD Screen shows the following:
The (empty) Battery Icon and the Clamp Icons light solid. The
Alarm Icon, Reverse Polarity Icons, and the “+” and “–” signs on
both the Clamp Icons and the Battery Icon flash. The unit emits
a continuous warning sound until the clamps are disconnected.
Remove the clamps and then reconnect the clamps properly.
4. When the clamps are connected correctly, press the Battery Charge
Button. The LCD Screen will show the following:
The Digital Display shows the output current that is charging the
battery. The Clamp Icons light solid and the bars on the Battery
Icon will change from empty to solid (bottom to top) to indicate
the unit is in Charging Mode.
NOTES:
A. If the battery is already charged to nearly full capacity, the
unit’s output current may be automatically reduced by a few
amperes, despite the maximum output current rating of 30A.
B. The charging process will start automatically approximately
one minute after the unit is properly connected to a battery if
no other actions are taken.
C. The charging process can be terminated by pressing the
Battery Charge Button again to stop the function. The unit
will revert to the Standby Mode. It will automatically restart the
charging process after approximately one minute if no other
actions are taken.
D. In Charging Mode, the Digital Display shows the output
current (A) that is charging the battery by default. Press the
Battery Voltage Button once to show the voltage (V) of the
connected battery. Press the Battery Voltage Button again to
show the charge status of the battery as a percentage (%)
of full. Pressing the Voltage Button cycles through different
charging status views of the connected battery.
5. When the battery is completely charged, the unit automatically
goes into Float Charge Mode. In this mode, the unit monitors the
battery voltage and charges as necessary to assure the battery
maintains a full charge. The unit remains in Float Charge Mode as
long as the charger is connected to the battery and plugged into
a functioning AC outlet. The LCD Screen shows the following:
The Digital Display shows “FLO” indicating that the unit is in Float
Charge Mode. The Clamp Icons and the Battery Icon (with three
bars) will light solid.
NOTE: In Float Charge Mode, the Digital Display shows “FLO” by
default. Press the Battery Voltage Button once to show the voltage
(V) of the connected battery. Press the Battery Voltage Button again
DXAEC801B_DXAEC801BCA_ManualENFRSP_080320.indd 12-13 10:30 AM
English
11/04/20