6
- Setting the Volume Level
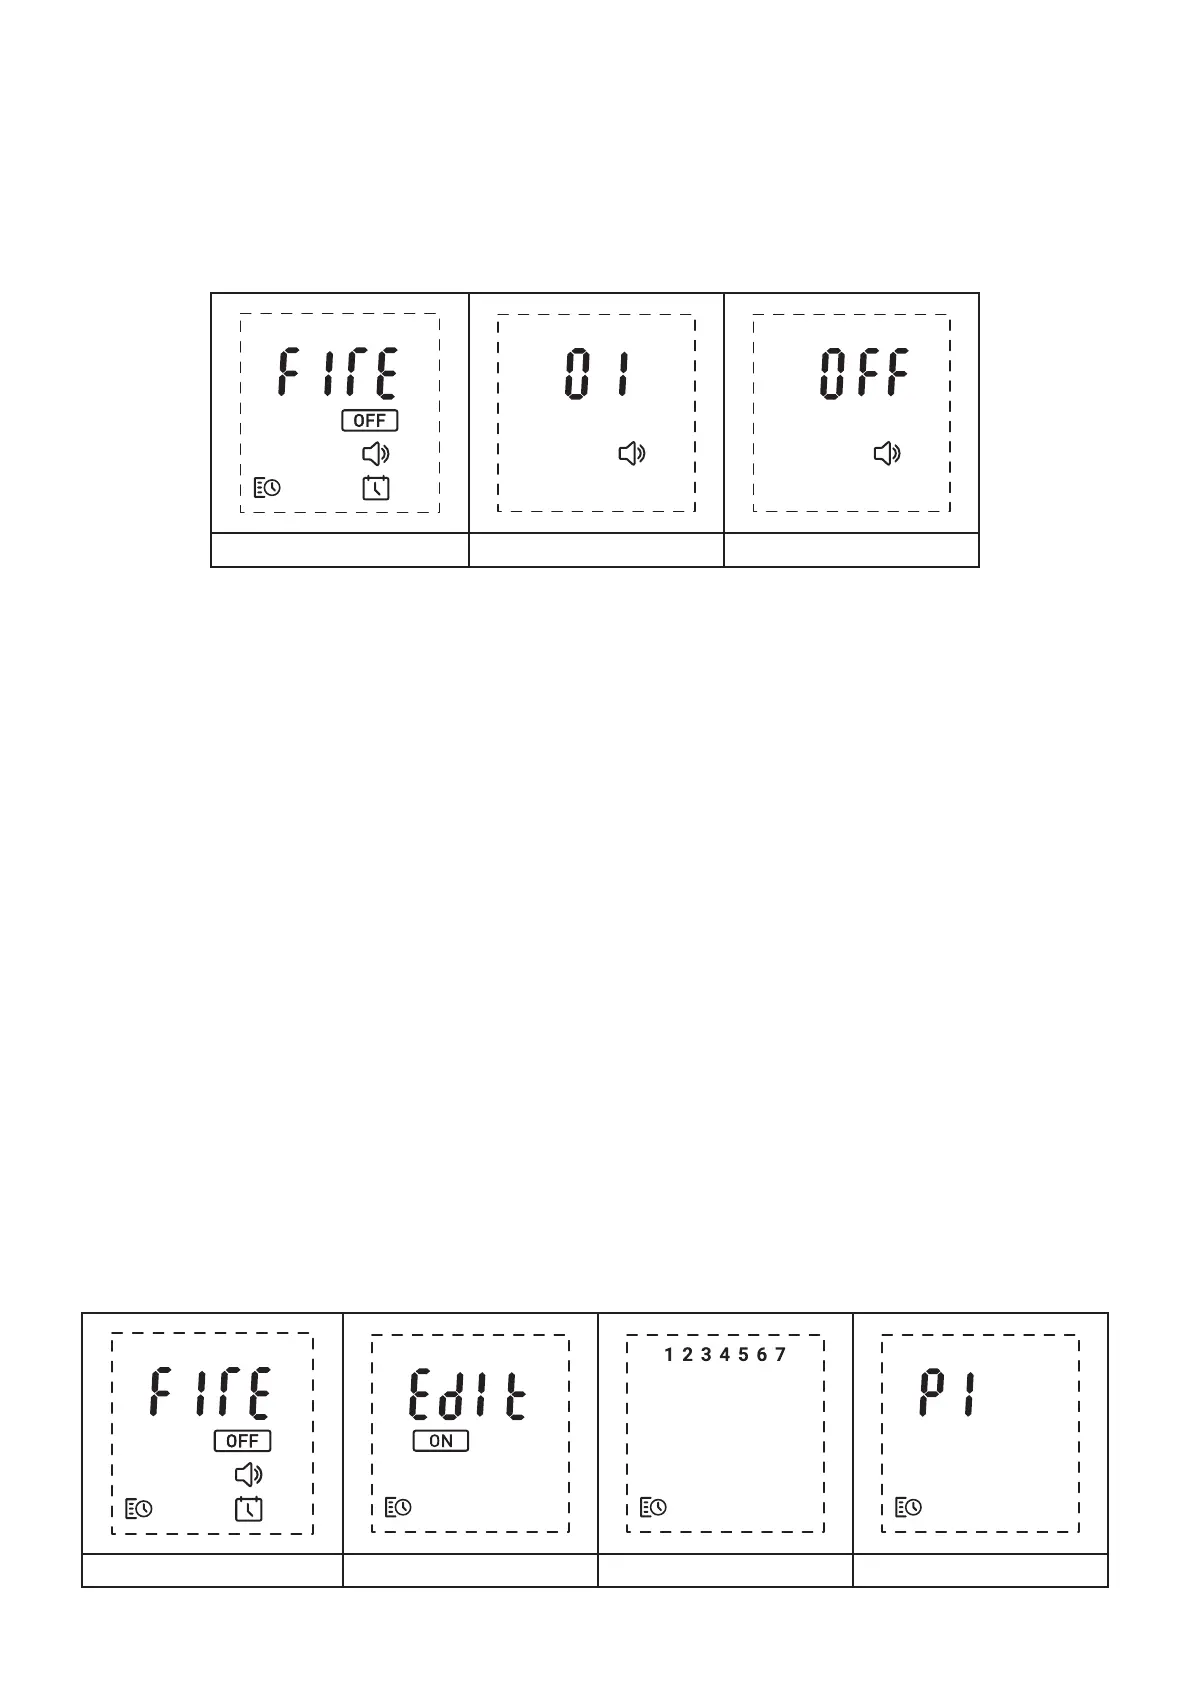
1. When on the home screen, push ‘Button 5 – Arrows’ to navigate down to the Speaker icon at the bottom of the
screen (Fig A).
2. When the Speaker icon is ashing, press ‘Button 6 - Enter’ to enter the volume level adjustment menu (Fig B).
3. The volume level can be adjusted from ’01 - 06’ using the ‘Button 5 – Arrows’.
4. The product can be muted by pushing the left hand ‘Button 5 – Arrows’ when the volume level is at setting ‘01’.
‘O’ will display on the screen to conrm that the volume has been muted (Fig C).
Note, once the volume setting has been changed, the command will automatically be sent to the product and a
conrmation beep will be heard.
Fig A Fig B Fig C
- Setting up the 7-day timer
The product can be set up to turn on/o over four dierent time periods over seven days of the week.
1. When on the home screen, push ‘Button 5 – Arrows’ to navigate to the Timer icon at the bottom left of the screen
(Fig A).
2. When the Timer icon is ashing, press ‘Button 6 - Enter’ to enter the timer menu
3. Push ‘Button 5 – Arrows’ to navigate to the ‘Edit’ icon at the top of the screen (Fig B).
4. You will be presented with the numbers 1-7 at the top of the screen which represent the days of the week (1=Monday,
7=Sunday) (Fig C).
5. Using ‘Button 5 – Arrows’ navigate to the day of the week that you want to edit.
6. When the number at the top of screen is ashing, press ‘Button 6 - Enter’ to edit this day.
7. You will be presented with the option to edit four time periods within that one day, P1-P4 (Fig D).
8. Using ‘Button 5 – Arrows’ navigate to the time period you wish to edit and press ‘Button 6 - Enter’ to select it.
9. The rst ‘0’ of the ‘On’ time for the selected time period will be ashing (Fig E). Using ‘Button 5 – Arrows’, navigate
to the correct number for the rst digit of the ‘On’ time for the selected time period. When the correct number is
ashing on the display, press ‘Button 6 - Enter’.
10. Once the rst digit of the time has been set, the second ‘0’ of the time will begin to ash. Navigate to the correct
number for the second digit of the ‘On’ time for the selected time period. When the correct number is ashing on
the display, press ‘Button 6 - Enter’.
11. (Note, if an incorrect number is selected for a particular time digit, press ‘Button 3 - Back’ to return to the previous
digit).
12. Complete the same steps for the third and four digits of the ‘On’ time for the selected time period.
13. When the four digits of the ‘On’ time for the selected time period have been set, you will be then given the option
to select the ‘O’ time for the selected time period (Fig F).
14. Repeat steps 9, 10 & 11 to set the ‘O’ time for the selected time period.
15. An audible beep will be heard when the ‘On’ and ’O’ times have been written to the product’s memory.
16. Repeat steps 7-13 to set the ‘On’ and ‘O’ times for the remaining time periods for that day. If only one ‘On/O’
time period is required for a particular day, set up the single time period using above steps and leave the remaining
time periods set to ’00:00’ as both their ‘On’ and ‘O’ times. This will ensure the product will only follow the single
time period that was set up.
Fig A Fig B Fig C Fig D