AUTOMATIC SHUT-OFF
When the tank is full of liquid, the automatic shut-off mechanism wiii shut off cleaner pick-up. When this happens, the motor sound will become
notIaeably
hlgher in pitch. Turn cleaner off and empty to continue use. The
automatic
shut-off will also engage
if
the cleaner has been tipped over.
TO co~ue
use,
turn cleaner off and set
it
upright
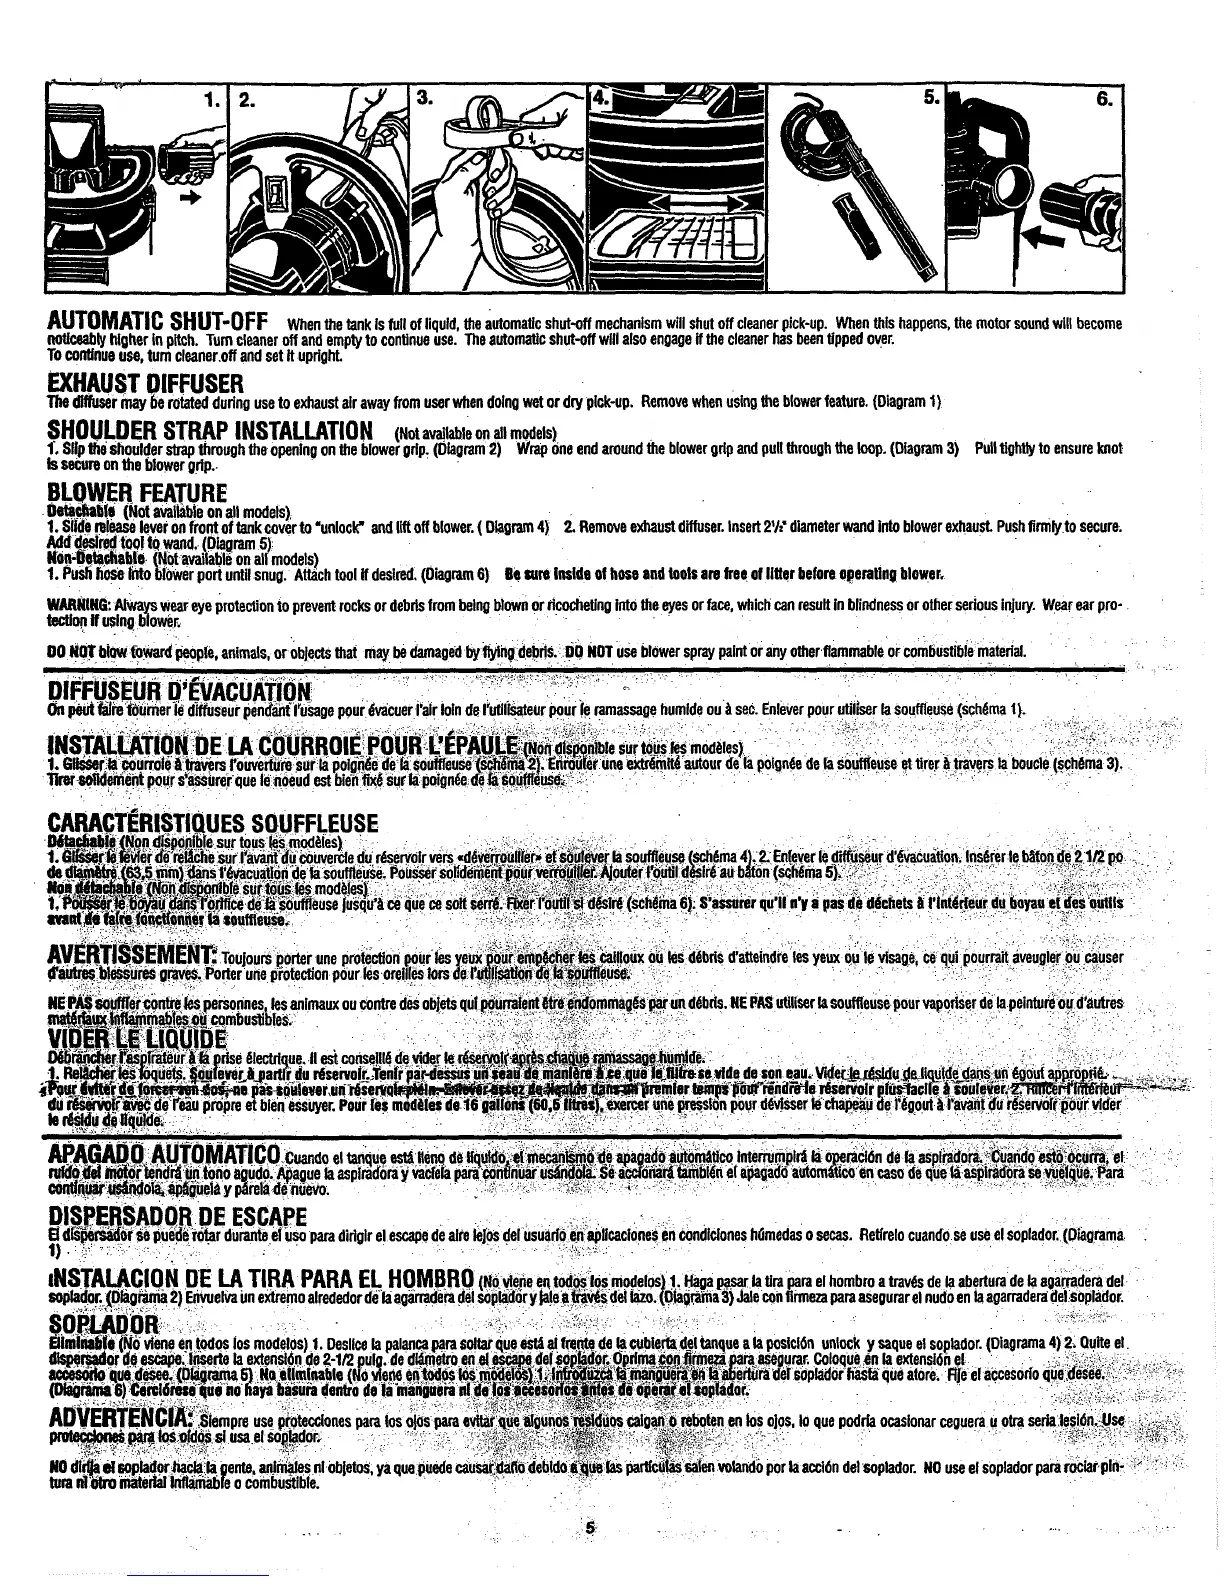
EXHAUST DIFFUSER
Tha
diffuser
may
be rotated during use to exhaust air away from user when doing wet or dry plck-up. Remove when using the blower feature. (Diagram
1)
SHOULDER STRAP INSTALLATION
(~ot available on ail models)
1..
Sllp the shoulder
strap
through the opening on the blower grip. (Diagram
2)
Wrap
one end around the blower grip and pull through the loop. (Diagram
3)
Pull tightly to ensure knot
Is
secure
on the blower grip.
BLOWER
FEATURE
DetaeAPBfa
(Not
available on all models)
1.
Slide talease lever on front of
tank
cover to 'unloclC
and
lift off blawer.
(
Diagram
4)
2
Remove exhaust diffuser. Insert
2'1:
diameter wand
into
blower exhaust. Push
firmly
to secure.
Add
desired tool
tq
wand.
(Diagm
5)
Won-6alachable Not available on all models)
1.
Push
hose
into
\
lower port until snug. Attach tool
if
desired.
(Oiagmm
6)
Be
rum Inside
of
hose
and
look
are free
of
liter before
operating
blower.
WARNING:
Afwa
wear eye protection to prevent rocks or debris from being blown or ncochetlng into the eyes or
face,
which
can
resuit in blindness or other serious injury. Wear
ear
pro-
won
u
using
Br.
00
NiItbtOW
foward people. animals, or objects
that
may be damaged
by
flying debris.
DO
NOT
use blower spray paint or any other flammable or combustible material.
,.-
7,--.
.
,...
DIAUSEUR
D@ACUA~ION
peut
a18
Durner
#
dmseur oendani Irusaoe wur Bvacuer I'air loin de I'utllisateur Dour le massage humide ou
a
seo. Enlever pour utiliser
la
souffleuse (schema
It
-.
INSTAL~ATION
DE
LA
COURROIE POUR
L'~!PAULE-~O~
dkponlble sur tous
le~
modhles]
1.
GWC
courroie
&
travers Pouverture sur
la
poigde de
fa
soufpeuse
(&h%a
2).
E'nrouier une
exbhite
&our de
la
poignC de
la
souffleuse
et
tirer
h
travers
h
boucle (schema
3).
Tkar
solidement pour s'assurer que le noeud
est
b~en
fix6
sur
la
polgnC de
h
soufffeuse,
CARACT~RISTIQUES SOUFFLEUSE
KWacbable Non dispopible sur tous les modkles)
1.
~bhrfi3
kier
d6
re& ar I'avant du couwde du rhrvot vers dbvemitlr d
M)&W
la
souffleuse sch6ma
1
.2
Ldever le diiseur d'6vacuation. Inserer le Mton de
2
lR
p
Pousser so~mhd~r veWl[iet ~jouter foutil d$ir& au bikon (schha
5).
,
\-.
x,
-.
,,,,Y
.,A
,r
r
^'
ce
que
ce
soft
sen$.
&r I'outil? d&in5 (xhdma
61.
S'assurer
qu'il
o'y
a
pas
Be
dkhets
h
11int6rieur du
boyau
tf
des outils
AVERvSSEMEm
Toujours porter une protection pour
b
yew
"r
ernp4ch;r
*r
caiiloux ou
ks
dMU d'altelndre
la
yew ou
k?
visage, ce qui pourrail aveugier iu causer
Mnr
biessures
graves.
Potter
UM
protection pour
b
oreillas
hs
de
l'$&ation
de
h
~uffteuss.
DISPERSADOR
DE
ESCAPE
a
di?&&dbt
se
puede mtar durante
el
uso
para
dirigir el escape de
aim
lejos dei usuarlo en aplicaciones
en
condidones hlrmedas o
secas.
Retirelo cuando
se
use el soplador. (Diagrama
1)
.
'C: