EasyManua.ls Logo

Disaster Area Design SMARTClock - User Manual

Disaster Area Design SMARTClock
6 pages
Print Icon
To Next Page IconTo Next Page
Loading...
!
Disaster!Area!Designs!
SMARTClock!
Quick!Start!Guide!
Rev!1.04!
May!2015!
Firmware!v1.11b!
!
!"#$ %&'(!)*+,-$ ./$ 0123$ +4$ 3"#$ 5./1/3#2$ '2#1$ %&'(!6#71*$ /#2.#/$ 8$ 0#71*9+127$ 7#:.,#/$
7#/.;<#7$3+$ ,+<<#,3$ 1**$ +4$ =+>2$ ;#12$ .<3+$1$ /.<;*#$ ,+"#/.:#$ ><.3?$$ !"#$ %&'(!)*+,-$ ./$ 1$ & @5@$
,1019*#$0#71*9+127$3#A0+$/+>2,#B$,1019*#$+4$/=<,"2+<.C.<;$&@5@$1<7$<+<D&@5@$;#12?$
$
$
$
$
$
$
$
$
$
!
!!
$
$
$
$
$
$
$
$
Connecting)the)SMARTClock)
!
MIDI!Input:!!Connect!the!output!of!your!MIDI!controller!or!computer!to!this!input.!!
!
MIDI!Output:!!Connect!this!output!to!the!input!of!your!first!MIDI!device.!
!
Multi!Jack:!!Multipurpose!jack,!functions!as!tap!input,!tempo!output,!or!MIDI!output.!
!
DC9V:! ! Power! supply! connection.! ! The! SM ARTClock! requires! an! isolated! power! supply! capable! of!
providing!at!least!64mA!of!current,!at!9VDC!center!negative.!!Do!not!connect!the! SMA RTClock!
to!power!supplies!rated !at!m ore!tha n!9V DC .!
!
USB:!!USB!MIDI!connection!to!computer!or!iPad!with!App le!C am e ra!C onn ection !K it.!!T he! SM A RT Clock !
can!send!and!receive!MIDI!through!the!USB!port.!
!
Tempo! Outputs! A! and! B:! ! Connections! to! tap! tempo! devices.! ! Each! output! is! isolated,! and! is!
compatible!with!both!normally!open!and!norma lly!closed!(Boss)!sw itch!type s.!
!
Encoder:! ! Rota ry ! control! knob! for! sele ct in g! menu ! options,! subdivis ion s ,! tempo,! or! pre s e ts .! ! The!
encoder!also!functions!as!the! Enter!button!wh en! pressed.!! 5E$ FE!$ 6(G%%$ !HG$ GF)E5G($
IJ!!EF$IK$LEE!?$
!
Footswitch:! ! SoftYtou ch! mo m en tary! foots w itc h! for! tap p in g! tem p o ,! selectin g ! pre set s,! startin g ! or!
stopping!the!clock.!
SMARTClock+
QUICK+START+
Encoder!/!
Enter!Button!
!
LED!Display!
!
Footswitch!
!
MIDI!Input!
!
Tempo!Outputs!!!!!!!DC9V!!!!MIDI!Output!!!USB!
!!!!!!!!!!!!!!!A!!!!!!!!!B!
Multi!Jack!
!

Other manuals for Disaster Area Design SMARTClock

Question and Answer IconNeed help?

Do you have a question about the Disaster Area Design SMARTClock and is the answer not in the manual?

Summary

Connecting the SMARTClock

Physical Interface Components

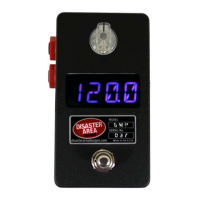
Details the ports and controls of the SMARTClock for connectivity and operation, including MIDI, USB, and tempo outputs.

Configuring the SMARTClock

Setup Menu Parameters

Explains various configuration options including MIDI channel, modes, output settings, and factory reset.

Using the SMARTClock

Tap Tempo Mode

How to use the footswitch and encoder to set tempo and subdivisions for tempo outputs.

Preset Mode

How to navigate and select presets using the footswitch and encoder for tempo recall.

Tempo Outputs and Subdivisions

Using Tempo Outputs as Selector Switches

Details how tempo outputs can function as selector switches to toggle device presets or sounds.

Using the Multi Jack

Multi Jack Functions

Explains the various functions of the Multi Jack, including tempo output, tap input, and MIDI output.

MIDI Clock

Synchronization and MIDI Clock Signals

How the SMARTClock sends and receives MIDI clock and sync signals for device synchronization.

MIDI Programs and BPM Presets

Editing and Saving Presets

Guide to editing and saving BPM presets via MIDI program changes and footswitch operations.

MIDI Channels

Information on default and customizable MIDI channels for communication and special device integration.

Disaster Area Design SMARTClock Specifications

General IconGeneral
BrandDisaster Area Design
ModelSMARTClock
CategoryMusic Pedal
LanguageEnglish