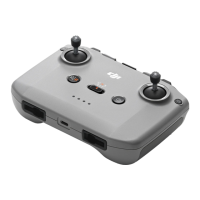
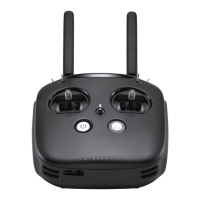
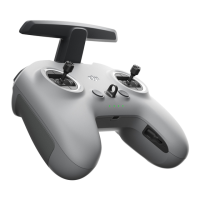
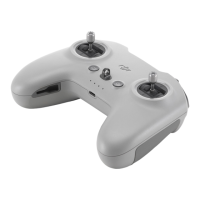
The DJI RC Motion 2 is a motion controller designed to provide an intuitive and immersive flight experience for DJI drones, particularly when used with DJI Goggles Integra or DJI Goggles 2. This user manual outlines its functions, usage, and maintenance procedures to ensure safe and effective operation.
Function Description
The DJI RC Motion 2 serves as a primary control interface for compatible DJI aircraft, allowing users to navigate and capture footage with natural hand movements. Its core functions include:
- Aircraft Control: The controller enables users to ascend, descend, move horizontally, and rotate the aircraft using a combination of a joystick, accelerator, and motion-sensing capabilities.
- Camera Control: Users can adjust camera tilt, switch between photo and video modes, and initiate/stop recording directly from the controller.
- Flight Modes: It supports switching between Normal and Sport modes, offering different levels of responsiveness and speed.
- Safety Features: Integrated safety functions include takeoff, landing, braking, and the ability to cancel Return-to-Home (RTH) or auto-landing procedures. In emergency situations, it also provides a method to stop aircraft motors mid-flight.
- Battery Level Indication: LEDs on the controller provide clear visual feedback on the current battery level during both operation and charging.
- Linking and Activation: The controller facilitates linking with the aircraft and goggles, and its activation is managed through the DJI Fly app.
Usage Features
The DJI RC Motion 2 is designed for ease of use, offering several features that enhance the flight experience:
- Powering On/Off: To check the current battery level, a single press of the power button is sufficient. To power the motion controller on or off, a press followed by a press and hold of the power button is required. The battery level LEDs provide a detailed indication of the remaining power, with different patterns for various charge percentages.
- Linking Process: Before flight, the aircraft, goggles, and motion controller must be powered on and linked. The process involves holding the power button on the aircraft until its battery level LEDs blink, then doing the same for the motion controller until it beeps continually and its LEDs blink. Successful linking is indicated when the beeping stops and all battery level LEDs turn solid. It's crucial to ensure that only one remote control device is linked to the aircraft during flight to prevent loss of control.
- Activation: Once all devices are powered on and linked, connecting the USB-C port of the goggles to a mobile device running the DJI Fly app will automatically identify and activate the DJI RC Motion 2 in silent mode. Prompt activation after purchase is recommended to ensure eligibility for after-sales service.
- Controlling the Camera: The FN Dial is a versatile tool for camera control. Pressing the dial opens the camera settings panel in the FPV view, allowing users to scroll through menus and adjust parameter values. A press confirms selections, and a press and hold exits the menu. Before takeoff, or during RTH and landing, the FN dial can be pressed and held from the FPV view, then scrolled up or down to tilt the camera, releasing the dial stops the tilt. The Shutter/Record Button allows for single presses to take photos or start/stop recording, while a press and hold switches between photo and video modes.
- Controlling the Aircraft:
- Lock Button: This button is central to flight control. A double press starts the aircraft motors, followed by a press and hold for takeoff, ascending to approximately 1.2 meters and hovering. While hovering, a press and hold lands the aircraft and stops the motors. During flight, a single press acts as a brake, causing the aircraft to hover in place with its attitude locked; pressing again unlocks the attitude and resumes flight control. It also cancels RTH or auto-landing procedures. For emergency situations, pressing the lock button four times can immediately stop the aircraft motors, though this should be used with extreme caution as it will cause the aircraft to crash.
- Joystick: The joystick controls vertical and horizontal movement. Toggling it up or down makes the aircraft ascend or descend, while toggling left or right moves the aircraft horizontally. For takeoff after motors are started, a slow push up on the joystick is recommended. For landing, pulling the joystick down and holding it until motors stop is the procedure.
- Accelerator: Pressing the accelerator moves the aircraft in the direction of the circle in the goggles. Pushing forward flies the aircraft backward. Applying more pressure increases acceleration, and releasing it stops the aircraft and initiates a hover. The flying speed controlled by both the joystick and accelerator can be customized through the goggles menu under Settings > Control > Motion Controller > Gain Tuning, allowing users to set maximum speeds in each direction.
- Motion Control: The controller's motion-sensing capabilities allow for intuitive aircraft orientation and gimbal tilt. Tilting the controller left or right rotates the aircraft counterclockwise or clockwise, respectively, with the circle in the goggles screen reflecting this movement. The greater the tilt angle, the faster the rotation. Tilting the controller up and down controls the gimbal tilt, with corresponding movement in the goggles' video transmission. To control ascent or descent using motion, the controller must first be tilted 90° up or down, and once the circle in the goggles indicates ascend or descend, the accelerator is pressed.
- Mode Button: This button allows users to switch between Normal and Sport flight modes. Normal mode is the default. Pressing the button switches modes, while pressing and holding initiates RTH. Pressing it again cancels RTH.
Maintenance Features
Proper maintenance ensures the longevity and reliable performance of the DJI RC Motion 2:
- Charging: When the battery level is low, it is recommended to charge the device using a charger that supports a 5V, 2A output. It is crucial to ensure the charger's default output voltage is 5V, as excessive voltage can damage the device. The battery level LEDs provide charging status, indicating different charge percentages.
- Firmware Updates: Keeping the firmware updated is essential for optimal performance and access to new features. Updates can be performed using either the DJI Fly app or DJI Assistant 2 (Consumer Drones Series).
- Using DJI Fly App: Power on all devices (aircraft, goggles, motion controller), ensure they are linked, connect the goggles' USB-C port to a mobile device, launch the DJI Fly app, and follow the update prompts. The mobile device must have an internet connection.
- Using DJI Assistant 2: Power on the device, connect its USB-C port to a computer, launch DJI Assistant 2 and log in, select the device, click "Firmware Update," choose the desired firmware version, and allow the update to proceed automatically. The device will restart upon completion.
- Update Precautions: During updates, ensure the computer has an internet connection, the device has sufficient power, and all steps are followed to prevent update failure. The process can take several minutes, and the USB-C cable should not be unplugged. Parameters may be reset after an update, so it's advisable to note preferred settings beforehand.
- Motion Controller Calibration: The compass, IMU, accelerator, and joystick of the motion controller can be calibrated. Calibration should be performed immediately when prompted. This is done by accessing the goggles menu (Settings > Control > Motion Controller > RC Calibration), selecting the module, and following the on-screen prompts.
- Calibration Precautions: Calibration should NOT be performed in areas with strong magnetic interference (e.g., near magnets, parking lots, or construction sites with reinforced concrete structures). Additionally, ferromagnetic materials like mobile phones should not be carried during calibration to avoid interference.
- Alerts: The remote controller provides alerts for low battery levels (6%-15%), which can be canceled by pressing the power button. A critical battery level alert (less than 5%) cannot be canceled. The controller also sounds an alert during RTH, which cannot be canceled.
- Aftersales Support: For aftersales service policies, repair services, and general support, users are directed to the DJI support website.