8
EU-CSD0923001–0923002
en
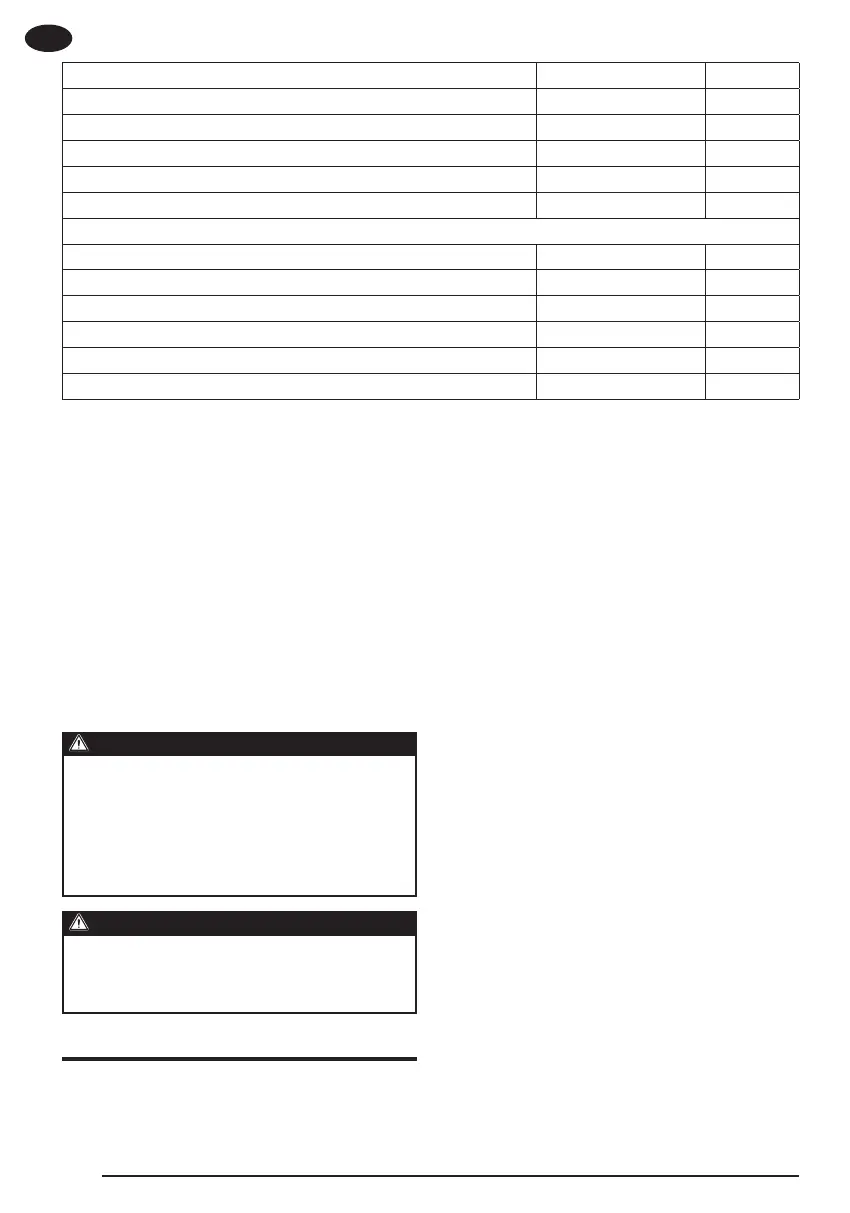
Parameters Unit of Measure CSD-36X
HEX chuck type inch 1/4
Degree of protection against dust and water IP 20
Class of protection against electric shock III
The weight of the power tool kg 0,15
Flashlight function
+
Noise and vibration level values according to EN 62841–2–2
LPA is the sound pressure level dB (A) 52
KPA is the uncertainty of the sound pressure level dB (A) 3
LWA is the sound power level dB (A) 63
KWA is the uncertainty of the sound power level dB (A) 3
ah is the arithmetic mean of the vibration total value m/s
2
0,4
K is the uncertainty of ah m/s
2
1.5
Information about noise and
vibration
The declared total noise and vibration
value has been measured according to
one power tool with another.
The declared general level of noise and
vibration can be used in preliminary as-
sessments of exposure to noise and vibra-
tion.
refers to operations for which the power
tool is intended.
WARNING!
Transmission of vibration and noise
emissions during use of the power
tool may differ from the declared
values, depending on how the pow-
er tool is used, especially what type
of material is processed.
WARNING!
If necessary, use personal protec-
tive equipment according to the
working conditions.
8. PREPARATION FOR WORK
Unpack the power tool and check the
package for external damage.
If you have stored or transported the
power tool at a temperature lower than
that at which it is planned to be used, you
must make sure that there is no conden-
sation on the power tool. If condensation
forms on the components and parts of
the power tool, its further preparation for
work or operation is prohibited until the
condensate dries completely.
The procedure for installing a bit/
bit extender (Fig. 2)
Pull the sleeve (2) of the chuck.
Install the bit in the chuck as far as it will
go (1).
Bits longer than 30 mm can be installed
in the chuck.
It is possible to use a power tool with a
bit length of less than 30 mm only with a
bit extension: install the bit in the bit ex-
tension and the shank of the extension in
the chuck.
*The bit extension is not included in the
scope of supply.
Battery charging procedure
Connect the USB Type-C cord to the char-
ger connector (Fig. 3).
Connect the other end of the power cord
to the power supply unit (the power sup-
ply unit is not included in the scope of
supply).
Wait until the accumulator is fully
charged, then disconnect the USB cable
from the power tool connector.
Charge indicator
The charge indicator (3) (Fig. 1) lights up
 Loading...