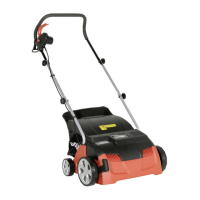
12
Removing or installing cutting tool
CAUTION:
•Wearprotectivegloves.
•Pay particular attention when
handling cutting tool. It is very
sharp and may become hot
duringoperation.
•Always use appropriate cutting
tool in accordance with your
operation.
•Before operation, make sure
twobolts,whichholdthecutting
tool onto the machine, are
rmlytightened.Donotusethe
machineifitislooseormissing.
If it is damaged, replace it
immediately.
Removing cutting tool
1)Removethegrasscatcher(11).
2)Removethehandlefromthemachine.
3)Placethemachineupsidedownonaatsurface.
4)Loosenthetwo bolts (16).Removethemandspring
washers.
5)Liftthebearingpartofthecuttingtool(17),andthen
pullthecuttingtool(15)outfromthedriveshaft(18).
Installing the cutting tool
1)Insertthecuttingtoolbyslidingitshexnutpartintothe
socketofdrivingshaft.
2)Fasten the bearing part tothe machineby thebolts
andspringwashers.
FUNCTIONAL DESCRIPTION
WARNING:
•Before plugging the machine,
always make sure that the
machineisswitchedoff.Plugging
themachinewiththeswitchon
maycauseanunexpectedstart
resulting in serious personal
injury.
•Neverusethemachineifpower
cableisdamaged.Otherwiseit
maycauseelectricshock.
•Do not use the machine if the
switch does not turn it on and
off. Have defective switches
replaced by Dolmar authorized
servicecenter.
Start/stop lever
Tostartthemachine,pressandholdthelock-offbutton
(13),andthenfullypullthestart/stoplever(14)andhold
it.Oncepulling the start/stop lever,youdonotneedto
holdthelock-offbutton.
Tostopthemachine,simplyreleasethestart/stoplever.
While the machine is working, the lock-off button (13)
doesnotworkevenifyoupressit(13)carelessly.
Height adjustment
Dependingontheconditionofthegrass,adjusttheheight
ofthecuttingtool.
Refer to the table below as rough indication for depth
settings.
Height
Usage
Scarifying
Raking
(Optionalaccessory)
+10mm
Fortransportationand
storage.
Fortransportationand
storage.
Rakingsensitivelawn.
Dethatchingthinlayers.
+5mm
Scarifyingsensitivelawn.
Dethatchingthinlayers.
Thesecondscarifying
operationinautumn.
Rakingnormallawn.
0mm
Scarifyingnormallawn.
Dethatchingnormal
layer.
Rakingroughthicklawn.
-5mm
Scarifyingnormallawn.
Dethatchingthicklayer.
DoNOTuseforraking
operation.
-10mm
Scarifyingroughthick
lawn.
Dethatchingthicklayer.
DoNOTuseforraking
operation.
Changing the height
Push in the height adjustment lever (9) towards wheel
axisside,andmoveitupwardsordownwards.
Overload protection
Thismachineisequippedwithoverloadprotection,andit
functionsunderthefollowingsituations:
• The cutting tool becomes clogged because scaried
materialsarebuiltuparoundit.
• Themachine is tryingtoscarify morethanthe motor
canhandle.
• Somethinghinderstherotationofthecuttingtool.
Whenthisprotectionworks,themachineisswitchedoff
automatically.