21
INSTALLATION
G. Converting The Furnace Gas Type
This section applies to DFLA35 and DFLA40 models only. These models are set up for LP gas at the factory, but can be
converted to natural gas. A natural gas conversion kit is included.
Any conversion to natural gas must conform with local codes, or in the absence of local codes, with the National Fuel
Gas Code, ANSI Z223.1/NFPA 54 Natural Gas and Propane Installation Code, in addition to the Standard for Recreational Vehicles
NFPA1192 and CSA Z240 RV Recreational Vehicle Code.
Changing The Adjustment Regulator Caps
Read the following BEFORE proceeding:
• The convertible valve is set for a pressure setting of
3.5" for natural gas (NAT) and 10.5" for LP gas. These
settings are not adjustable.
• Do NOT modify the adjustment regulator caps or use
them with any other valve.
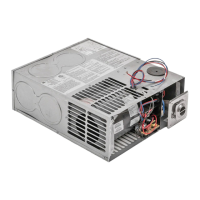
FIG.1
LP Cap
Valve
Regulator
Tow e r
Nat Cap
• Unscrew the adjustment regulator cap and remove from
the valve regulator tower. Do NOT remove the rod from
inside the regulator tower or perform any adjustments.
• Place the NAT or LP cap appropriate for the conversion
onto the valve regulator tower.
• Tighten the adjustment regulator cap by hand or use
a small wrench. Do NOT overtighten the adjustment
regulator cap.
• Install the main burner orifice. Refer to the “Conversion
Specifications Table” for information specific to LP or NAT
conversion.
Conversion Specifications Table
GAS
TYPE
BTU/HR
LINE
PRESSURE
REGULATOR
CAP SETTING
DRILL
SIZE
Propane
(LP)
40,000
11" WC
10.5" WC
49P
Natural
(NAT)
40,000
7" WC
3.5" WC
#30
Propane
(LP)
35,000
11" WC
10.5" WC
#51
Natural
(NAT)
35,000
7" WC
3.5" WC
#30
WC = Water Column
Replacing The Orifice
Read the following BEFORE proceeding:
• Each Furnace is supplied with two main burner orifices.
One is installed on the manifold and the other is
attached to the blower housing cover.
• The type of gas in use must match the adjustment
regulator cap and orifice installed in the Furnace.
FIG.2
Orifice
Burner
Assembly
Gas Connection
• Disconnect the gas line from the valve.
• Remove the three screws holding the burner assembly to
the back wall of the control box.
• Remove the two screws holding the burner to the manifold.
• Unscrew the orifice using a 7/16" wrench or socket.
• Use the “Conversion Specifications Table” to select the
correct orifice needed for the gas type.
• Install the new orifice.
• Reverse steps 1–3 to reinstall the burner, burner assembly,
and the gas line.
• Test gas connections for leakage with a commercially
available soap solution made specifically for the detection
of leaks.
• Place the "converted" sticker (provided) in a visible
location, next to the model number label.