Do you have a question about the Donco kids 760 LOW LOFT BED and is the answer not in the manual?
Key warnings include not tightening screws fully until assembly is complete and avoiding power tools.
Lists necessary tools and advises assembling on a clean, soft surface to prevent damage.
Visual guide to identify all numbered parts (1-16) used in the assembly of the bed frame.
Illustrations and quantities for all hardware types (A-I) required for assembly.
Assembly of the main bed frame components, including attaching side rails and connecting elements.
Constructing the vertical side structures of the bed frame using identified parts and hardware.
Connecting the main side rails and support beams using specified hardware for structural integrity.
Adding horizontal cross supports to reinforce the bed frame structure, ensuring stability.
Further reinforcing the bed frame by attaching additional structural components and hardware.
Attaching final support elements to complete the main bed frame structure.
Installing the bed slats onto the frame, ensuring proper spacing and secure attachment.
Critical warning regarding the maximum allowable mattress height to ensure safety.
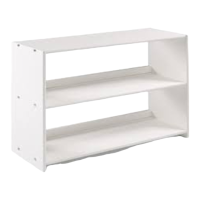
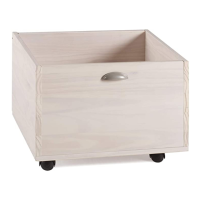
Instructions for attaching the optional 3-drawer chest to the loft bed structure.
Guidance on integrating the optional desk and bookcase units with the loft bed.
This document provides assembly instructions and a parts list for the Donco Kids 760 Low Loft Bed, manufactured in Fort Worth, Texas 76140. The manual is designed to guide users through the process of setting up the bed, ensuring a safe and correct assembly. It emphasizes the importance of careful preparation and adherence to instructions to prevent damage and ensure the longevity of the product.
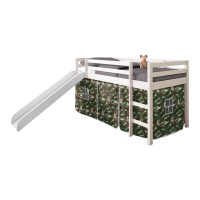
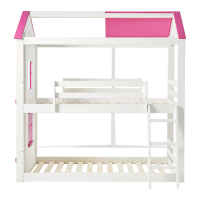
The Donco Kids 760 Low Loft Bed is a multi-functional furniture piece designed for children's bedrooms. Its primary function is to provide an elevated sleeping surface, which frees up floor space underneath for various activities or additional storage. The "low loft" design makes it more accessible than traditional high loft beds, reducing the height for easier climbing and a less imposing presence in a room. This design is particularly beneficial for younger children or rooms with lower ceilings.
Beyond just a bed, the 760 Low Loft Bed offers optional components that significantly enhance its utility. These options include a 3-drawer chest, a desk, and a bookcase. When integrated, these components transform the space beneath the bed into a highly functional area. The 3-drawer chest provides essential storage for clothes, toys, or other personal items, helping to keep the room tidy and organized. The desk option creates a dedicated workspace for homework, drawing, or other creative activities, making it ideal for students. The bookcase offers open shelving for books, decorative items, or additional storage, contributing to a well-organized and personalized space. The modular nature of these components allows users to customize the bed to suit their specific needs and the available room layout, making it a versatile solution for maximizing space in smaller bedrooms.
The bed frame itself is constructed to be sturdy and safe, featuring side rails and a slatted base for mattress support. The assembly instructions highlight key structural elements like front side rails with holes, ensuring proper alignment and secure connections. The design prioritizes stability, which is crucial for children's furniture. The inclusion of a ladder (implied by the loft design) provides access to the elevated sleeping platform. The overall aesthetic is practical and adaptable, designed to blend with various room decors while offering significant functional benefits.
The Donco Kids 760 Low Loft Bed is designed for practical and safe use, with several features that enhance its functionality and user experience. One of the most significant usage features is its space-saving design. By elevating the sleeping area, the bed creates valuable floor space underneath, which can be utilized for various purposes. This is particularly advantageous in smaller bedrooms where maximizing every square foot is essential.
The optional components—a 3-drawer chest, a desk, and a bookcase—are key usage features that allow for customization and increased utility. Users can choose to integrate one or more of these components beneath the loft, transforming the space into a personalized study area, storage hub, or play zone. The 3-drawer chest provides enclosed storage, keeping clutter out of sight and maintaining a neat appearance. The desk offers a dedicated surface for schoolwork, crafts, or computer use, promoting good study habits and organization. The bookcase provides open shelving for easy access to books, display items, or additional storage bins. These modular options allow the bed to adapt to a child's evolving needs, from early childhood through their school years.
The assembly process itself is designed with user-friendliness in mind, though it requires careful attention to detail. The manual provides clear illustrations and step-by-step instructions, breaking down the assembly into manageable stages. Parts are clearly labeled, and hardware is identified with corresponding illustrations, simplifying the process of matching components. The instruction to "DO NOT TIGHTEN SCREWS UNTIL COMPLETELY ASSEMBLED" is a crucial usage feature, as it allows for minor adjustments during assembly, ensuring all parts align correctly before final tightening, which prevents warping or misalignment.
Safety is a paramount usage feature. The warning regarding the mattress surface not exceeding a specific height ("MATTRESS 8" HIGH LIMITED") is critical for preventing falls and ensuring the effectiveness of the guardrails. The instructions also advise assembling the product on a clean, soft surface to prevent damage to the furniture pieces during construction. The explicit warning against using power tools for assembly is another safety-oriented usage feature, as power tools can easily over-tighten screws, strip threads, or damage the wood, compromising the structural integrity and safety of the bed. Manual assembly ensures a controlled and secure build.
The low loft design itself is a usage feature that enhances accessibility and safety for younger children compared to higher loft beds. It reduces the climbing height, making it easier and safer for children to get in and out of bed. The bed's overall sturdy construction, once properly assembled, ensures a stable sleeping and activity platform. The inclusion of hex screwdrivers as a required tool (though not included) indicates that the assembly relies on common household tools, making it accessible for most users.
The Donco Kids 760 Low Loft Bed is designed with straightforward maintenance in mind, primarily focusing on proper assembly and care to ensure its longevity and safety. The most critical maintenance feature begins even before the bed is used: correct assembly. The manual emphasizes checking all packing material carefully for small parts and hardware, separating, identifying, and counting them against the parts list. This meticulous initial check prevents missing components that could compromise the bed's structural integrity or lead to an incomplete assembly, which would require further maintenance or replacement parts.
The instruction to "DO NOT TIGHTEN SCREWS UNTIL COMPLETELY ASSEMBLED" is not only an assembly tip but also a maintenance feature. By allowing for adjustments during the initial build, it helps prevent stress on the joints and wood, which could lead to cracks or loosening over time. Once fully assembled and tightened, the bed's structure is more stable and less prone to requiring frequent re-tightening of fasteners.
Regular inspection of the bed's hardware is an essential ongoing maintenance feature. Over time, due to daily use and movement, screws and other fasteners can loosen. Periodically checking and re-tightening all screws, especially those connecting the main frame, side rails, and ladder, will help maintain the bed's stability and safety. This preventative measure can significantly extend the life of the furniture and prevent potential accidents caused by loose components.
The warning against using power tools for assembly is a crucial maintenance consideration. Power tools can easily over-tighten screws, stripping the wood or the screw threads. This damage can weaken the joints, making them prone to loosening or breaking, which would necessitate repairs or replacement of parts. Manual assembly, as recommended, ensures that fasteners are tightened appropriately, preserving the integrity of the wood and hardware.
The recommendation to assemble the product on a clean, soft surface is also a preventative maintenance measure. This protects the furniture pieces from scratches, dents, or other cosmetic damage during the assembly process. Such damage, if not addressed, could worsen over time or detract from the bed's appearance.
For general cleaning, the bed's wooden construction typically requires only simple care. Wiping down surfaces with a soft, damp cloth can remove dust and minor spills. Avoiding harsh chemical cleaners is advisable, as they can damage the finish of the wood. Promptly cleaning up spills prevents stains and moisture damage, which could compromise the wood's integrity.
The "MATTRESS 8" HIGH LIMITED" warning is a safety-related maintenance feature. Adhering to the recommended mattress height ensures that the guardrails remain effective in preventing falls. Using a mattress that is too thick would reduce the effective height of the guardrails, increasing the risk of a child rolling out of bed. This is a critical ongoing safety check for users.
In summary, the maintenance of the Donco Kids 760 Low Loft Bed primarily involves careful initial assembly, regular checks and re-tightening of hardware, gentle cleaning, and adherence to safety guidelines, particularly regarding mattress height. These simple practices ensure the bed remains safe, stable, and aesthetically pleasing for years of use.
| Product Name | Donco Kids 760 Low Loft Bed |
|---|---|
| Category | Indoor Furnishing |
| Product Type | Loft Bed |
| Material | Solid Wood |
| Size | Twin |
| Ladder Included | Yes |
| Guardrails Included | Yes |
| Slat Kit Included | Yes |
| Assembly Required | Yes |
| Finish | White |
| Mattress Support Type | Slats |