EasyManua.ls Logo

Dorman 741-644 - User Manual

Dorman 741-644
9 pages
Print Icon
To Next Page IconTo Next Page
Loading...
INSTALL/REMOVAL INSTRUCTIONS: WINDOW REGULATOR
741-644
Disclaimer:
Even though every attempt is made to ensure this information is complete and accurate, it is impossible to account for all possible circumstances or situations. Please consult with a quali ed auto technician
before attempting to perform any work you are not quali ed to do. Automobiles can be hazardous to work on; be sure to take all necessary safety precautions. Failure to do so may result in property damage
or personal injury. Certain motor vehicle standards and performance requirements may apply to your motor vehicle (such as Federal Motor Vehicle Safety Standards by the National Highway Tra c Safety
Administration). Be sure that your work is performed in accordance with such standards and that you do not disable any motor vehicle safety feature.
ATTENTION: Refer to the appropriate shop manual for your vehicle to obtain speci c service procedures for this part. If you do not have
a service manual or lack the skill to install this part, it is recommended that you seek the services of a quali ed technician. Pay special
attention to all cautions and warnings included in the shop manual. Read and follow all instructions carefully.
1
©2011 Dorman Products, Inc.
No reproductions in whole or in part without prior written approval.
REMOVAL/INSTALL OF WINDOW REGULATOR (741-644)
Cadillac Escalade, Chevrolet Suburban, Chevrolet Tahoe, GMC Yukon,
Chevrolet Silverado, GMC Sierra 2000–05
General Tech Tips:
Use painter’s tape rather than duct tape to secure window. It will not damage paint or leave sticky residue.
A plastic pry tool is useful. It will not easily damage delicate trim like a screwdriver or metal pry bar.
The replacement regulator should have a liberal amount of grease on slide area. If there is not much grease
present, white lithium grease works well to lubricate the slide area.
Aftermarket window tinting can cause the window to travel slower and put additional strain on the window
regulator assembly.
Window run channels should be cleaned and lubricated before installation of a new window regulator
assembly. Silicone spray works well.
PLEASE WEAR SAFETY
GLASSES!
Tools required for removal and
installation of window regulator and
motor assembly:
• Phillips screwdriver
Pry bar with  at end
• 7mm socket
• 10mm socket
• Socket wrench
Wooden wedge or wide tape
Cable cutter (if motor is immovable)
Silicone spray lubricant
Question and Answer IconNeed help?

Do you have a question about the Dorman 741-644 and is the answer not in the manual?

Summary

Window Regulator Removal Process

Remove Interior Trim Panel Components

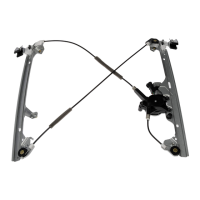
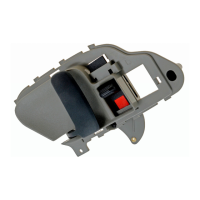
Pry and remove plastic mirror trim, handle bezel, switch, and door lock bezel to access the regulator.

Remove Trim Panel and Secure Window

Remove three 7mm screws securing the trim panel, then lift the panel away and secure the window.

Access Regulator Assembly

Peel back the plastic water barrier to expose the window regulator assembly.

Position Window and Disconnect Motor

Reconnect switch, move window to access bolts, or cut cable. Secure window and disconnect motor plug.

Loosen Guide Clamps and Remove Regulator

Loosen 10mm window guide clamp bolts. Remove six 10mm regulator mounting bolts.

Remove Regulator Side Tracks

Remove the right side track, then remove the left side track from the door.

Window Regulator Installation Process

Prepare New Regulator and Install Tracks

Loosen window guide clamp bolts on new regulator. Install left and right side tracks into the door.

Position Regulator and Reconnect Motor

Align regulator bolt holes, install 10mm bolts loosely, reconnect motor electrical plug.

Seat Window and Tighten Bolts

Remove window securing wedge/tape, lower window into guides, ensuring proper seating.

Secure Window Guides and Regulator

Tighten window clamp bolts to 9 Nm, then tighten regulator mounting bolts in specified order.

Lubricate Channels and Perform Final Check

Lubricate window run channels and operate window to ensure smooth movement and proper seating.

Reinstall Interior Trim Panel

Reinstall plastic barrier, trim panel, bolts, switch, handle bezel, and mirror cover.

Dorman 741-644 Specifications

General IconGeneral
Product TypeWindow Regulator
ColorBlack
TypePower Window Regulator
FitVehicle Specific
Part Number741-644
Product LineOE Solutions
CategoryAutomobile Accessories
MaterialPlastic
Placement on VehicleFront, Left

Related product manuals