Do you have a question about the Doro DFB-0120 and is the answer not in the manual?
Instructions for installing the SIM card, memory card and battery.
Procedure for turning the phone on/off and receiving calls.
Setting speed dial numbers and making emergency calls.
Adding new contacts with names and phone numbers.
How to activate the assistance button for emergency help.
Creating and sending SMS and MMS messages.
Instructions for capturing photos and configuring camera settings.
Enabling Bluetooth and connecting to other devices.
Customizing sound, display brightness, text size.
Setting alarms and using the phone's flashlight.
Restoring phone settings to default or clearing all data.
Resolving problems with power, SIM cards, and network connection.
Precautions for medical devices and hazardous areas.
Safety guidelines for batteries and protecting hearing.
Device technical data, operating parameters, and radio wave exposure.
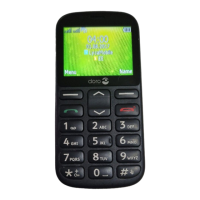
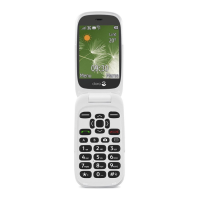
The Doro 1361 is a user-friendly mobile phone designed for ease of use, particularly for individuals who prioritize simplicity and essential communication features. It includes a range of functionalities to facilitate daily communication and provide peace of mind in emergency situations.
To begin using the phone, you'll first need to remove the battery cover. Exercise caution to avoid damaging your fingernails or bending the cover. Once the cover is off, insert your SIM card. The phone has two SIM card slots, SIM1 and SIM2; if you're using only one SIM card, SIM1 is recommended. Slide the card under the metal part with the gold-colored circuit board facing down, using the cut-off corner as a guide for correct placement. An optional SD card can also be inserted by carefully pressing the card's lid until it clicks, lifting it, inserting the card with contacts facing downwards, and then folding and pushing the lid back into place. Remember to avoid scratching or bending the circuit boards on the cards. Finally, insert the battery by sliding it into the compartment with the circuits facing down to the right, and then replace the battery cover.
To charge the phone, use only the approved battery, charger, and accessories to avoid damage or invalidating the warranty. When the battery is low, a warning signal will sound, and an icon will be displayed. Connect the mains adapter to a wall socket and then to the phone's charging socket. Don't forget to remove any protective plastic film from the display.
To turn the phone on or off, press and hold the red button. To confirm power off, select "Yes." If your SIM card is protected by a PIN code, "Input SIM1 PIN" will be displayed. Enter the PIN code and press OK, using "Clear" to delete mistakes. If you don't have the PIN or PUK codes, contact your service provider. The phone will show the number of remaining PIN attempts; if all attempts are used, the SIM will be blocked, requiring a PUK code to unlock it. When starting the phone for the first time, a start-up wizard will guide you through basic settings, which can also be run later.
To make a call, enter the phone number and press the green call button. To cancel, press "Abort." To end a call, press the red button. For international calls, always use "+" before the country code. You can also call from the phonebook by pressing "Name," scrolling through entries, or using quick search by pressing the key corresponding to the first letter of the name. Then, press "Options" followed by "Call," or simply press the green call button.
To receive a call, press the green call button to answer. Alternatively, press "Silent" to mute the ring signal and then "Reject" to send a busy signal, or press the red button directly to reject the call. To end the call, press the red button. During a call, use the scroll buttons to adjust the sound volume, which is indicated on the display.
The phone also features a "Silent" profile, which disables keypad tone, message tone, and ring tone, while vibration, tasks, and alarms remain active. To activate or deactivate silent mode, press and hold the "#" button. During a call, the soft keys provide access to additional functions.
Speed dial allows you to quickly dial entries from standby. Use "0" and "2-9" to speed dial an entry by pressing and holding the corresponding button. To add speed dial numbers, go to "Menu" → "Settings" → "Phonebook" → "Speed dial," select "0 Add," choose an entry from the phonebook, and confirm with OK. Repeat for buttons "2-9."
The phone supports SOS calls. As long as the phone is switched on, you can place an SOS call by entering the main local emergency number for your present location followed by the green call button.
The "ICE (In Case of Emergency)" feature is crucial for providing vital information to first responders in an emergency. This can include medication details and next of kin contacts, improving safety. To add ICE contacts, go to "Menu" → "Phonebook" → "ICE," scroll through the list, press "Edit" to add or edit information, and then "Save."
The "Assistance Button" provides easy access to predefined help numbers. Ensure the function is activated and configured before use, and test it thoroughly. To make an assistance call, press and hold the assistance button for 3 seconds, or press it twice within 1 second. The call begins after a 5-second delay, during which you can prevent a false alarm by pressing the red button. An assistance text message (SMS) is sent to all recipients, and the first recipient in the list is dialed. If the call isn't answered within 25 seconds, the next number is dialed. This process repeats 3 times or until the call is answered or the red button is pressed. When an assistance call is activated, the phone is pre-set to handsfree mode, so avoid holding it near your ear due to potentially loud volume. Assistance settings can be accessed via "Menu" → "Settings" → "Assistance."
To enter text, press a numerical key repeatedly until the desired character is shown, then wait a few seconds before entering the next character. Press the "*" button for a list of special characters, select with the scroll buttons, and press OK. Use the scroll buttons to move the cursor within the text. Press the "#" button to cycle between upper case, lower case, and numerals. Press and hold "#" to change the writing language. The default language is determined by the SIM card.
The call log saves received, missed, and dialed calls in a combined log, storing up to 20 calls of each type. For multiple calls from the same number, only the most recent one is saved. To view the call log, press the green call button, then use the scroll buttons to navigate. Icons indicate received, dialed, or missed calls. Press the green call button to dial an entry, or "Options" for more actions.
To create and send text messages (SMS), go to "Menu" → "Messages" → "Create new" → "SMS." Write your message, then press "To." Select a recipient from "Add from Phonebook" or "Enter number" to add manually. You can modify recipients by selecting one and pressing "Options" → "Edit/Delete/Delete all." When done, press "Options" → "Send."
To create and send picture messages (MMS), both you and the recipient must have subscriptions that support picture messages. The settings are usually supplied automatically by your service provider. Go to "Menu" → "Messages" → "Create new" → "MMS." Write your message, then press "Options" → "Add picture." You can choose "My pictures" to select a file or "Take picture" to use the camera. For best quality, send only one picture per message. You can also add sound, video, and preview MMS via the "Options" menu. Press "Options" → "Add subject" and enter your subject, then press "Options" → "Done." Press "Options" → "To" and select recipients from "Add from Phonebook" or "Enter recipient." Press "Add" to add more recipients. Finally, press "Options" → "Send." Message settings can be accessed via "Menu" → "Settings" → "Messages."
The phonebook can store 100 entries, each with up to 3 phone numbers. To add a contact, go to "Menu" → "Phonebook" → "-New contact-" → "Add." Enter a name, then use the scroll buttons to select "Mobile," "Home," or "Office," and enter the phone number(s) including the area code. When done, press "Save."
The phone includes a camera for taking photos. To take a photo, go to "Menu" → "Camera" → "Take photo." To view photos, go to "Menu" → "Camera" → "My photos."
The phone also supports Bluetooth connectivity. To activate Bluetooth, go to "Menu" → "Settings" → "Bluetooth" → "Activate." To search for devices, go to "Menu" → "Settings" → "Bluetooth" → "Search device." Select a device from the list and press "Bond" to connect. If the device is not enabled, press "Yes" to activate.
Sound settings can be adjusted via "Menu" → "Settings" → "Sound." Here you can set the ringtone, message tone, and incoming call volume. The "Silent" profile is also available.
The display settings allow you to adjust the text size and brightness. To change text size, go to "Menu" → "Settings" → "Display" → "Text size." To adjust brightness, go to "Menu" → "Settings" → "Display" → "Brightness."
The phone includes an alarm function. To set an alarm, go to "Menu" → "Alarm" → "On." Use the keypad to enter the time and press OK. You can repeat the alarm daily, weekdays, or weekends. To turn off an alarm, go to "Menu" → "Alarm" → "Off."
The phone also has a built-in torch. To turn it on or off, press and hold the torch button.
The phone's battery is a consumable part and may need replacement over time. If the battery is completely discharged, it may take a few minutes for the charging indicator to appear. If the phone doesn't charge, check the charger connection and ensure the battery is inserted correctly. If the battery is faulty, it may need to be replaced.
If the phone doesn't turn on, ensure the battery is charged and inserted correctly. If the SIM card is not detected, check its insertion and ensure it's not faulty. If the phone is locked by a PIN code, enter the correct PIN. If the PIN is blocked, use the PUK code.
If you experience poor call quality, check the network signal strength. If the phone doesn't connect to the network, ensure the SIM card is inserted correctly and that you have network coverage. If the phonebook is not working, ensure memory is available.
For any issues, try restarting the phone. If problems persist, contact your service provider or Doro customer support. Always use approved accessories and avoid exposing the phone to extreme temperatures, liquids, or physical damage. Clean the phone with a soft, dry cloth.
Always follow safety guidelines to prevent injury or damage. Do not use the phone in areas where mobile phone use is prohibited or where it may cause interference or danger. Turn off the phone in aircrafts, hospitals, and near medical equipment. Avoid using the phone while driving. Keep the phone away from children and pets. Dispose of the phone and battery responsibly according to local regulations.
| Bluetooth | Yes |
|---|---|
| Rear camera | Yes |
| Flash card support | Yes |
| Maximum memory card size | 32 GB |
| Display diagonal | 2.4 inches |
| Headphone connectivity | 3.5 mm |
| Data network | GSM |
| GSM bands (primary SIM) | 900, 1800, 1900 MHz |
| SIM card type | Micro-SIM |
| Compatible memory cards | MicroSD |
| Camera | Yes |
| Expandable Memory | Yes |
| Network | 2G |