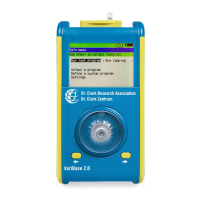
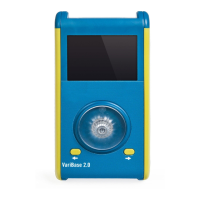
The VariZapper 2.0
Selecting a program opens the following panel (Fig. 24). Choose between “Run program” or “View
program details”.
To run the program, choose “Run program” rotating the Turnwheel and pressing it to select. Next you
will have to confirm the connection of the electrodes by selecting to start the connection check (Fig.
25; the Zappicator program starts immediately without connection check).
When the connection check is completed:
• Successful: if the connection check is successful select to run the program (Fig. 26). The device will
show the running panel where you can follow the progress of the program (Fig. 20). At the center of the
panel is a progress bar, the voltage, the frequency and the wave type. At the top of the display starting
from the left are indicated the time remaining to finish the program, the step currently running and the
total number of steps. (Skipping steps see paragraph 4.1.6.2.)
• Poor connection: if the connection is not good, the device will show a POOR CONNECTION Panel (Fig.
21).You can select to retry the connection check after checking the electrodes or select to
continue without connection check (Note: there is no connection control for the Zappicator Program).
When the program is completed, select to return to the Main Menu (Fig. 11).
Note: Within the Zappicator and Continuous Zapping programs, skipping steps will terminate the
program, due to the programs having only 1 step. The same holds true for any other 1-step program, or
when you are on the last step of a program. At the end of the program, select to go back to the Main
Menu.
To view the program details of a program choose “View program details” with the Turnwheel and press it
to select. The Program details of the chosen program will be shown (Fig. 27).
Here you will be able to see all the parameters of a program for each step: Step – active time, Step –
pause time, Wave shape, Duty cycle, Voltage 5-15 V, Offset POS or MIXED, Wobble YES or NO, Wobble
times, Minimum frequency, Maximum frequency.
To navigate and view each step rotate the Turnwheel to the symbols or to go back or forth
between the steps. Choose to go to the last step. Choose to go to the first step.
4.2 Battery
The VariZapper 2.0 is powered by a 9 V rechargeable block battery.
4.2.1 Battery voltage indicator
The battery status is indicated by the battery symbol on the top-right of the display.
The shorter the black bar in the battery icon, the lower the voltage.
• full bar 9.5-8.7 V
• ¾ bar 8.7-8.5 V
• half bar 8.5-8.2 V
• ¼ bar 8.2-8 V
• <8 V. Once the battery voltage has decreased to 8 V, there is usually enough power left to complete
the current program. Recharge the battery once the program has finished.
• 7.4 V or less icon. The active program will stop immediately. A battery alarm message to charge the
battery will appear, while the VariZapper 2.0 is shutting off. When the progress bar is at 100% the device
will shut off (Fig. 28). Recharge the battery!
11
Fig. 24 Fig. 25
Fig. 27
Fig. 28
Fig. 26