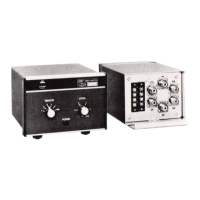
Connect antennas to coax receptacles on the ANTENNA
SWITCH using
a
good grade of
50
ohm coaxial cable and
PL-259 connectors. Connect the single transmission line to be
used to the coax receptacle labelled "C" using a PL-259 con-
nector. Makea record of the number of the coax receptacle used
for each specific antenna. These numbers will correspond to
the numbers on the console REMOTE SWITCH.
It
is advisable to use the ANTENNA SWITCH even if only one
antenna is used, as it provides easy grounding of the antenna
when leaving the station and future antenna installations are
then easily accomplished.
Connect the single transmission line from the ANTENNA
SWITCH to the coax receptacle labelled "C" on rear panel of
console.
Connect the receivers, transmitters or transceivers using
a
good grade of 50 ohm coaxial cable and PL-259 connectors to
the other coax receptacles. Make
a
record of the number of the
coax receptacles used for each specific radio. These numbers
will correspond to the numbers on the console LOCALSWITCH.
OPERATION
Determine your particular line voltage and select the proper
voltage range on the rear panel, either
120VAC or 220VAC/60
Hz. Be sure to change fuse ratings if the voltage range
is
changed.
When the ON-OFF button
is
depressed, the "ON lamp should
light indicating the unit is energized. The remote switch deter-
mines which antenna is terminating the transmission line. To
change antennas,
me~ely rotate the remote switch
to
the
desired number or description. The standby indicator will light
showing the motor driven switches are turning. When the
"STANDBY" light goes out, the antenna selected
is
terminat-
ing the transmission line.
When
leavlng the station, return the ANTENNA SWITCH to
GND. After the "STANDBY" light goes out, depress the power
switch and note the "ON lamp goes out.
.
CAUTION: BE SURE TRANSMIPER IS INTHE
"OFF-THE-AIR" CONDITION WHEN STANDBY
LIGHT IS LIT CONTINUOUSLY, INDICATING
MOTOR DRIVEN SWITCHES ARE TURNING.
DURING THIS INTERVAL THE TRANSMIS-
SION LINE IS IMPROPERLY TERMINATED.
 Loading...