EasyManua.ls Logo

DREAMS KIMBERLEY BED User Manual

Default Icon
5 pages
To Next Page IconTo Next Page
Page #1 background imageLoading...
Page #1 background image
1 of 5
KIMBERLEY BED
Assembly Instructions
NOTE: It will require two people to assemble this bed. Assembly should be carried out in the room that
the bed will be used in.
1. We suggest you spend a short time reading through this leaflet and then follow
the simple step by step instructions.
2. If you follow the instructions carefully the end result should be worth the effort.
3. Do not discard any of the packaging until you have checked that you
have all the parts and the pack of fittings.
4. Assemble this product on a carpet.
5. To ensure an easier assembly, we strongly advise that all fittings are only
finger tightened during initial assembly. Only upon completion of the assembly
should all fixing points be fully tightened.
6. We recommend a periodic check on all fixing points to make sure they remain
fully tightened.
7. Keep glue and fittings out of children’s reach.
In the unlikely event that this product has missing or damaged parts,
p
lease call
 to obtain spares
Before you
Start, here
is some
helpful advice
Minimum No. of people
Recommended to assemble
This product.
Approx assembly time:
X
Question and Answer IconNeed help?

Do you have a question about the DREAMS KIMBERLEY BED and is the answer not in the manual?

DREAMS KIMBERLEY BED Specifications

General IconGeneral
CategoryIndoor Furnishing
BrandDREAMS
ModelKIMBERLEY BED
MaterialWood
ColorWhite
SizeKing

Summary

KIMBERLEY BED Assembly Instructions

Before you Start, here is some helpful advice

Provides crucial preparatory advice and safety tips for assembling the bed.

Component parts and fittings contained in the box

ASSEMBLY

STEP 1

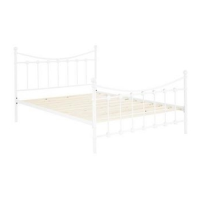
Connects headboard and footboard using specific bolts.

STEP 2

Attaches side frames to headboard/footboard with dowels and connectors.

STEP 3

Details adjusting support leg height for bedstead assembly.

STEP 4

Secures legs to the slats frame using bolts.

STEP 5

Fixes the slats frame to the bed using bolts and nuts.

STEP 6

Secures the slats frame onto the bed using bolts and nuts.

Related product manuals