Do you have a question about the DREAMS WILLIAM OTTOMAN BED 4-0 and is the answer not in the manual?
Main vertical support at the head of the bed.
Main vertical support at the foot of the bed.
Lateral supports connecting headboard and footboard.
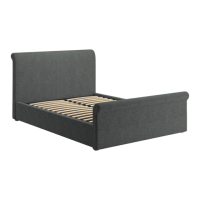
The base structure for supporting the mattress.
Connectors used to reinforce the bed frame structure.
Prevent mattress from sliding on the slats.
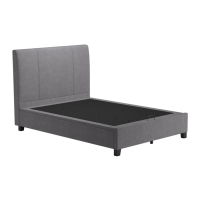
Upholstery that covers the bed frame base.
Structural support bar for the bed frame.
Lists of bolts, washers, screws for gas-lift, frame, and slat frame.
List of additional tools needed for assembly, e.g., screwdriver.
General hints for assembly, bolt checks, and care advice.
Attaching gas-lift mechanism (M b) to the left side of the headboard.
Attaching gas-lift mechanism (M a) to the right side of the headboard.
Loosely attach headboard and footboard to side panels using bolts.
Fit angle brackets and 'U' bar, square the frame, and tighten bolts.
Turn bed on side and attach fabric cover with velcro.
Attach metal plates to the slat frame using bolts and washers.
Place slat frame support bars in position for the slat frame.
Loosely fix slat frame to support bars using bolts, washers, and nuts.
Hold frame and tighten all slat frame bolts using spanner and Allen key.
Slide gas-lift piston onto axle and secure with lock-nut.
Push mattress stoppers into the metal frame to secure the mattress.
Specifications for Small Double and King size bed dimensions.
This document provides comprehensive instructions for assembling and maintaining the William Ottoman Bed, available in 4-0 and 5-0 sizes. It emphasizes careful attention to detail throughout the assembly process to ensure proper functionality and longevity of the bed.
The primary function of the William Ottoman Bed is to provide a comfortable sleeping surface while also offering significant under-bed storage space. This storage is accessed via a gas-lift mechanism that allows the mattress and slat frame to be easily lifted, revealing a spacious compartment beneath. The design incorporates a fabric base cover to enclose the storage area, keeping its contents tidy and protected.
The assembly is divided into several stages, each with clear instructions and diagrams. Users are advised to watch a full instructional video available on YouTube for a visual guide, which can be particularly helpful for understanding complex steps.
This initial stage focuses on attaching the gas-lift mechanisms to the headboard and footboard. A crucial feature here is the flexibility to choose the lift-up side. If access is needed from the left side of the bed, both lift mechanisms (M(a) and M(b)) should be fitted to the right side of the bed, bolting into holes marked with blue labels. Conversely, if access is needed from the right side, the mechanisms are fitted to the left side, bolting into holes marked with red labels. This adaptability ensures the bed can be configured to suit various room layouts and user preferences. The instructions highlight the importance of ensuring fixing bolts are centered within the long holes of the mechanism for proper operation.
This stage involves connecting the headboard, footboard, and side panels. Initially, bolts, spring washers, and flat washers are loosely inserted into the headboard and footboard, leaving about 10mm protruding. This allows for the side panels to be easily fitted by locating their brackets behind the flat washers. The instructions explicitly state not to tighten any bolts yet, as the bed needs to be squared up first.
The bed is squared up to 90 degrees, and angle brackets are fitted into threaded inserts in the corners of the headboard, footboard, and side panels using bolts, spring washers, and flat washers. A key feature at this stage is the fitting of a 'U' shaped cross bar to the center of each side panel. This bar is fixed using screws that drive directly into the side rails, as there are no pre-drilled pilot holes. This design choice likely contributes to the structural integrity of the bed. Once all four corners are located and the bed is squared, all bolts are tightened using the provided Allen key. The emphasis on squaring up the bed before tightening is critical for ensuring a stable and correctly aligned frame.
Before proceeding with the slat frame, the bed is turned on its side to attach the fabric base cover to the bottom of the side panels, headboard, and footboard using velcro tape. This feature creates the enclosed storage space and gives the bed a finished look. Users are instructed to ensure the fabric is fixed evenly all around.
This stage begins with opening the metal slat frame. Two pieces of metal plate are then fitted to the top of the slat frame using bolts and flat washers, which are tightened 100% with an Allen key. This step prepares the slat frame for integration with the gas-lift mechanism.
With assistance, the slat frame is lifted onto the slat frame support bars. A crucial note here is to ensure the holes for the mattress stoppers are on the correct side of the slat frame before bolting. Six bolt sets (bolts, flat washers, spring washers, and nuts) are then used to loosely fix the slat frame to the support bars, initially finger-tight. The instructions include a diagram illustrating how to hold the slat frame forward during this process.
The slat frame is carefully laid down, ensuring an even gap of approximately 10mm on each side. All six bolt sets are then fully tightened using the spanner and Allen key. This step secures the slat frame to the gas-lift mechanism, making it ready for operation.
The gas-lift piston stem is slid onto the axle, and a flange lock-nut is fitted and tightened with a spanner. Users are cautioned not to over-tighten the nut, as a small gap is intentionally left to allow the stem to move freely, which is normal for the mechanism's function. This detail is important for the smooth and safe operation of the gas-lift system.
Finally, two mattress stoppers are pushed into the metal frame. These stoppers prevent the mattress from sliding off when the bed is in the lifted position. The instructions provide important usage notes: after placing the mattress on the slats, slowly push down the metal frame, ensuring it aligns with the side panels. It's noted that the speed of the lift will vary depending on the mattress weight, so users should exercise caution until they become accustomed to it. The fabric handle should always be used to lift or lower the frame, keeping fingers well away from moving parts to prevent injury.
In summary, the William Ottoman Bed is designed for both comfort and practical storage. Its assembly process, while requiring attention to detail and two people, is made accessible through clear instructions and a video guide. The bed incorporates features like adjustable lift-up sides, a secure gas-lift mechanism, and a fabric base cover for a functional and aesthetically pleasing design. Ongoing maintenance, such as periodic bolt checks, is encouraged to ensure long-term durability and safe operation.
| Product Name | DREAMS WILLIAM OTTOMAN BED 4-0 |
|---|---|
| Category | Indoor Furnishing |
| Type | Ottoman Bed |
| Storage | Yes |
| Material | Fabric |
| Frame Material | Wood |
| Headboard | Yes |
| Divan | No |
| Mattress Included | No |
| Size | 4-0 |
| Color Options | Multiple |