21 22
menu options
A THE MAIN MENU
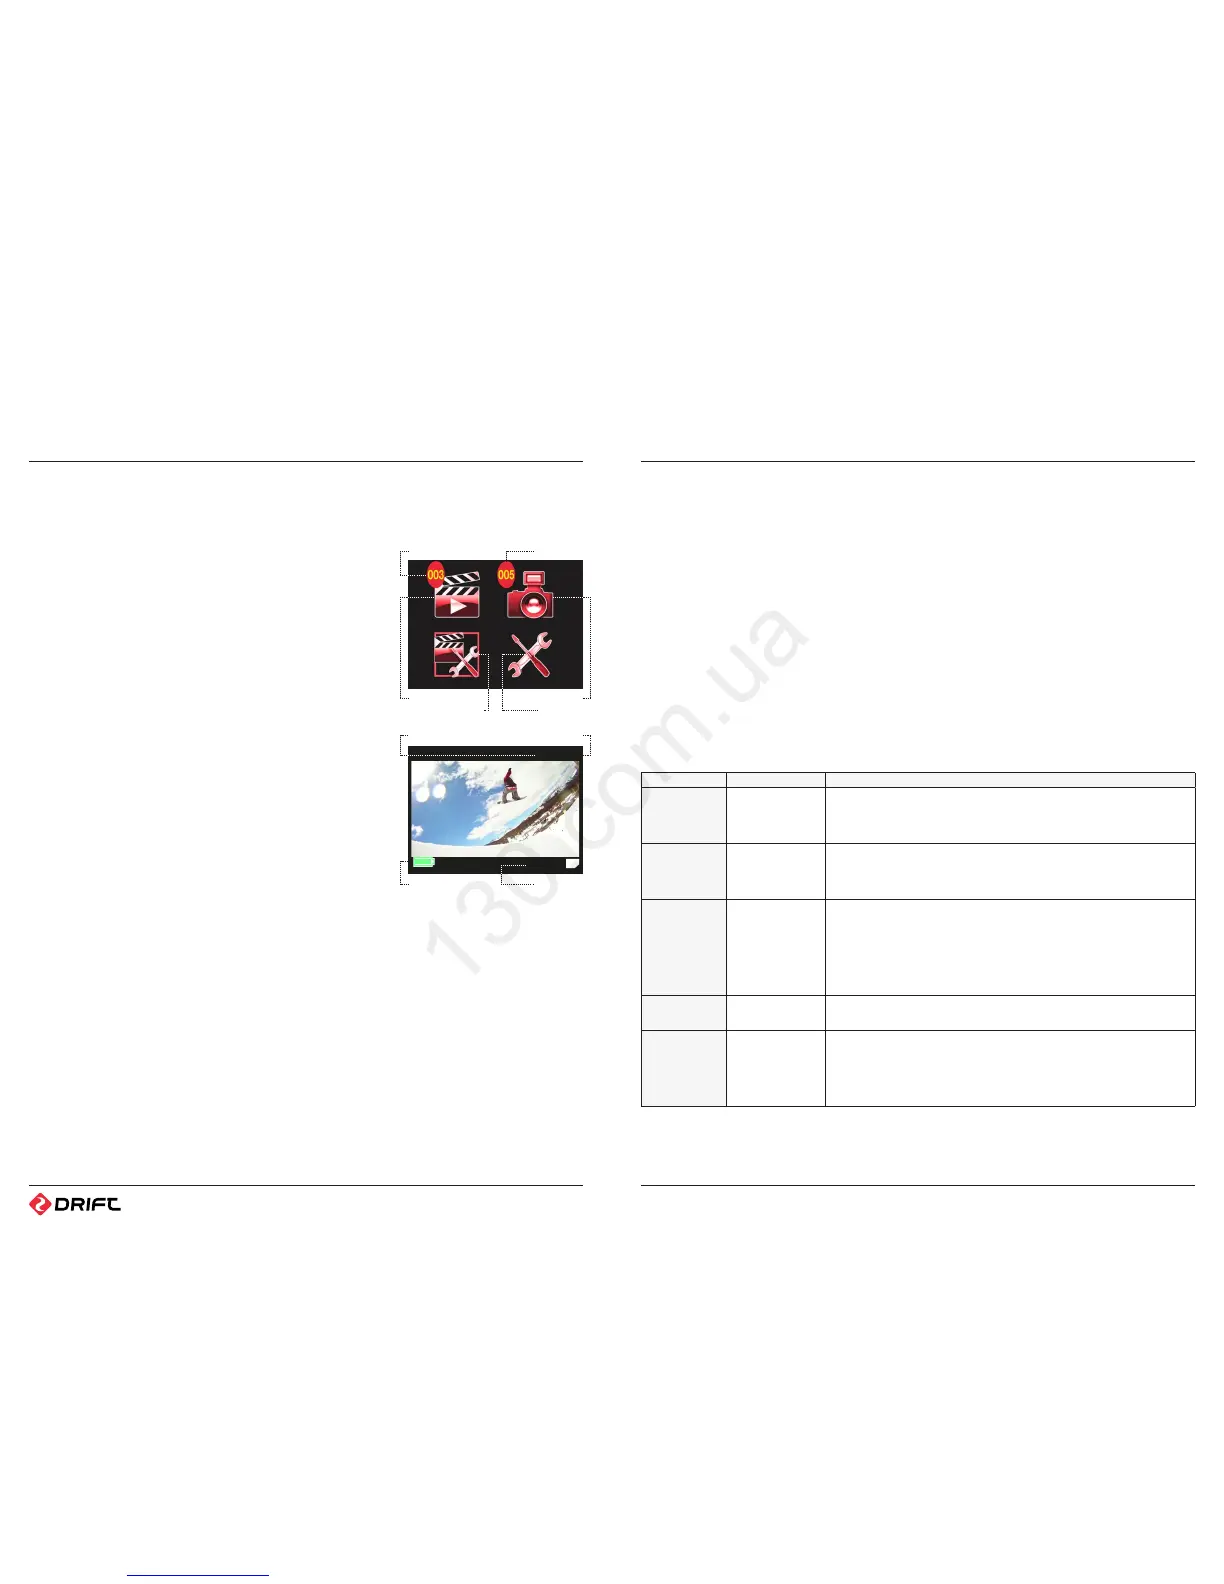
To open the Menu, press the MENU button when the camera is switched on. A screen
containing the four Menu icons will appear:
If the Micro SD Memory card contains any Video or Photo les, the number of each
will be indicated beside the Video and Photo menus icons.
Opening the Sub-Menus
1. Once the Main Menu is open, use the UP and DOWN buttons to highlight the icon
of the menu option you wish to open.
2. Press the SELECT button.
B VIDEO MENU
Once you have selected the Video Menu, you will either see the ‘No File’ screen, or
you will see a thumbnail image of the last video file recorded to the Micro SD card.
Video Playback
1. Scroll through the thumbnail images using the UP and DOWN arrows.
2. Once you nd the video you want to watch, press the SELECT button.
3. A screen with three options will appear - highlight the View option and press the
SELECT button. The video will start playing.
4. Press the SELECT button to pause and resume playback, or the MENU button to exit.
Deleting Videos
1. Scroll through the thumbnail images using the UP and DOWN arrows.
2. Once you nd the video you want to delete, press the SELECT button .
3. A screen with three options will appear – highlight the Delete option and press the
SELECT button.
4. Conrm le deletion by highlighting the tick icon and pressing the SELECT button.
C PHOTO MENU
Once you have selected the Photo Menu, you will either see the ‘No File’ screen, or
you will see a thumbnail image of the last photo saved to the Micro SD card.
Viewing Photos
1. Scroll through the thumbnail images using the UP and DOWN arrows.
2. Press the MENU button to exit.
Slideshow Function
1. Scroll through the thumbnail images using the UP and DOWN arrows.
2. Once you nd the image you want to show rst, press the SELECT button.
3. A screen with three options will appear – highlight the View option and press the
SELECT button. The camera will show all the photos on the card in order, changing
image every few seconds.
4. Press the SELECT button to pause the slideshow, and press it again to resume it.
Note: The MENU button also functions
as a BACK button. Pressing the MENU
button while in a sub-menu will take
you back to the Main Menu. Pressing the
MENU button on the Main Menu will take
you back to Live Preview mode.
! You can Fast Forward and Rewind a
video while it is playing. Press the DOWN
arrow to fast forward, and the UP arrow
to rewind. Once you reach your desired
point in the le, press the SELECT/Play
button to pause the video. Press the
SELECT/Play button to resume playback.
Note: You can delete all the videos on
the camera by selecting the Delete All
option. This will not delete any of the
photo files on the SD card.
! Use the slideshow function when the
camera is connected to a television to
view all your photos on a big screen.
Deleting Photos
1. Scroll through the thumbnail images using the UP and DOWN arrows.
2. Once you nd the video you want to delete, press the SELECT button.
3. A screen with three options will appear – highlight the Delete option and press the
SELECT button.
4. Conrm le deletion by highlighting the tick icon and pressing the SELECT button.
D VIDEO CONFIGURATION MENU
To change Video Conguration settings, highlight the setting you wish to change and
press the SELECT button. Use the UP and DOWN arrows to choose the option you
want, and press the SELECT button again to conrm it. The icon next to the setting
name will reect the new setting.
Note: The options available depend on the recording mode selected – the Resolution
option is only available in Video mode, and the Sequence Interval option is only
available in Time Lapse mode.
Setting Options Description
Record Mode 1. Video (Default)
2. Photo
3. Time Lapse
Choose whether to record video, still photos or time-lapse photos.
Resolution 4. 1080p HD
5. 729p HD (Default)
6. WVGA (SD)
Dierent video qualities can be selected to optimise the video quality or le size.
1080p requires the most memory but has the best video quality.
Exposure 7. -2.0
8. -1.0
9. 0 (Default)
10. +1.0
11. +2.0
(Advanced Users) The exposure setting determines the camera’s sensitivity to light. If
conditions are very bright (eg. sun on snow), use a negative value. For dark conditions
(eg. dusk), use a positive value. Most of the time you can just use zero.
Outdoor / Indoor 12. Outdoor
13. Indoor
Sequence Interval 14. 3 seconds (Default)
15. 5 seconds
16. 10 seconds
17. 30 seconds
Allows the user to select the time interval between photos when shooting in Time-
Lapse mode.
! You can delete all the photos on the
camera by selecting the Delete All
option. This will deleted only the photos,
and will not aect any of the video les
on the micro SD card.
! Once a le is deleted, it cannot be
restored. Make sure you no longer need
a video before deleting it. Please be
especially careful when using the Delete
All option.
# Video Files
Video Menu
Video Configuration
# Photo Files
Photo Menu
Setup Menu
00.00.32
0001/0004
File Number
Video Length
Total Video Files
Remaining Battery