15 16
using the camera
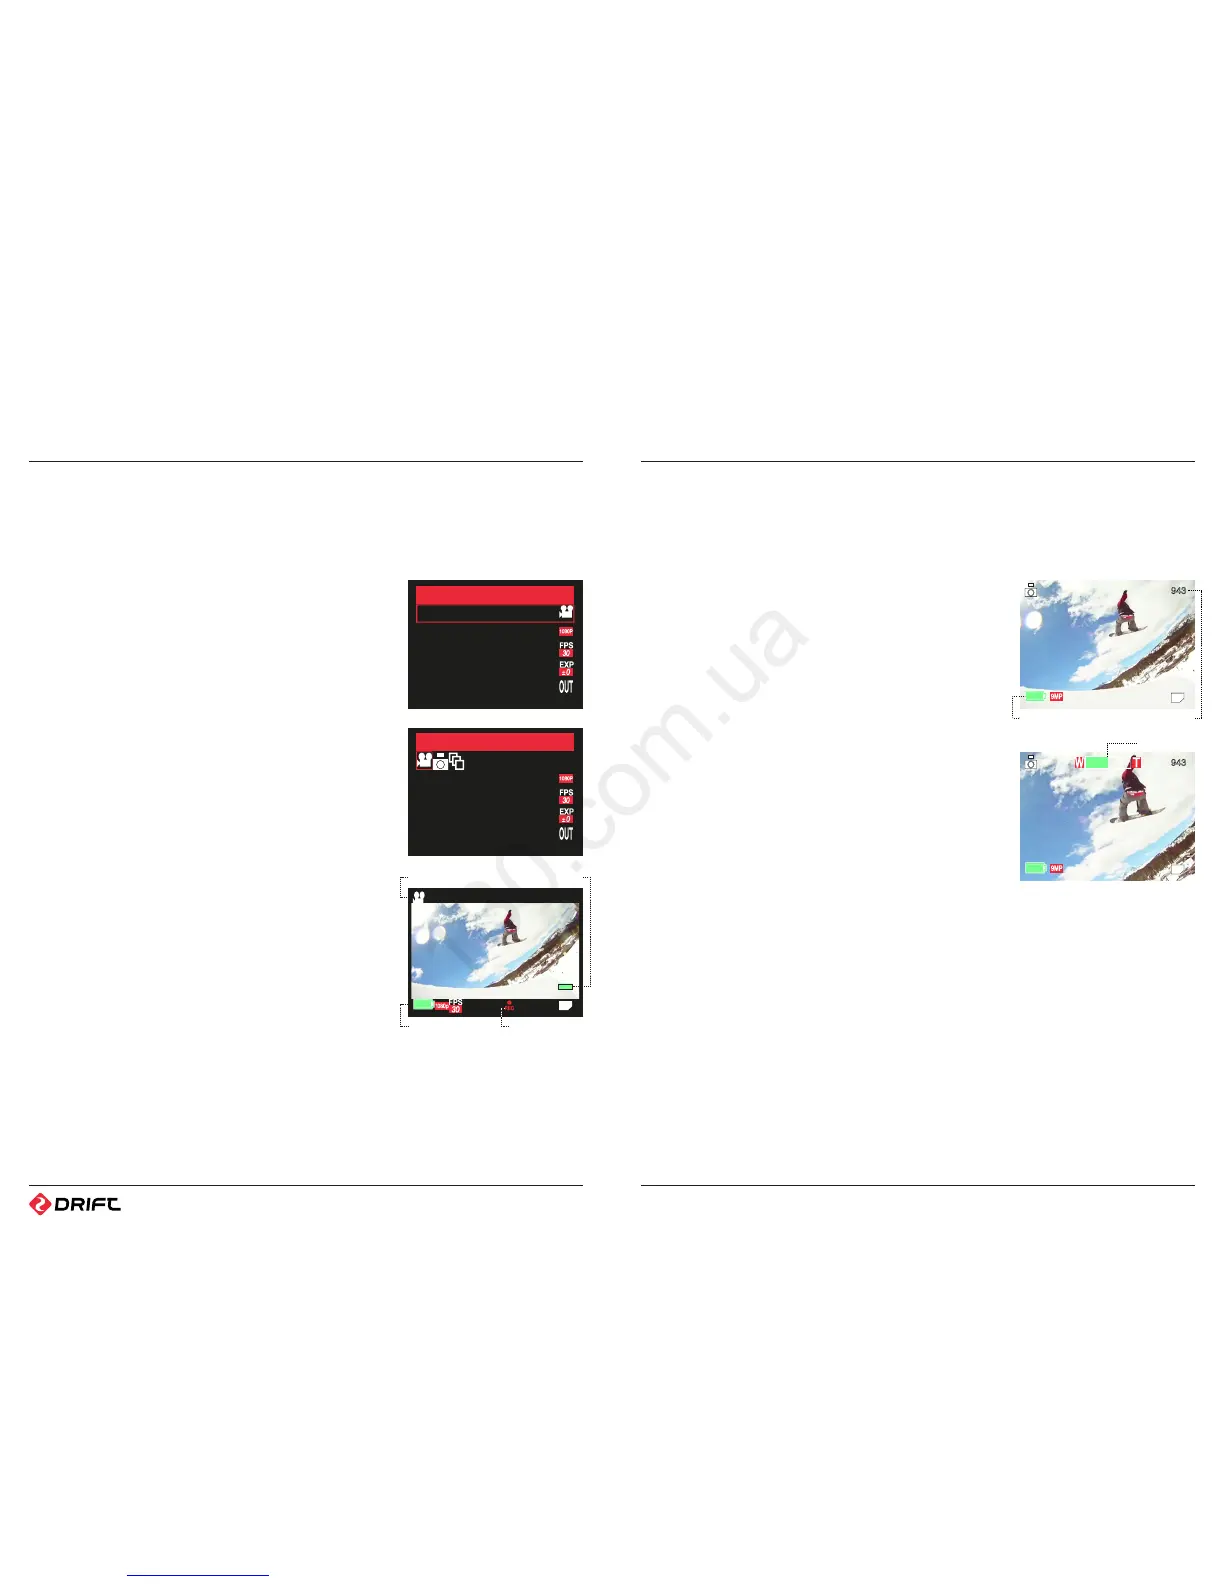
A CHANGING THE RECORD MODE
In order to switch between recording video and shooting photos, you will need to
change the camera Record Mode in the Video Configuration Menu.
1. Press the MENU button to open the Main Menu.
2. Use the UP and DOWN buttons to highlight the Video Conguration icon, and press
the SELECT button.
3. The screen will show a list of settings. Highlight the Record Mode option and press
the SELECT button.
4. Highlight the icon of the Record Mode you wish to use and press the SELECT button
again.
5. Press the MENU button twice to return to Live Preview mode.
Note: The camera must be in Live Preview mode to record any video or take any
photos. The MENU button also functions as a BACK button. Press the MENU button a
few times to return to Live Preview mode.
B VIDEO MODE
When the camera is in Video mode, the screen will display a live preview image from
the camera lens and a number of icons indicating the camera’s status.
Recording Video
1. Ensure that the camera has been set to Video Mode using the Video Conguration
menu.
2. To start recording, press the SELECT button on the camera or the RECORD button
on the remote control. The unit will beep and the LED will turn red.
3. To stop recording, press the SELECT button again, or the STOP button on the
remote. There will be another beep and the LED will return to green.
Note: If the SD card runs out of space while recording, the camera will stop recording
but it will remain switched on. You will need to turn it o yourself unless Camera
Auto-O has been enabled (page 19).
Note: If the video being recorded is very long, the video le will be separated into
multiple les every 3.6 GB (i.e. every 40 minutes in 1080p). This is automatic – you do
not need to monitor this process. The camera will resume lming after a few seconds,
once the file is saved. Please be patient while the file is saving.
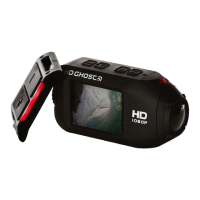
B) PHOTO MODE
When the camera is in Photo mode, the screen will also display a live preview image,
but the camera status icons are slightly dierent.
Taking Photos
1. Ensure that the camera has been set to Photo mode using the Video Conguration
menu.
Record Mode
Video Configuration
1/2
Resolution: 1080P
Frame Rate: 30
Exposure: 0.0
Outdoor / Indoor
Video Configuration
1/2
Resolution: 1080P
Frame Rate: 30
Exposure: 0.0
Outdoor / Indoor
00.00.02
Mode Indicator
Recording Indicator
Remaining Memory
Remaining Battery
2. Press the SELECT button on the camera or the RECORD button on the remote
control. The unit will beep once and the LED will briey turn red.
3. Once the LED returns to green, the camera is ready to take another photo.
D TIMELAPSE MODE
Taking Time-Lapse Photos
The Drift HD includes a time lapse mode. When activated, the camera will take a
photo every few seconds until it is stopped or the memory card is full.
1. Ensure that the camera has been set to Time Lapse mode using the Video
Configuration menu.
2. Press the SELECT button on the camera or the RECORD button on the remote
control. The unit will beep once and the LED will briey turn red.
3. The camera will take photos every 3 seconds by default.
Note: You can change the time interval between time-lapse photos by modifying the
Sequence Interval setting as described below.
Changing the Sequence Interval
1. Press the MENU button to open the Main Menu.
2. Use the UP and DOWN buttons to highlight the Video Conguration icon, and press
the SELECT button.
3. The screen will show a list of settings. Highlight the Sequence Interval option and
press the SELECT button.
4. Use the UP and DOWN arrows to choose the desired time interval and press the
SELECT button to conrm.
Note: The Sequence Interval setting can only be changed when the record mode is
set to Time-Lapse. The available Sequence Interval settings are 3 seconds, 5 seconds,
10 seconds and 30 seconds.
E ZOOM
The Drift HD includes a digital zoom function that allows you to take close-up photos
and videos. To use it, press and hold the UP arrow to zoom in, and the DOWN arrow
to zoom out.
Note: You can zoom in and out while video recording is in progress
Note: The zoom indicator bar may disappear when it is not in use.
Note: Please be aware that using the digital zoom may aect the image quality of your
recording.
Shots RemainingRemaining Battery
Zoom Indicator