EasyManua.ls Logo

Drive Medical Deluxe User Manual

Drive Medical Deluxe
2 pages
To Next Page IconTo Next Page
Page #1 background imageLoading...
Page #1 background image
1. Remove contents from packaging and lay top board
upside down on flat surface with Mounting Tube (5)
facing upward. See Fig. 2.
2. Take the Column Assembly (2) and place Trip Lever (3)
on top of Trip Rod and secure with Bolt and Nut (4)
See Fig. 1.
3. Remove Triangle Knob (16) and Spacer (17) and
remove Inner tube (6) from Outer tube (18). See Fig. 3.
4. Insert Outer tube (18) on Column Assembly through
Mounting Tube (5) on table top. Then insert Inner
tube (6) through Mounting Tube (5). See Fig. 4.
5. Replace Triangle Knob (16) and Spacer (17) and
secure by tightening the knob.
Assembly Instructions
Drive Medical
TILT TOP TABLE - 13008
6. Install two Casters With Lock (8) into Base (7) which
connects to Column Assembly (2). Install two
Non-Locking Casters (9) into base opposite Column
Assembly (2). See Fig. 5.
7. Install two Bolt Sleeves (10) into upside down Base (7)
and then position two Bolts (12) through Bolt Plate
(11) and into Bolt Sleeves (10). Position Base (7) over
Column Assembly (2) and thread bolts into boom of
Column Assembly (2) and tighten using 16mm wrench.
See Fig. 6.
8. Turn the table upright and stand on casters.
9. CAUTION: This step must be completed last to
prevent damage to the spring loaded mechanism.
Remove the Black Screw (13) in the Column Assembly
(2) collar labeled “Remove for Assembly” and replace
it with the Chrome Screw (14) contained in hardware
package. Do not remove Chrome Screw labeled “Do
Not Remove”. See Fig. 7 and Fig. 8.
FIG. 2
5
1
FIG. 1
4
3
2
FIG. 4
17
16
6
18
2
FIG. 7
Remove 13
FIG. 8
Insert 14
WARNING
FOR SAFETY – DO NOT REMOVE BLACK SCREW (13) ON COL-
UMN ASSEMBLY (2) UNTIL THE TABLE IS FULLY ASSEMBLED AND
STANDING IN UPRIGHT POSITION. AFTER REMOVING BLACK
SCREW, REPLACE WITH CHROME SCREW (14) INCLUDED IN
HARDWARE PACKAGE.
THE BOTTOM CHROME SCREW WITH THE “DO NOT REMOVE”
LABELSHOULDNEVERBEREMOVEDASITWILLDAMAGETHE
UNITANDVOIDYOURWARRANTY
12
11
2
FIG. 6
10
1
7
8
9
FIG. 5
Column end of base
with 2 holes
7
FIG. 3
2
18
17
6
16
Question and Answer IconNeed help?

Do you have a question about the Drive Medical Deluxe and is the answer not in the manual?

Drive Medical Deluxe Specifications

General IconGeneral
Weight Capacity300 lbs
Seat Depth16 inches
Backrest Height18 inches
Overall Depth27 inches
Upholstery MaterialNylon
Wheel Size8 inches
ColorBlue

Summary

Drive Medical Tilt Top Table Assembly

Prepare Table Top and Components

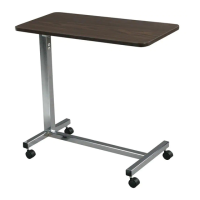
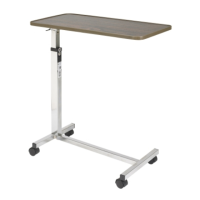
Remove contents, place top board upside down, and identify components for assembly.

Assemble Column and Base Components

Attach trip lever to column, separate inner/outer tubes, insert tubes into mounting tube, and secure.

Install Base and Casters

Install casters with and without locks into the base, then attach the base to the column assembly.

Final Assembly and Safety Check

Turn table upright and replace the black safety screw with a chrome screw after full assembly.

Drive Medical Overbed Table Information

Parts Identification

Lists and illustrates all parts included in the assembly kit for the overbed table.

Operating Instructions

Details how to raise, lower, and tilt the table top using the provided controls.

Assembly Precautions and Warnings

Provides critical safety advice and warnings regarding assembly and product use.

Intended Use and Weight Limitations

Defines the product's intended purpose, usage restrictions, and maximum weight capacity.

Lifetime Limited Warranty

Outlines the warranty coverage, exclusions, and contact information for service.

Related product manuals