EasyManua.ls Logo

DS18 DDX9AD - User Manual

DS18 DDX9AD
20 pages
Print Icon
To Next Page IconTo Next Page
Loading...
DDX9AD
9'' SINGLE DIN MODULAR MULTIMEDIA RECEIVER WITH
ANDROID Q OPERATING SYSTEM MIRROR-LINK FOR IOS & ANDROID
BT/AUX/GPS/USB/SD/AM/FM & ALL YOUR FAVORITE APPS
OWNER’S MANUAL
Question and Answer IconNeed help?

Do you have a question about the DS18 DDX9AD and is the answer not in the manual?

Overview

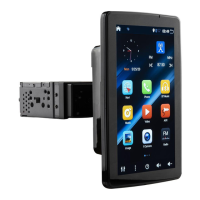
This document serves as the owner's manual for the DS18 DDX9AD, a 9-inch single DIN modular multimedia receiver. It operates on an Android Q operating system and offers mirror-link functionality for both iOS and Android devices. The receiver supports various connectivity options including Bluetooth (BT), Auxiliary (AUX), GPS, USB, SD card, AM/FM radio, and allows access to your favorite apps.

Instructions for Use

General Safety Warnings: To ensure safe operation and prevent damage, avoid placing metal objects (like coins) inside the unit, which could cause short circuits. Install the unit in a location that does not obstruct the driver's view or interfere with vehicle operations. While driving, prioritize attention to the road rather than the display. The head unit contains high-precision components, so avoid strong impacts. Do not attempt to remove the cover or adjust internal components; for maintenance, consult a professional service center.

Before Use: When purchasing optional accessories or making system settings, verify compatibility with the unit with your dealer. You can select your preferred language settings in the language menu.

Display Protection: Protect the display from damage by not using ballpoint pens or sharp tools to touch it. For cleaning, use a mildly damp soft cloth. Avoid rough cloths, alcohol, or any other corrosive liquids, as these can damage, blur, or blank the screen. Proper cleaning prevents damage. Damage resulting from improper operation is not covered by the warranty.

Note on Manual Discrepancies: The actual display screen of your device may differ slightly from the images in this manual due to unannounced software upgrades and updates; this does not affect normal use. Some functions (e.g., DVD, color LED, TV) are optional, and your specific device may not include all functions listed in this manual.

Basic Operation

The device features several keys for various functions:

  • Power/Mute (1): Press and hold for about 1 second to power off the system; a short press mutes the audio.
  • MAP (2): Accesses the map card slot.
  • MENU (3): Returns to the home page.
  • RETURN (4): Navigates back to the previous interface.
  • NAVI (5): Displays the navigation interface.
  • RADIO (6): Displays the radio interface.
  • VOL+/VOL- (7): Adjusts volume up or down.
  • USB (8): USB slot.
  • SD (9): SD card slot.
  • Reset (RST / RES) (10): If the unit malfunctions, pressing this button restores factory settings.
  • Phone (11): Displays the Bluetooth phone screen.
  • Video (12): Plays videos from an SD card or USB device.
  • Music (13): Plays music from an SD card or USB device.
  • Seek (14): Searches for the previous/next chapter or channel.
  • Mute (15): Turns off the sound.

Opening and Turning Off the System: Press the power button for 1 second to activate the system. To turn it off, press and hold the power button for 1 second.

Operating Instructions for Main Interface

Main Interface Navigation: Press the home button to return to the default main interface. You can slide left or right to navigate between different interfaces.

Moving or Removing Icons: To uninstall a program, long-press its icon. A prompt will appear asking if you want to uninstall the app.

Time and Date Settings

  1. Press the Setup icon, then select "Date & Time."
  2. Choose one of the two displayed methods for setting the time and date.
  3. Touch "<Automatic date & time>" and "" to uncheck them.
  4. Touch "" to adjust the date, then touch "done."
  5. Touch "" to adjust the time, then touch "done."
  6. Touch "
  7. Press the back button to exit.

Start Logo Setup

To set a custom boot logo: Click "logo select." Touch the ES File Explorer icon to select your car logo from a USB or SD device (the image must be in BMP format). Click the upper right corner and select "Set as Bootlogo."

Language Setup

Touch the Setup icon, then "Language & Input," then "Language," and select your desired language. Press the back button.

Steering Wheel Control Setup

  1. Click the steering wheel icon to enter key function learning.
  2. Select the function you wish to assign.
  3. Click the corresponding key on your steering wheel.
  4. Repeat steps 1 and 2 for other keys.
  5. Press "Save and Exit" to complete the setup.

Remark: If you need to reset the keys, click "Reset" and then set them again.

Colorful Lights Set

Press the colorful lights icon to choose your favorite color for the car's key lights. (Note: Some models may not support this function.)

Network Setup

Wi-Fi Setup: To connect to Wi-Fi: Touch "Settings" >> "Wi-Fi" >> turn on Wi-Fi >> select your network >> type the password >> connect.

Wi-Fi Hotspot Setup: To connect to a Wi-Fi hotspot: Touch "Settings" >> "More" >> "Tethering & portable hotspot" >> set up Wi-Fi hotspot >> enter the Security code >> touch "SAVE."

Radio Basic Operation

Controls:

  1. Band Selection: Select FM1, FM2, FM3, AM1, or AM2 band.
  2. Frequency Display: Switches to the previous or next frequency manually.
  3. Preset Channel List: Displays the preset channel list. Hold a key (P1-P6) to store the current broadcast frequency.
  4. Multi-function Menu:
    • Automatic Tuning: Tunes in a station with good reception automatically.
    • Seek Tuning: Short touch for non-stop seek tuning; touch again to cancel. Long touch for switching preset channels; long touch again to cancel.
    • LOC/DX Mode: Changes between Locate and DX mode.
    • RDS Function: Touch "" to activate the RDS function.
    • EQ and FAB Setting: See the EQ and FAB setting section below.
  5. Mono and DX: "DX" displays LOC or DX. "Mono" displays Mono or Stereo, determined by the radio IC.

Storing Channels: Press and hold the P1 key to store the current channel to P1. You can save up to 6 channels this way.

EQ and FAB Setting

  1. EQ Interface: Choose sound effects like Flat, Pop, Rock, etc.
  2. FAB Interface: Choose Loud mode, Bass on/off.

BT Control

Connecting a BT Device:

  1. Activate Bluetooth on your phone.
  2. Touch "search" on the unit to find BT devices waiting for pairing.
  3. Touch the BT Device name (e.g., "jj" or other) to connect.
  4. Type the PIN code (default is 0000 or 1234) on your phone.

Connecting a Registered BT Device Manually:

  1. Activate Bluetooth on your phone.
  2. Touch the list icon to view registered BT devices.
  3. Click the box next to the device name to connect.
  4. Type the PIN code (default is 0000 or 1234) on your phone.

Deleting a Registered Device:

  1. Touch the list icon to view registered BT devices.
  2. Click the "X" next to the device name.
  3. Touch the "X" again; a prompt "Do you want to unpair the Device?" will appear.
  4. Touch "OK" to delete the device.

Hands-Free Call:

  1. Phone Call: Touch the dial pad icon to type the phone number, then click the call icon to initiate a call. To cancel, touch the hang-up icon. To switch to speaker, touch the speaker icon.
  2. Phone Book: Touch the phone book icon to enter the BT phone book interface and follow instructions to download the phone book.
  3. Phone Call Record: Displays dialed, missed, and received calls.

BT Setup:

  1. Touch "BT" to change the device name.
  2. Touch "Pin code" to change the PIN code.

Multimedia

Playing BT Audio Device: Click the BT music icon to play music from the connected BT device. You can navigate between the last tune, next tune, and play/pause.

Music Player and Video Player: The Music Player and Video Player function when a USB or SD card containing music or video files is connected.

  • Music Player Functions: Back to folder, Pause, Cycle mode, Last tune, Next tune, EQ.
  • Video Player Functions: Play/pause, seek, previous/next video.

Android USB Connect:

  1. On your mobile, find "developer options" and turn on "USB debugging."
  2. Turn on Bluetooth on your mobile and connect to the unit's Bluetooth.
  3. Once BT is connected, touch "easy connect."
  4. Select the connecting method.
  5. The device should now be "Connected."

iPhone Wi-Fi Connect:

  1. Turn on Bluetooth on your mobile and connect to the unit's Bluetooth.
  2. Once BT is connected, touch "easy connect."
  3. Select the connecting method.
  4. The device should now be "Connected."

Note for Wi-Fi Connect: For Wi-Fi connection, ensure both the mobile and the unit are connected to the same Wi-Fi network or that the unit is connected to the mobile's Wi-Fi hotspot. Android 6.0 systems support 4G dongles; the connection process for a 4G dongle is consistent with a 3G dongle.

Set-Up

General Settings:

  • Radio Area: Set via "general settings" >> "radio area."
  • Button Sound: Set via "general settings" >> "button sound" >> "On/Off."

Display Settings:

  • Screen Brightness: Adjust via "settings" >> "display" >> "brightness." Confirm your adjustment.

Backup and Reset: To back up files and reset the system: Go to "Settings" >> "Backup & reset" >> "reset" >> "Restore the factory settings."

About Device:

  1. Go to "Settings" >> "About device."
  2. In this interface, you can view version information and host memory details.

DS18 DDX9AD Specifications

General IconGeneral
Display Size9 inches
Touch ScreenYes
Apple CarplayYes
Android AutoYes
BluetoothYes
USB Ports1
USBYes
Micro SDYes
AM/FM RadioYes
RCA OutputYes
Video OutputYes
Backup Camera InputYes
Operating SystemAndroid
Wi-FiYes
GPSYes
Rear Camera InputYes
Steering Wheel ControlYes
Audio Output4 x 50W
Compatible FormatsMP3, WMA, AAC, FLAC