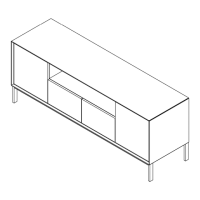
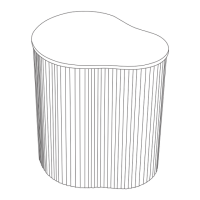
The Nova Desk is a piece of furniture designed for living, bedroom, or dining areas, intended for domestic use. It requires assembly and is designed for a two-person assembly process, estimated to take up to 30 minutes.
Technical Specifications:
- Range Name: NOVA
- Box Dimensions: L134 x W73 x H13 (cm)
Parts List:
The desk comprises various panels and supports, including:
- Top panel (1 pc)
- Bottom panel (1 pc)
- Left side panel (1 pc)
- Right side panel (1 pc)
- Middle panel (1 pc)
- Back panel (2 pcs)
- Left drawer front (1 pc)
- Right drawer front (1 pc)
- Drawer left panel (2 pcs)
- Drawer right panel (2 pcs)
- Drawer back panel (2 pcs)
- Drawer bottom (2 pcs)
- Leg (2 pcs)
- Front leg support (1 pc)
- Back leg support (1 pc)
- Metal support (2 pcs)
Fittings:
The assembly requires a variety of screws, dowels, and other components:
- M6x64 CAM Lock Screw (12pcs + 1pc extra)
- M6x44 CAM Lock Screw (10pcs + 1pc extra)
- Φ15x11mm CAM Lock (34pcs + 2pcs extra)
- M3.5x14mm Screw (30pcs + 2pcs extra)
- Φ6x25mm Wooden Dowel (8pcs + 1pc extra)
- Φ8x30mm Wooden Dowel (4pcs + 1pc extra)
- M7x50mm Screw (2pcs)
- Φ20mm Cover (8pcs + 1pc extra)
- 15x9mm Plastic Buckle (8pcs + 1pc extra)
- M6x12mm Bolt (4pcs)
- M6x30mm Bolt (12pcs + 1pc extra)
- M6x40mm Bolt (4pcs)
- 4mm Allen Key (1pc)
- M3.5x35mm Screw (8pcs + 1pc extra)
- 83x14x19mm Pusher (2pcs)
- Φ16mm Screw and Washer (2pcs)
- M6 Adjustable Foot (4pcs)
- 340mm Slide (4pcs)
- Φ8mm Expansion Tube (2pcs)
- M4x40mm Screw (2pcs)
- 76x32mm L-shaped Bracket (2pcs)
- M4x12mm Screw (2pcs)
Usage Features:
The Nova Desk is designed for general domestic use in various rooms. It includes two drawers for storage, which are assembled with slides for smooth operation. The desk features adjustable feet (M6 Adjustable Foot) to ensure stability on uneven surfaces. The L-shaped brackets are provided for fixing the desk to a wall, enhancing stability and safety, especially in homes with children or pets. The desk's design incorporates leg supports and metal supports for structural integrity.
Assembly Instructions:
- Preparation: Before starting, identify all parts and fittings. Lay them out on a clean, flat floor to ensure all components are present and to familiarize yourself with them.
- Location: Assemble the table in its intended room to avoid damage during movement.
- Slide Separation: The 340mm slides must be separated before assembly. This involves extending the slide, pushing a lever (up for the left drawer, pressing for the right drawer), and then removing the runner. The sliding module must be at the front end when connecting.
- Top Panel Assembly: Attach the M6x64 CAM Lock Screws, M6x44 CAM Lock Screws, Φ15x11mm CAM Locks, 76x32mm L-shaped Brackets, and M4x12mm Screws to the top panel.
- Bottom Panel Assembly: Attach the M6x64 CAM Lock Screws, Φ15x11mm CAM Locks, 83x14x19mm Pushers, and M3.5x14mm Screws to the bottom panel.
- Side Panel Attachment: Attach the left and right side panels to the top panel using Φ15x11mm CAM Locks and Φ6x25mm Wooden Dowels.
- Middle Panel Attachment: Attach the middle panel to the frame using Φ15x11mm CAM Locks and Φ8x30mm Wooden Dowels.
- Side and Middle Panel Fittings: Attach M3.5x14mm Screws and Slide-R1 (part of the 340mm Slide) to the left side panel, right side panel, and middle panel.
- Back Panel Installation: Insert the two back panels into the frame.
- Bottom Panel Attachment to Frame: Attach the bottom panel to the assembled frame using Φ15x11mm CAM Locks, Φ6x25mm Wooden Dowels, and Φ8x30mm Wooden Dowels.
- CAM Lock Tightening: Tightly lock all CAM Locks using M7x50mm Screws and the 4mm Allen Key.
- Leg and Leg Support Attachment: Attach the legs to the leg supports using M6x40mm Bolts and the 4mm Allen Key. Install the M6 Adjustable Feet.
- Legs to Frame Attachment: Attach the assembled legs to the main frame using M6x30mm Bolts and the 4mm Allen Key.
- Metal Support Attachment: Attach the metal supports to the frame and securely tighten the M6x12mm Bolts using the 4mm Allen Key.
- Plastic Buckle Installation: Attach the 15x9mm Plastic Buckles using M3.5x14mm Screws.
- Drawer Assembly (Part 1): Attach the Φ16mm Screw and Washer, and M6x44 CAM Lock Screws to the drawer front panels.
- Drawer Assembly (Part 2): Assemble the drawer components (drawer left panel, drawer right panel, drawer back panel) using M3.5x35mm Screws.
- Drawer Base and Front Attachment: Slide the drawer bottom into the assembled drawer frame. Attach the drawer front by locking the CAM Locks tightly using Φ15x11mm CAM Locks and Φ20mm Covers. Attach M3.5x14mm Screws and Slide-R2 (part of the 340mm Slide) to the drawer.
- Drawer Installation: Assemble the completed drawers into the desk.
- Pusher Adjustment: Adjust the pushers to the appropriate position for smooth drawer operation.
- Wall Fixing (Optional but Recommended): Fix the L-shaped brackets to the wall using Φ8mm Expansion Tubes and M4x40mm Screws for added stability.
Safety and Care:
- Safety Precautions:
- Do not stand on the product.
- Pregnant women should exercise additional care.
- Do not leave children unattended; direct adult supervision is required during use.
- Always use on a firm, level ground, ensuring all legs maintain contact with the surface.
- Keep children and animals away from the assembly area due to small components that pose a choking hazard.
- Keep all plastic and wrapping materials away from children and animals to prevent suffocation.
- Maintenance:
- Cleaning: Use only a clean, colorless sponge or cloth. Avoid bleach or abrasive cleaners, which can damage the tabletop. Do not use a very wet cloth or allow liquids to contact the table for extended periods; wipe spills immediately. Do not scrub or rub the surface when cleaning.
- Moving: Lift the table off the floor instead of dragging it to prevent damage.
- Heat Protection: Use placemats or coasters for hot items (e.g., hot drinks, dishes).
- Placement: Avoid placing the desk next to heat sources (radiators, fires) or in direct sunlight.
- Fixings: Regularly check all fixings and re-tighten if necessary.
- Sharp Objects: Avoid using sharp items like screwdrivers or pointy tools on the surface.
- Packaging: Dispose of all packaging carefully and responsibly, recycling where possible.
- Surface Protection: Due to the delicate nature of the product, gently place hard items onto the tabletop to prevent surface damage.
Support and Recycling:
- Customer Service: For questions or issues, contact the customer service team at 0113 519 0311.
- Recycling: Dispose of packaging safely and environmentally friendly, recycling where possible. Keep assembly instructions for future reference.