Do you have a question about the E-Z UP Vantage and is the answer not in the manual?
Steps to unpack and partially open the E-Z UP® Frame before attaching the top.
How to attach the fabric top to the frame using hook and loop strips.
Procedure for securing the fabric top to frame attachment points using nuts and bolts.
Instructions for fully opening the E-Z UP® shelter with a partner.
How to engage and secure the Auto-Slider® Pull Pin for frame stability.
Steps for extending and locking the shelter frame legs at desired heights.
Procedure for retracting the shelter legs using the toggle button.
How to release the Auto-Slider® Pull Pin to allow leg collapse.
Steps for folding the shelter frame completely and storing it.
Guidelines for cleaning and maintaining the shelter for longevity.
Crucial safety precautions and warnings for using the instant shelter.
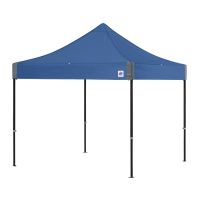
The E-Z UP® Vantage™ Instant Shelter® is a portable, temporary shelter designed for quick and easy setup, providing shade and protection from the elements. It is ideal for various outdoor activities, offering a convenient solution for instant shelter needs.
The primary function of the E-Z UP® Vantage™ is to provide a temporary, portable shelter. It features a collapsible frame that allows for rapid deployment and takedown, making it suitable for events, markets, recreational use, and other outdoor gatherings where quick shade is required. The shelter includes a fabric top that attaches securely to the frame, offering protection from sun and light weather conditions. Its design emphasizes ease of use, enabling individuals to set up and pack away the shelter efficiently. The shelter is designed to be secured to the ground using stakes or weight bags, ensuring stability in various outdoor environments.
The E-Z UP® Vantage™ is engineered for user-friendly operation, incorporating several features that streamline its setup, use, and takedown.
The initial installation of the fabric top is a straightforward process. Users begin by placing the E-Z UP® Frame in the desired area and partially opening it. With a partner, two outer legs are grasped, and the frame is lifted slightly off the ground, pulling backward to open it to about half its fully-opened size. Once the frame is set back on the ground, the fabric top is gently unfolded and placed over the semi-opened frame. The fabric top is then attached to the frame by matching and pressing together the Hook and Loop strips located on the inside corners of the fabric top with those on each frame corner. After securing the corners, the fabric top is pulled down over the frame corners, ensuring a snug fit.
To further secure the top, grommet holes on the sides of the fabric top are aligned with the frame's top attachment points, which are marked by RED tags. A coin is used to unscrew the Top Attachment Nut from the frame bolt. The fabric top's grommet is then placed onto the frame bolt, and the top attachment nut is screwed back on and tightened until snug. It's important not to overtighten, allowing the top fabric to rotate easily. This procedure is repeated for all top attachment points, with the recommendation to hold the bolt assembly with one hand while tightening the nut with the other.
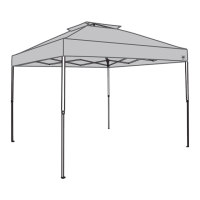
Opening the E-Z UP® Shelter is a collaborative effort. With a partner on the opposite 10' side, users grasp the bottom of the diamond-shaped area of the outer trusses near the "OPEN HERE" sticker. The frame is then lifted slightly, and users step backward, pulling the shelter open until it is almost fully extended. A gentle shake helps in opening the shelter, while caution is advised to avoid pinching fingers.
Once the shelter is mostly open, the Auto-Slider® Pull Pin needs to be engaged. This involves folding up the fabric top corner to expose the pull pin. The shelter corner is then lifted slightly off the ground, and the Auto-Slider® Pull Pin is engaged by pushing up on the frame side trusses with one hand while holding down the top of the frame leg with the other. The pins are designed to auto-engage once aligned with the holes on the frame legs. After the pull pin locks into place, the fabric top is pulled down over the frame leg, ensuring the hook and loop strips on the fabric top align and secure to the frame. This process is repeated for all remaining corners.
To extend the legs, two adjacent outer legs are lifted simultaneously to about waist height with a partner. The lower/inner legs are then slid out until the leg adjustment toggle buttons lock at the selected height on each leg. The shelter offers five adjustment settings for height. The middle leg is then lowered until its toggle button locks, and this process is repeated for the remaining legs. For optimal stability, it is recommended to use genuine E-Z UP® Deluxe Weight Bags and/or Heavy-Duty Stake Kits to secure the shelter.
Collapsing the shelter legs begins by depressing the toggle button on one of the middle legs to slide the lower/inner leg section into the upper/outer leg. With a partner, two adjacent corner legs are slightly lifted simultaneously. The toggle button is then depressed, and the lower/inner legs are slid into the upper/outer legs, ensuring two legs are retracted at a time. This is repeated for the remaining legs, keeping the toggle button depressed during retraction.
To release the Auto-Slider® Pull Pin, one hand is used to slightly push up on the truss near the pull pin to relieve pressure. With the other hand, the pull pin is released by pulling its ring. This process is repeated for the remaining legs.
To close the shelter, the frame is grasped on the top of the diamond-shaped area of the center outer trusses on opposite sides, near the "CLOSE HERE" sticker. The shelter is then lifted slightly and shaken while stepping toward a partner until it is approximately three-quarters closed, again being careful to avoid pinching fingers. Finally, the two outer legs are grasped, and the frame is pushed together until it is fully closed. The shelter is then stored in the provided cover bag, with a recommendation to hug the shelter before placing it in the bag.
To ensure the long-lasting durability and best possible protection of the E-Z UP® Vantage™ Instant Shelter® products, several care and maintenance instructions are provided:
The fabric top should be cleaned using a mild soap (not detergent) and plenty of water. After cleaning, both the E-Z UP® top and frame should be allowed to dry completely before closing or storing to prevent mildew.
The frame's operation and appearance can be enhanced by occasionally treating it with silicone spray, especially before and after use in damp conditions. Any excess silicone residue should be removed before applying the top. If the frame bolts become loose over time, they should be slightly tightened.
If the top leaks or drips water, a seam sealer (available at most sporting and hardware stores) can be applied to the seams.
Replacement parts for all shelter sizes are available through the manufacturer's website or by contacting customer service.
The product comes with a SEVEN-YEAR warranty from the date of original purchase, covering defects in material or workmanship for normal and expected uses. The warranty is limited to the repair or replacement of the product or its parts, at the manufacturer's option, after review and examination. To initiate a warranty claim, specific return shipping instructions must be obtained by submitting a Warranty Claim Form online or by contacting customer service. All shipping costs for warranty returns must be prepaid, and the manufacturer is not responsible for products damaged in transit.
Users are advised to always stake or weigh down the shelter with genuine E-Z UP® accessories and avoid using it in potentially windy or rainy weather, as wind and rain can damage the product and cause injury. The shelter is designed as a temporary shelter and should not be left up for extended periods. Caution should be exercised when handling the folding frame to avoid pinching hands or fingers. The shelter should not be used in a lightning storm, left unattended, or used to build fires within its enclosure.
All flame and heat sources must be kept away from Instant Shelter® fabrics and accessories. These fabrics meet the flammability requirements of CPAI-84, but the fabric may burn if left in continuous contact with any flame source. Applying foreign substances to the fabric may render its flame-resistant properties ineffective. The fabrics also comply with CAN/ULC-S109 National Standard of Canada, Flame Tests of Flame-Resistant Fabrics and Films.
| Coverage Area | 100 sq ft |
|---|---|
| Carry Bag Included | Yes |
| Size | 10 x 10 ft |
| Frame Material | Steel |
| Top Material | Polyester |
| Water Resistance | Water Resistant |