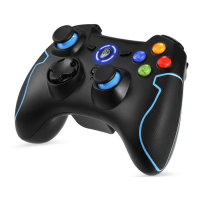
The AL-NS2076 Switch Bluetooth Controller is a versatile game controller designed for multiple platforms, including Nintendo Switch, PC, and mobile phones. It functions as a Switch PRO controller, offering advanced features such as macro-defined programming keys, a turbo key, and vibration adjustment.
Function Description:
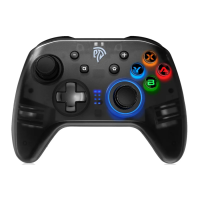
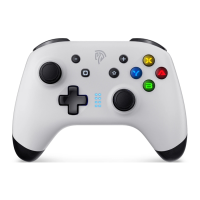
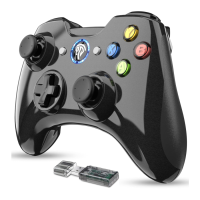
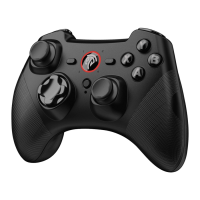
The controller provides a comprehensive set of buttons and controls for an immersive gaming experience. Key components include:
- R Button and L Button: Standard shoulder buttons.
- RT Button and LT Button: Analog triggers for precise input.
- [+] Button and [-] Button: Plus and Minus buttons, typically used for menu navigation on Switch.
- Turbo Button: Activates the turbo burst function for rapid input.
- Left Analog Stick/L3: Primary analog stick with a clickable L3 function.
- Screenshot Button: Captures screenshots on compatible platforms.
- Directional Pad: For directional input.
- Action Buttons (A, B, X, Y): Standard face buttons.
- Right Analog Stick/R3: Secondary analog stick with a clickable R3 function.
- M1 Button and M2 Button: Macro-defined programming keys.
- SET Button: Used for programming macro functions.
- ON/OFF Switch: Powers the controller on or off.
- HOME Button: Returns to the home screen on compatible platforms.
- LED Indicator: Displays connection status and charging information.
- Vibration Motor: Provides haptic feedback during gameplay.
Important Technical Specifications:
- Charging Voltage: 5V
- Recharging Current: 250mA
- Battery Capacity: 600mAh
- Charging Time: 2.5-3 hours
- Product Weight: 213.4g
- Product Size: 15.5 x 6.5 x 10.6 cm
Usage Features:
Bluetooth Connection and Pairing:
- Connect to Switch:
- Press and hold the Home button for 3 seconds while the controller is off. The LED indicators (1-4) will flash quickly, indicating Bluetooth pairing mode.
- On the Switch, navigate to "Controller" and then "Change Grip/Order." The controller will automatically recognize and pair with the Switch host. Upon successful connection, the corresponding channel LED light will remain on.
- Connect to Android Phone:
- Press the "A" button and "Home" button simultaneously to enter Bluetooth pairing mode.
- LED2 and LED3 lights will flash. After a successful connection, LED2 and LED3 will remain on.
- Connect to iOS Phone:
- Press the "X" button and "Home" button simultaneously to enter Bluetooth pairing mode.
- LED1 and LED4 lights will flash. After a successful connection, LED1 and LED4 will remain on.
Note: iOS only supports system versions above 13.0.
Connect to PC:
- USB Cable Connection: Connect the controller to the PC via a USB cable. The indicator light will turn on after a successful connection.
- Default Xinput Mode: By default, the controller operates in Xinput mode, with LED1 and LED4 lights on.
- Switch to Dinput Mode: To switch to Dinput mode, long-press the "+" key and "-" key combination for 5 seconds. LED2 and LED3 lights will turn on.
- Steam Platform (Switch Mode): In the shutdown state, press and hold the R3 key (right 3D joystick down key). While holding R3, connect the USB data cable. Release the R3 key, and LED1 will light up, enabling audio features.
- Activating Turbo: Press a function key (e.g., A, B, X, Y, RB, LB, RT, LT, or directional pad) along with the "T" key to enable the Turbo burst function for that key.
- Turbo Setting Steps:
- Press the function key + T key once: Enters semi-automatic burst function.
- Press the function key + T key a second time: Enters automatic burst function.
- Press the function key + T key a third time: Cancels the Turbo burst function for that key.
- Clear All Turbo Functions: Press and hold the "T" key for 5 seconds to cancel the burst function for all programmed keys.
Motor Vibration Intensity Adjustment:
- Vibration Settings: The controller offers three vibration intensity levels: strong, medium (default), and weak.
- Adjustment Method: Press the vibration button to cycle through the intensity levels. The conversion order is: medium → strong → weak.
- Note: Vibration switching is only supported in Switch mode.
Macro Definition Programming Settings:
- Turn On/Off Programming: Toggle the programming key switch on the back of the controller to "ON" to enable programming, and "OFF" to disable it.
- Single Key Macro Definition:
- Press the "SET" button. LED2 and LED3 will light up, indicating entry into macro definition programming.
- Press either the M1 or M2 key once. LED2 will turn on, confirming that the M1/M2 key has been selected for programming.
- Press the desired function key to be mapped.
- Press the "SET" key again to exit programming mode. The LED light will return to the channel indicator state, and the one-key programming is successful.
- Multiple Function Key Macro Definition:
- Press the "SET" button. LED2 and LED3 will light up, indicating entry into macro definition programming.
- Press either the M1 or M2 programming key once. LED2 will turn on, confirming that the M1/M2 key has been selected for programming multiple function keys.
- Press a sequence of function keys (e.g., 1st function key + 2nd function key + 3rd function key + ...N function keys). The user can define the trigger interval time between function keys based on the timing of presses before and after mapping.
- Press the "SET" key again to exit programming mode. The LED light will restore the channel indicator state, and the multi-key macro definition function is successfully set.
Audio Headphone Jack Description:
- Audio on Switch Platform: Use a USB data cable to connect to the Switch host, and a 3.5mm plug for wired headset audio.
- Audio on Steam Platform: In the shutdown state, press and hold the R3 key (right 3D joystick down button). While holding R3, insert the USB data cable. Release the R3 key, and LED1 will light up, enabling the 3.5mm plug for wired headphone audio.
- Note: The controller's audio function is only available when the controller is in Switch wired connection mode.
Maintenance Features:
Charging:
- When turned off: All LED lights will flash slowly during charging and turn off when fully charged.
- When in use: The LED indicator of the currently connected channel will flash slowly during charging and remain on when fully charged.
Packing List:
- 1x Switch Bluetooth Controller
- 1x Product manual
- 1x USB data cable
- 1x Aftermarket card
Precautions:
- Avoid using or storing the product in humid environments.
- Protect the product from dust and heavy pressure to ensure its service life.
- Do not immerse the product in water, subject it to bumps, or break it due to improper use, as this can affect its electrical performance.
- If any problems occur, discontinue use immediately.
- Do not dry the product with external heating equipment, such as microwave ovens.
- Keep the product out of reach of children.
After-sale services:
For any problems or suggestions, customers are encouraged to contact EasySMX for support.
- United States: easysmx@easysmx.com
- United Kingdom: easysmx@easysmx.com
- France: fiona@easysmx.com
- Germany: leslie@easysmx.com
- Spain: support.es@easysmx.com
- Italy: support.it@easysmx.com
- Russia: support.ru@easysmx.com
- Japan: support.jp@easysmx.com