This document is a user manual for the EasySMX ESM-9101 Game Controller. It provides instructions on how to use, connect, and troubleshoot the device across various platforms.
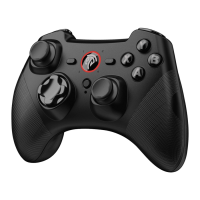
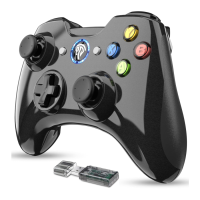
The EasySMX ESM-9101 is a versatile game controller designed for an enhanced gaming experience. It utilizes 2.4G Wireless Technology, allowing for a cable-free connection to compatible devices. The controller is equipped with a standard layout, featuring two joysticks, a D-pad, action buttons (X, Y, A, B), shoulder buttons (LB, RB), and triggers (LT, RT). Additionally, it includes "Back," "Home," and "Start" buttons, along with a "TURBO" button for special functions. LED indicators (LED1, LED2, LED3, LED4) are integrated to display connection status, charging status, and active mode. A "Reset Hole" is also present for troubleshooting purposes.
Function Description:
The primary function of the ESM-9101 game controller is to provide intuitive and responsive input for gaming across multiple platforms. It allows users to control in-game characters and actions with precision, offering a more immersive experience than keyboard and mouse controls for many game types. The controller supports vibration feedback, which enhances immersion by providing tactile responses to in-game events, such as collisions or explosions.
A key feature of this controller is its multi-platform compatibility. It can connect to:
- PC: The controller supports both Xinput and Dinput emulation modes. Xinput is the default mode for modern PC games, offering broad compatibility. Dinput emulation provides support for older games that may not recognize Xinput controllers. There's also a Dinput digit mode and an Android mode for PC, expanding its versatility.
- PS3: The controller can connect to a PlayStation 3 console, allowing users to play PS3 games with the ESM-9101. The PS3 console supports up to seven game controllers, with specific LED indicators showing which controller number is active.
- Android Smartphones/Tablets: With the use of a Micro-B/Type C OTG adapter (not included), the controller can be connected to Android mobile devices, enabling gaming on the go.
The "TURBO" function is a notable feature, allowing users to assign rapid-fire capabilities to any button. This can be particularly useful in games requiring fast, repeated button presses, providing a competitive edge or simply reducing user fatigue.
Usage Features:
Power On/Off:
To power on the controller, the user simply plugs the USB receiver into their device (PC, PS3, or Android device via OTG adapter) and then presses the "Home" button once. The controller will automatically connect to the device. The controller does not have a manual power-off button in the traditional sense. Instead, it powers off automatically under certain conditions:
- If the receiver is unplugged, the gamepad will power off after 30 seconds of being unconnected.
- If the gamepad remains connected to a device but receives no operation for 5 minutes, it will shut down automatically to conserve battery.
Charging:
The controller is charged via an included USB cable, which connects to a PC. The LED indicators provide clear feedback on the charging status:
- If the controller is connected to a device during charging, the corresponding LED indicator will flash slowly. Once fully charged, the LED will stay on.
- If the controller is not connected to any device while charging, all four LED indicators will flash slowly. They will turn off once the gamepad is fully charged.
- When the battery is low, the corresponding LED indicator will flash, alerting the user to recharge.
Connecting to PC:
- Insert the USB receiver into the PC.
- Press the "Home" button. The controller will auto-connect, and LED1 and LED2 will stay on, indicating Xinput mode.
- To switch to Dinput emulation mode, press and hold the "Home" button for 5 seconds. LED1 and LED3 will glow solid.
- To switch to Dinput digit mode, press the "Home" button once. LED1 and LED4 will stay on.
- To switch to Android mode, press the "Home" button for 5 seconds. LED3 and LED4 will stay on. Pressing it for another 5 seconds will return to Xinput mode.
The manual notes that one computer can pair with multiple game controllers, suggesting multi-player support.
Connecting to PS3:
- Plug the receiver into a free USB port on the PS3 console.
- Press the "Home" button. The gamepad will power on and automatically connect to the PS3.
The LED status table in the manual clarifies which LED(s) will stay on to indicate the controller's assigned number (1st through 7th) on the PS3.
Connecting to Android Smartphone/Tablet:
- Plug a Micro-B/Type C OTG adapter (not included) into the Nano receiver.
- Plug the receiver (with adapter) into the phone or tablet.
- Press the "Home" button. LED3 and LED4 will keep on, signifying a successful connection.
Important notes for Android connection include ensuring the Android device fully supports OTG function and understanding that Android games currently do not support vibration. If the gamepad attempts to pair in a non-Android mode, pressing the "Home" button for 5 seconds will correct it.
- To set a button with the TURBO function, press and hold the desired button, then press the "TURBO" button. The TURBO LED will flash, confirming the setting. This allows for rapid input by simply holding down the assigned button during gameplay.
- To disable the TURBO function for a specific button, hold down that button again and simultaneously press the "TURBO" button.
Maintenance Features:
Notice and Troubleshooting:
The manual provides important notices and a FAQ section to help users maintain and troubleshoot their controller:
- Pairing Issues: If pairing fails, all LEDs will flash rapidly. Pressing the "Home" button is recommended to force pairing.
- Environmental Care: Users are advised to keep the gamepad away from water and high-temperature conditions to prevent damage.
- Child Safety: Children should use the product under parental supervision.
- Button Test: A method for testing button functionality on a PC is described, involving navigating to "Device and Printer" settings, then "Game Controller Settings," and finally "Property" to access a visual button test interface. This allows users to verify if all buttons are registering correctly.
FAQ for Common Issues:
- USB Receiver Not Recognized:
- Verify the PC's USB port is functional.
- Try another free USB port, as insufficient power can cause unstable voltage.
- For Windows XP or older operating systems, installing the X360 game controller driver is necessary.
- Controller Not Working In-Game:
- Confirm that the game supports game controllers.
- Check the in-game settings to ensure the gamepad is properly configured.
- No Vibration:
- Determine if the game supports vibration feedback.
- Verify that vibration is enabled in the game settings.
- Connection Failure:
- Recharge the gamepad if it's running on low batteries.
- Ensure the gamepad is within the effective wireless range of the receiver.
The manual concludes with after-sale services information and contact details for various regions, emphasizing customer support for any problems or suggestions.