6
INM MTL 130-0175 Rev 4
4 OPERATION
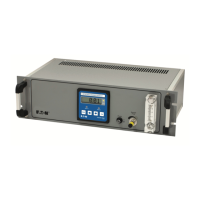
4.1 First Checks
With the sensor and electronic unit connected up to each other and electrical supplies, the
instrument is ready for use. Ensure that all the connections are correct and that the actual
supply voltage is the same as that set at the voltage selector. Check all piping connections for
tightness.
4.2 Start-up
With all the initial checks completed and found to be satisfactory, apply power to
the instrument.
When power is applied the concentration read-out will display briefly its start-up messages and
then, as the sensor heater warms up, the sensor temperature controller’s display will alternate
between indicating the rising sensor temperature and ‘ALARM’. Once the temperature
has reached its normal level, the controller display goes to a constant display of sensor
temperature. During the warm up period the concentration meter read-out and signal output
will be seen to go up and down the scale once or twice; this is quite normal.
CAUTION
Under no circumstaces pass a combustible sample until both the catalyst and sensor
are at their normal operating temperatures.
The instrument is calibrated prior to dispatch and is ready for immediate use, once warmed up.
User quality assurance procedures may require that a calibration check is made before use. If
this is the case then proceed to section 4.3, otherwise go to section 4.4.
4.3 Calibration check
The procedure requires two gases; one a standard gas with a known oxygen content of
between 0.5% and 2% of oxygen in nitrogen, and air. It is important that these gases contain
no combustible gas. The oxygen in nitrogen mixture may be obtained in cylinders from a
number of gas suppliers. The cylinder will need to be fitted with a regulator. The calibration
gases are introduced through the normal sample inlet. Either the sample will need to
disconnected, or a suitable manifold of valves will need to be arranged. Any source of the
normal sample should be removed when performing a calibration check.
Firstly connect the air and adjust the flow to between 150 and 250 ml/min. Allow the system
to stabilise for at least 60 seconds.
When the reading is stable, press and hold the Calibrate button for approximately 8 seconds.
The display will go blank for a moment and then show “H xxxx”; where H indicates that the
high calibration point is selected. Use the up/down arrow buttons to set the reading to 20.9%,
and then press the Edit button momentarily to reset the calibration. The display will now
show “H 20.9”. Press and hold the Calibrate button for a further 8 seconds. The display will
now show “Lxxxx” where “ L” indicates that the low calibration point is selected and “XXXX”
is the measured value of the gas passing across the sensor.
Now apply the 0.5 to 2% standard calibration gas and adjust the flow as before. Allow the
reading to stabilise and use the up/down arrow buttons to set the reading to the correct
concentration. Press the Edit button momentarily to reset the calibration and return to normal
measurement mode.
4.4 Commissioning
If a calibration check has been conducted ensure the standard calibration gas connection is
removed. The air gas mixture stream may now be applied. The flow control valve should be
turned fully clockwise (closed) prior to applying the mixture to the analyser. This is to avoid
passing high flow rates through the system.
 Loading...