Separate collection of used machine and
packaging let you recycle materials and use
them again. Use of the recycled materials
helps prevent environmental pollution and
decreases the requirements for raw materi-
als.
At the end of their useful life, discard batter-
ies with a precaution for our environment.
The battery contains material that is danger-
ous to you and the environment. You must
remove and discard these materials separate-
ly at a location that accepts lithium-ion bat-
teries.
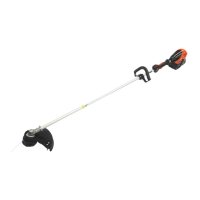
8 INSTALLATION
8.1 UNPACK THE MACHINE
WARNING
Read the operator's manual carefully to ensure that you
assemble the product correctly. Using a product that has
been incorrectly assembled could lead to an accident or
serious injury.
WARNING
• If parts of the machine are damaged, do not use the
machine.
• If you do not have all the parts, do not operate the
machine.
• If parts are damaged or missing, contact your dealer.
1. Open the package.
2. Read the documentation provided in the box.
3. Remove all the unassembled parts from the box.
4. Remove the machine from the box.
5. Discard the box and packing material in compliance with
local regulations.
8.2 ATTACH THE EDGE GUIDE
Figure 2.
NOTE
The edge guide can limit the cutting range of the machine
and decrease the risk of the damage caused by the rotating
cutting line.
1. Push the edge guide onto the trimmer head until it
engages in the slots.
2. The edge guide can be flipped up for storage.
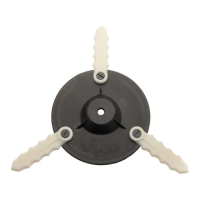
8.3 ATTACH THE GUARD
Figure 3.
WARNING
Do not touch the cut-off blade.
1. Remove the screws from the guard with a Phillips head
screwdriver.
2. Put the guard onto the trimmer head.
3. Align the screw holes on the guard with the screw holes
on the trimmer head.
4. Tighten the screws.
8.4 ATTACH THE FRONT HANDLE
Figure 4.
1. Remove the screws from the handle with a Phillips
screwdriver.
2. Match the concave of the handle and lower clamp with
the convex of the shaft.
3. Set the auxiliary handle in the comfortable position.
4. Tighten the screws.
8.5 INSTALL THE BATTERY PACK
Figure 5.
WARNING
• If the battery pack or charger is damaged, replace the
battery pack or the charger.
• Stop the machine and wait until the motor stops before
you install or remove the battery pack.
• Read, understand, and follow the instructions in the
battery and charger manual.
1. Align the lift ribs on the battery pack with the grooves in
the battery compartment.
2. Push the battery pack into the battery compartment until
the battery pack locks into place.
3. When you hear a click, the battery pack is installed.
8.6 REMOVE THE BATTERY PACK
Figure 5.
1. Push and hold the battery release button.
2. Remove the battery pack from the machine.
9 OPERATION
DANGER
All over head electrical conductors and communications
wires can have electricity flow with high voltages. This unit
is not insulated against electrical current. Never touch wires
directly or indirectly, otherwise serious injury or death may
result.
8
English Original Instructions
EN