Do you have a question about the Ecolab Apex2 and is the answer not in the manual?
Explains the Apex2 system's purpose and benefits.
Details the overall capabilities and functions of the Apex2 system.
Describes features related to detergent dispensing.
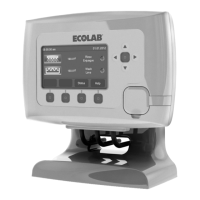
Provides physical dimensions and space needs for the controller and I/O box.
Lists the physical dimensions of the Apex2 controller unit.
Lists the physical dimensions of the Apex2 I/O enclosure.
Outlines the power and signal input specifications for the Apex2.
Lists the components included in the new customer install kit.
Lists the components included in the retrofit kit for upgrading to Apex2.
Lists components for the dual pump new customer install kit.
Provides instructions for installing the Apex2 controller unit.
Details the steps for securely mounting the Apex2 controller.
Instructions for connecting the RS-485 communication cable.
Steps for mounting and adjusting the controller's viewing angle.
Instructions for mounting the Apex2 I/O enclosure.
Guidelines for selecting the location and installing the inductive probe.
Step-by-step guide for drilling and installing the inductive probe into the wash tank.
Instructions for installing the rinse thermistor and injection point.
Instructions for connecting water lines to the unit.
Instructions for connecting the water line to the detergent valve.
Details the installation of an optional pressure switch.
Covers electrical wiring and connection procedures.
Covers wiring for power and machine signals.
Explains how the Apex2 receives its main power supply.
Details the provided power and signal wire cable.
Specifies requirements for enclosing the electrical cable in conduit.
Instructions for connecting the main power wires.
How to connect the detergent signal input.
How to connect the rinse signal input.
Details how to connect components to the Apex2 I/O board.
Instructions for installing the cable sealing block to prevent moisture ingress.
Steps to reconfigure the rinse aid out-of-product signal for Apex2.
Instructions for disconnecting and removing the old Apex board.
Steps to remove the Sonalert from the I/O enclosure.
Instructions for removing the Apex controller board and cover.
Instructions for installing the RS-485 cable sealing assembly.
Detailed steps for installing the Apex2 I/O board and connecting components.
Configures the dishmachine type (Door, Conveyor, Flight) to set dispensing parameters.
Selects the specific detergent, rinse aid, and third product used.
Sets specific dispensing parameters like set points, delays, and speeds.
Configures alarm volume, delays, and mute times.
Details the priority order for different alarm conditions.
Addresses common questions regarding Apex2 operation and troubleshooting.
Actions to take when the Apex2 controller screen is blank.
Steps to resolve a frozen or locked-up Apex2 controller.
Troubleshooting steps for I/O communication alarms.
Diagnoses and resolves issues with detergent dispensing.
Addresses issues where the controller continuously feeds detergent.
Troubleshoots why the rinse pump is not activating.
Diagnoses discrepancies between controller and gauge wash temperatures.
Diagnoses discrepancies between controller and gauge rinse temperatures.
Resolves continuous rinse additive out-of-product alarms.
Troubleshoots when the rinse pump runs but no additive is injected.
Steps to resolve issues with the rinse aid pump not priming.
Addresses inaccuracies in rack counting.
Troubleshoots problems with the Ethernet connection.
Provides step-by-step instructions for replacing squeeze tubes.
Provides estimated rinse volume based on time and speed.
Settings for detergent dispensing parameters.
Settings for rinse aid dispensing parameters.
Settings for third product dispensing parameters.
Configuration for Door Probe mode dispensing.
Provides diagnostic information related to the probe and set point.
Shows the status of dispenser lid switches (open/closed).
Displays status of machine wash and rinse signals.
Shows the out-of-product status for detergent, rinse aid, and sanitizer.
Allows testing of individual dispensing components like valves and pumps.
Configures machine mode, product selection, and languages.
Selects the specific detergent, rinse aid, and third product used.
Selects the primary and secondary display languages.
Configures alarm volume, delays, and mute times.
Sets the controller's date, time, and time zone.
Selects between English or metric units for measurements.
Resets the controller to its factory default settings.
Allows setting or calibrating tablet values, like rack time.
Displays counts of various events like total racks, racks without product, etc.
Shows total signal time and run time for detergent, rinse, and third product.
Provides a chronological log of alarm activations and deactivations.
Displays serial number, build date, and software version for the controller.
Displays serial number, build date, and firmware version for the I/O board.
| Brand | Ecolab |
|---|---|
| Model | Apex2 |
| Category | Control Systems |
| Language | English |