Do you have a question about the ECS 945GCT-M3 and is the answer not in the manual?
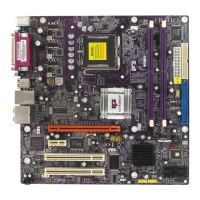
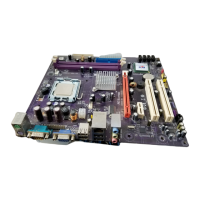
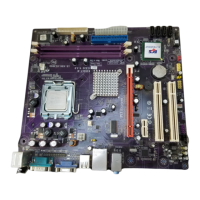
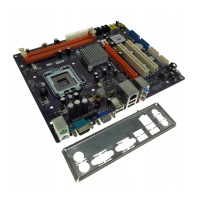
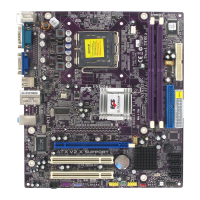
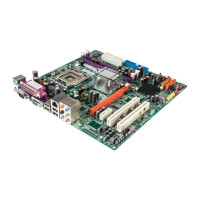
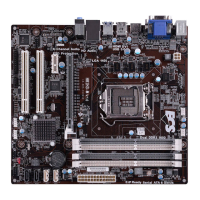
Provides an overview of the motherboard and its key features and specifications.
Details the technical features of the motherboard, including processor, chipset, and memory support.
Details the integrated input/output ports and connectors on the motherboard.
Identifies and describes the various components and connectors on the motherboard.
Describes the available expansion slots like PCI Express and PCI slots for add-on cards.
Outlines essential safety measures to follow before and during motherboard installation.
Guides users on selecting a compatible computer case based on motherboard form factor and requirements.
Provides instructions on physically mounting the motherboard inside a computer case.
Explains how to check and set motherboard jumpers for correct system configuration.
Details the process of installing hardware, focusing on CPU installation.
Guides users through the procedure of installing DDR2 SDRAM memory modules into the motherboard slots.
Describes how to install expansion cards into the motherboard's expansion slots.
Provides instructions for installing IDE and SATA hard drives and CD-ROM drives.
Guides the user on connecting the floppy diskette drive to the motherboard connector.
Explains how to connect external devices to the motherboard's backplane I/O ports.
Details how to connect internal case components like fans, switches, and LEDs to the motherboard headers.
Describes the pin assignments for the front panel header for case switches and LEDs.
Introduces the BIOS Setup Utility and its function in configuring system parameters.
Explains the procedure to access the BIOS Setup Utility by pressing a key during system startup.
Lists and describes the keyboard keys used for navigating and operating within the BIOS Setup Utility.
Details system information display and basic configuration settings like date, time, and IDE devices.
Covers advanced system settings, CPU features, and boot device priority configurations.
Explains critical motherboard timing parameters and settings related to DRAM and graphics.
Defines operations of peripheral components like IDE, USB, and onboard audio devices.
Allows control over system power-saving modes, timeouts, and wake-up features.
Configures Plug and Play (PnP) and PCI expansion card operations, including IRQ and DMA assignments.
Monitors critical system parameters like voltages, temperatures, and fan speeds.
Enables adjustment of the CPU clock speed and system bus frequency.
Installs stable, fail-safe default settings for system stability and troubleshooting.
Installs optimized default settings for maximum performance, if supported by hardware.
Allows setting supervisor or user passwords for system security and BIOS access control.
Saves the current BIOS configuration changes and exits the Setup Utility.
Discards any changes made in the BIOS Setup Utility and exits without saving.
Provides instructions for downloading and installing updated BIOS versions from the manufacturer's website.
Describes the contents of the support CD-ROM, including drivers and utility programs.
Explains the automated installation process for drivers and software on Windows 2000/XP systems.
Guides users on manually installing drivers and software if the auto-install feature fails or is not used.
Provides information on available utility software, its compliance, and licensing terms.
| Form Factor | Micro ATX |
|---|---|
| Socket Type | LGA 775 |
| Supported CPU | Intel Core 2 Duo / Pentium D / Pentium 4 / Celeron D |
| Memory Type | DDR2 |
| Memory Slots | 2 |
| Maximum Memory Supported | 4 GB |
| IDE | 1 x ATA100 |
| Audio Chipset | Realtek ALC662 |
| LAN Chipset | Realtek RTL8101E |
| LAN | 10/100 Mbps |
| PS/2 Ports | 1 x PS/2 keyboard, 1 x PS/2 mouse |
| Serial Ports | 1 |
| Parallel Port | 1 |
| Chipset | Intel 945GC |
| Memory Standard | DDR2 667/533 |
| Expansion Slots | 1 x PCI-E x16, 2 x PCI |
| SATA | 4 x SATA 3Gb/s |
| USB Ports | 4 x USB 2.0 |
| Onboard Video | Intel GMA 950 |
| Audio | 5.1-Channel HD Audio |