PRODUCT SAFETY SOLUTIONS
© 2012 Educated Design & Development, Inc. All rights reserved. Rev B: February, 2012 Page 11 of 19
OPERATING INSTRUCTIONS: (Continued)
8. IEC60950 specifies that the measurement taken in step 7 be repeated for each position of the product’s
power switch and with all combinations of the “Neutral” and “Line” switches on the LT-952. Be sure to
release the Ground switch before changing any of the test conditions (Line or Neutral switches) or before
contacting the device under test. Failure to do this will result in blown meter fuses on the LT-952.
Surface to Reference Leakage Measurement Procedure
1. Isolate the product under test from ground. This can be accomplished by placing the product on a rubber
pad or other suitable insulator. This may also include disconnecting any accessory cables connected to the
product under test (i.e. a shielded monitor or printer cable).
2. To verify that there are no other grounds to the equipment under test, connect an ohmmeter between the
ground pin on the product under test and the power system ground. Readings of close to 0 Ohms indicate
the presence of an extraneous ground that needs to be removed. This step can probably be omitted for
simple test setups. The only penalty for an extraneous ground may be a blown meter fuse in the LT-952.
3. Secure the work area so that you or another person cannot accidentally come into contact with the
product during the test. Since the product ground is disconnected while the Ground switch is toggled
OPEN, the product under test poses a potential shock hazard.
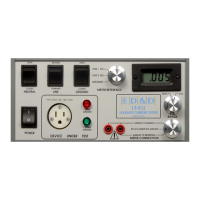
4. Set the controls on the LT-952 as follows:
Voltage selector 115
Power OFF
Neutral CLOSED
Line FORWARD
Meter Connection SURFACE TO REFERENCE
Range 20mA
5. Connect the product under test to the front panel receptacle. Make sure that the product under test’s
power switch is ON.
6. Set the Power switch of the LT-952 to ON. Observe that the leakage indicated on the LT-952 is ZERO.
This is normal as the leakage current is flowing through the still connected product ground.
7. Connect a test lead from the right front panel banana jack on the LT-952 to the surface to be tested on
the product.
8. To measure the true leakage, depress and hold the Ground switch to the OPEN position. Within a few
seconds, the display on the LT-952 should settle to the final leakage current value. If the displayed result is
less than 20mA, change the Range switch to the 2mA position.
8. IEC60950 specifies that the measurement taken in step 7 be repeated for each position of the product’s
power switch and with all combinations of the “Neutral” and “Line” switches on the LT-952. Be sure to
release the Ground switch before changing any of the test conditions (Line or Neutral switches) or before
contacting the device under test. Failure to do this will result in blown meter fuses on the LT-952.