EasyManua.ls Logo

Eden FLEX-DESIGN User Manual

Eden FLEX-DESIGN
2 pages
To Next Page IconTo Next Page
Page #1 background imageLoading...
Page #1 background image
97063-EDAMZ
You can place your sprinklers and make custom-length garden hoses to suit your watering needs.
You "permanently" place the sprinklers and hoses in areas that are out of sight and set them on timers.
Once the system is in place and set on the timer, you can leave it and forget about it.
The system is completely modular and can grow with your needs.
You can even add the extensions where needed for added height.
The best part is, if you ever move, you can take it all with you and use it at your next place.
How much of your yard do you want to water? Depending on your watering needs, some plants may
require more water than others.
Where can you put a sprinkler to reach the maximum amount of area, yet remain out of sight while taking
care of your plants?
Where are your outdoor faucets located, and if needed, can you add another one?
Sometimes, the outdoor faucets are not nearby.
Where will hoses need to be run, and can they be hidden in ower beds, under a deck, etc...? Some will
place the hoses in the ground to hide them and also to protect them from getting damaged.
Attach the hose to the Tap Flow Connector. By inserting the hose into the connector, tighten the connector, then you can connect to your faucet / tap or
watering timer.
Position the spikes at the locations you want to have them. As the water coverage for each spike is 5m in diameter, The best distance between sprinklers
will be 3 - 13 ft (1 - 4m). A maximum of 4 spikes in one water line will work well with 50 PSI water pressure.
FLEX-DESIGN SPRINKLER SET
Step 1
Step 2
Cut your hose to match the distances
between each spike location. To prevent
leaks, please cut your hose properly
squared. Attach the hoses to the spike
by loosening the side hose connectors.
Insert the hose into the connector, then
tighten the connector, creating a tight
t. Put the STOP end cap at the end or
remove the STOP end cap to add
additional units.
Step 3
The idea is to place the Flex-Design Sprinklers Set in "permanent" locations.
Ask yourself the following questions:
Best Distance 3-13ft (1-4m)
Question and Answer IconNeed help?

Do you have a question about the Eden FLEX-DESIGN and is the answer not in the manual?

Eden FLEX-DESIGN Specifications

General IconGeneral
BrandEden
ModelFLEX-DESIGN
CategoryLawn and Garden Equipment
LanguageEnglish

Summary

Flex-Design Sprinkler Set Overview

Key Features and Benefits

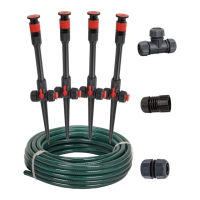
Highlights the modularity, customizability, and portability of the sprinkler system for garden watering.

Step 1: Planning Permanent Locations

Placement Considerations

Guides users to determine watering needs, optimal sprinkler placement, and faucet locations.

Step 2: Hose Connection and Spike Positioning

Hose Attachment and Spike Setup

Instructions for connecting the hose to the tap connector and positioning sprinkler spikes for effective coverage.

Optimal Sprinkler Spacing

Details the recommended distance between sprinklers for optimal water coverage, up to 4 spikes per line.

Step 3: Hose Cutting and Connection

Securing Hose Connections

Provides guidance on accurately cutting hoses and securely attaching them to sprinkler spikes with end caps.

Step 4: Adjusting Sprinkler Settings

Watering Range and Arc Adjustment

Explains how to adjust the watering range and arc angle for each spike to achieve desired coverage.

Hose Connector Options

Illustrates setup methods and the use of a 3-way connector for multi-channel watering.

Step 5: Adding Height Extensions

Extending Sprinkler Height

Details how to use and combine extensions to increase sprinkler height for taller plants or hedges.

Step 6: Turning On the Water

Watering Schedule Recommendations

Suggests watering in the early morning and advises against late-night watering to prevent plant diseases.

Related product manuals