Do you have a question about the Eden WTX-264 and is the answer not in the manual?
Warning about potential hearing loss from high volume levels and advising consultation with an audiologist if discomfort occurs.
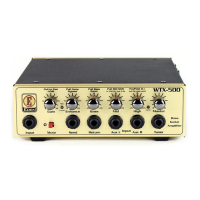
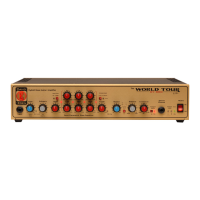
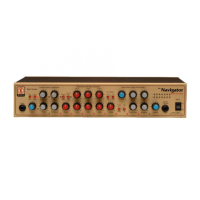
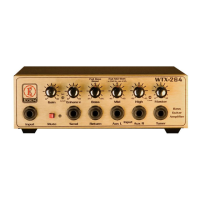
Regulates the preamplifier's first gain stage and signal availability to the system.
Indicator light to help set the appropriate amount of gain, ideally lighting on loudest/lowest notes.
Boosts very low bass, upper mids, and highs while dipping lower mids; flat at minimum.
Three controls with 'Pull' function to boost or cut tone at desired frequencies.
Bass control provides shelving tone adjustment; Bass Boost engages dynamic boost for low-volume consistency.
Midrange covers center sound envelope; Mid Shift toggles between low mid (550Hz) and high mid (2.2KHz).
Traditional shelving tone control providing 15 db of boost or cut at approximately 5KHz.
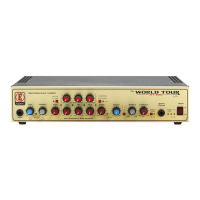
Indicates power amplifier limiting circuit activity protecting speakers from severe distortion.
Adjusts overall system output and stage loudness.
Standard 1/4-inch mono input, accepts various signals, recommended use with shielded cable.
Mutes all outputs except Tuner Out for silent tuning; indicator lights when active.
Standard 1/4-inch jacks for sending/receiving signal to/from external devices, located post tone section.
1/4-inch inputs for external sources like CD/cassette players, drum machines, summed prior to Master Volume.
Provides a pre-gain signal for connection to a tuner or pre-tone signal to other devices.
Turns system power ON or OFF; illuminates to indicate AC power presence.
Removable power cord attached here; unit comes prewired for appropriate voltage.
Connects optional footswitch to engage Mute and bypass Enhance control on the fly.
Balanced XLR output for sending pre- or post-EQ signal to a mixing console (Pin 2 hot).
Lifts ground within balanced output to eliminate noise/ground loops with external systems.
Controls level sent from XLR balanced output; suggested starting at 10-11 o'clock.
Accepts a standard 1/4-inch stereo or mono headphone plug.
Two 1/4-inch jacks and NL-4 connector for speaker output; total impedance should not exceed 4 ohms.
Passive thermal safety system activates AGC if temperature exceeds 190°F, reducing output.
Place amplifier away from heat/moisture, do not obstruct vents; address thermal shutdown causes immediately.
Requires at least 10 Amps of correctly wired AC power for proper operation and tone.
Use shielded cables for line connections; use high-quality 16 gauge or larger speaker cables for speaker connections.
Instructions for setting controls (Power OFF, Volume min, Tone flat, Enhance min, Gain min, Compressor OFF, Mid to 550Hz).
Plug in power cord, then plug in bass and turn on the unit with Master Volume at minimum.
Turn Input Gain up slowly while playing until compressor or set level light blinks with regularity.
Engage compressor by pushing Enhance control; adjust Input Gain to achieve desired compression effect.
Guide to adjusting EQ frequencies based on instrument, style, and venue; suggests starting with flat EQ.
Adjust Enhance control to achieve desired sound; limit to 12:00 if sound isn't improved.
Avoid excessive boosting; active EQ controls can boost by boosting or cutting adjacent frequencies.
Adjust Bass and Treble controls to cover broad frequency spectrum, noting small adjustments have significant effect.
Adjust Midrange for presence; choose between 550Hz (general/fretless) or 2.2KHz (rock/aggressive).
Engage for full bass at low volumes based on Fletcher-Munson curve; effect reduces as volume increases.
Make final adjustments to Midrange and other controls to achieve desired warmth and grit.
Cut lower frequencies if running out of headroom; watch the Limit light for indicator of overload.
Choose speaker systems to accommodate amplifier characteristics; 8 Ohm models allow for future expansion.
Do NOT operate amplifier at an impedance less than 4 Ohms to prevent overheating and potential damage.
Amplifier can be used safely with headphones only for practice or as a preamplifier.
Clean solderless connection points regularly with denatured alcohol or de-oxidant for optimal tone.
Periodically inspect and vacuum ventilation openings to remove dust buildup.
If smoke appears, immediately turn off the amplifier and seek qualified technician service.
Visit www.eden-electronics.com for articles, FAQs, and online forum for product information.
| Type | Bass Amplifier Head |
|---|---|
| Enhance Control | Yes |
| Effects Loop | Yes |
| Frequency Response | 10Hz - 20kHz |
| EQ | 3-band EQ with semi-parametric mid control |
| DI Output | Balanced XLR |
| Inputs | 1/4" instrument input |
| Outputs | DI Output |
| Power Output | 260 Watts RMS @ 4 Ohms |