This document describes the Eduard 32 130 Fw-190A Landing Flaps, a 1/32 scale detail set designed for Hasegawa model kits of the Fw-190A aircraft. This set enhances the realism of the model by providing photo-etched parts to represent the landing flaps, offering a more detailed and accurate representation than the original kit parts.
Function Description:
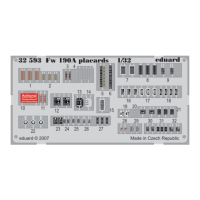
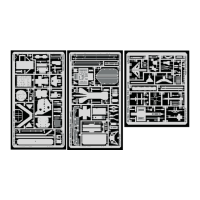
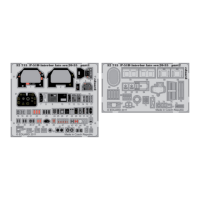
The Eduard 32 130 Fw-190A Landing Flaps set is an aftermarket accessory intended for experienced modelers to upgrade their 1/32 scale Hasegawa Fw-190A model kits. Its primary function is to replace the solid, often simplified, plastic landing flap components of the original kit with finely detailed photo-etched metal parts. These photo-etched parts allow for the depiction of the landing flaps in a deployed or partially deployed position, adding a dynamic element to the finished model. The set includes components for both the main wing flaps and their internal structures, providing a comprehensive upgrade. The use of photo-etched parts allows for a much finer scale thickness and intricate detail that is difficult to achieve with injection-molded plastic.
Technical Specifications:
- Scale: 1/32
- Compatibility: Designed specifically for Hasegawa 1/32 Fw-190A model kits.
- Material: Photo-etched brass (indicated by the "PHOTO-ETCHED PARTS" label and typical material for such sets).
- Components: The set includes multiple sheets of photo-etched parts, as well as instructions for their integration with original kit parts. The diagrams show various structural elements, hinges, and the flap surfaces themselves.
- Tools Required (not included):
- Hobby knife or sharp blade for removing original kit parts.
- Sanding tools for grinding/smoothing.
- Photo-etch bending tool (recommended for precise bends).
- Cyanoacrylate (CA) glue or similar adhesive suitable for metal-to-plastic bonding.
- Fine-tipped tweezers for handling small parts.
- Ball pen (as indicated in the instructions for marking or shaping).
- Filler (TMELIT) for gaps or imperfections.
- Paints and brushes for finishing.
- Optional Accessories (not included): Eduard Express Mask XL 050 for 1/32 Fw-190D (though the set is for Fw-190A, the mask reference might be a typo or indicate a related product for painting specific details like wheels, as shown in the diagram with parts F20 and F21, which are wheel masks). The mask set includes parts K31 and K26, likely for masking wheels.
Usage Features:
The installation process involves several steps, clearly illustrated with diagrams:
- Preparation of Original Kit Parts: Modelers must first identify and remove specific sections of the original plastic kit parts (labeled "ORIGINAL KIT PARTS" and marked with a red outline and "REMOVE" symbol). This often involves cutting, sanding, and grinding to prepare the area for the new photo-etched components. For example, parts B2 and B3 from the original kit are shown being modified.
- Bending Photo-Etched Parts: Many of the photo-etched parts require precise bending (indicated by the "BEND" symbol). This is crucial for creating the three-dimensional structure of the flaps and their internal ribs. A specialized photo-etch bending tool is highly recommended for achieving clean, sharp bends.
- Assembly: The photo-etched parts are then assembled, often layered, to create the detailed flap structure. The instructions show how individual ribs and skin panels are joined. The "SYMETRICAL ASSEMBLY" symbol indicates that certain steps need to be mirrored for the opposite side of the aircraft.
- Integration with Kit: The completed photo-etched flap assemblies are then attached to the modified original kit parts. The "APPLY EXPRESS MASK AND PAINT BEFORE GLUING" symbol suggests that some painting steps might be necessary before final assembly to ensure proper finish in hard-to-reach areas.
- Detailing: The set includes small, intricate details such as hinges and actuators, which further enhance the realism. The "DRILL HOLE" symbol indicates where holes need to be created in the plastic parts to accommodate new photo-etched elements.
- Finishing: After assembly, any gaps or seams should be filled (indicated by "FILL TMELIT"), and the entire assembly should be painted to match the aircraft's camouflage scheme.
- Optional Masking: The document references an optional Eduard Express Mask XL 050 set, which, while stated for Fw-190D, shows wheel masks (F20, F21, K31, K26) that could be used for painting the wheels of the Fw-190A model, simplifying the painting process for these circular components.
Maintenance Features:
As this is a static model detail set, "maintenance" primarily refers to the care taken during the assembly process and the long-term preservation of the finished model.
- Handling: Photo-etched parts are delicate and can be easily bent or damaged if not handled carefully. Fine-tipped tweezers are essential.
- Adhesion: Proper application of appropriate adhesives (e.g., CA glue) is critical for durable bonds between the metal parts and the plastic kit, as well as between the metal parts themselves.
- Cleaning: Before painting, ensure all parts are clean and free of oils or residues from handling to ensure good paint adhesion.
- Storage: Once assembled and painted, the model should be stored in a dust-free environment to preserve its finish and prevent damage to the delicate photo-etched details. Regular dusting with a soft brush can help maintain its appearance.
In summary, the Eduard 32 130 Fw-190A Landing Flaps set is a high-quality, intricate upgrade for modelers seeking to achieve an exceptional level of detail and realism in their 1/32 Hasegawa Fw-190A models, particularly in depicting the aircraft's landing gear and flap mechanisms. It requires patience, precision, and familiarity with photo-etched parts assembly techniques.