3
Dimensions Product: 141mm x 21mm without cover or
26mm with cover
Package: 145mm x 145mm x 30mm
Weight 182g (Pack +30g)
Warranty 5 years
WARNING: Mains powered Relay Bases must be installed and
interconnected by a qualified electrician in accordance with the
relevant local regulations for Electrical installations. Failure to
install this device correctly may expose the user to shock or fire
hazards and damage the product. This unit is not waterproof and
must not be exposed to dripping or splashing.
The Relay Bases must only be interconnected with Ei Electronics
mains powered devices - otherwise they will not comply with the
mandatory safety regulations.
WARNING: An all-pole mains switch shall be incorporated in the
electrical installation of the building.
Attention: Alternative Energy Sources - (Wind, Solar, UPS, etc.)
This product is designed to be connected to a Pure or True Sine
Wave 230V AC supply.
If connecting to a power source that utilises an inverter, e.g. PV
solar panel, the Total Harmonic Distortion (THD) must be less than
5%. If in doubt please check with the manufacturer of the inverter.
This also applies to battery powered UPS (Uninterruptible Power
Supply) inverters.
The Relay Bases must not be powered from a light dimmer circuit.
WARNING: First disconnect the mains from the circuit to be used.
WARNING: To prevent injury, this apparatus must be securely
attached to the ceiling or wall in accordance with the installation
instructions.
5.1 Installation under an Easifit Alarm
1. Choose a mounting position following the siting instructions in
the Alarm manual.
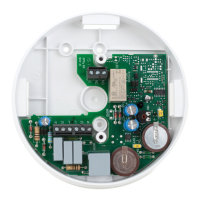
2. Where the incoming wiring is surface mounted, the appropriately
sized ducting/conduit must be chosen to mate with the unit. Use
a sharp knife to remove material from the selected knockout,
making sure that there is no gap when mated with ducting /
conduit. There are three knockouts – two on the sidewall and
one on the rear. DO NOT USE the knockout closest to the P/C
switch.
Ei128RBU
or
Ei128R
Mains Alarm
(Smoke, Heat or CO)
Figure 2
4. Important Safety Instructions
5. Installation