EN
- 14 -
Reduce noise generation and vibration to a
minimum!
•
Use only equipment that is in perfect
condition.
•
Maintain and clean the equipment regularly.
•
Adapt your way of working to the equipment.
•
Do not overload the equipment.
•
Have the equipment checked if necessary.
•
Switch off the equipment when not in use.
•
Wear gloves.
CAUTION!
Residual risks
Even if you use this electric power tool in
accordance with the instructions, certain
residual risks cannot be eliminated. The
following hazards may arise in connection
with the equipment‘s construction and
layout:
1. Lung damage if no suitable protective dust
mask is used.
2. Damage to hearing if no suitable ear
protection is applied.
Warning!
This equipment generates an
electromagnetic fi eld during operation. Under
certain circumstances this fi eld may actively
or passively impede medical implants. To
reduce the risk of serious or fatal injuries, we
recommend persons with medical implants
to consult their doctor and the manufacturer
of the medical implant prior to using the
equipment.
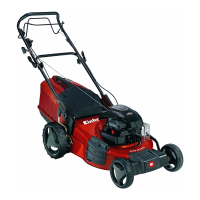
5. Before starting the equipment
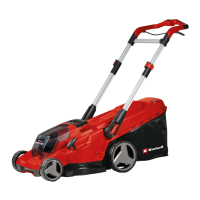
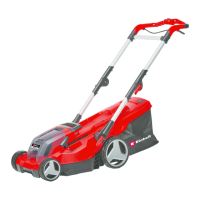
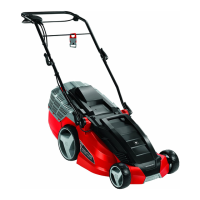
The lawn mower is delivered partly assembled.
The push bar and the grass basket must be
assembled before using the lawn mower. Follow
the instructions step by step and refer to the
pictures when assembling.
Important! Required assembly parts (screws,
cable guides, etc.) or functional parts (e.g. plugs,
wrenches, etc.) can be found in the molded parts
of the packaging or on the equipment.
There are three contacts on the right-hand teeth
of the handlebar adjustment facility (Fig. 3/Item
18), as well as on the right-hand push bar (Fig.
3/Item 19). The contacts are for connecting the
electrical connections of the motor and switching
bar.
To avoid a loose connection while mowing, which
would cause the motor to stop, the contacts on
the handlebar adjustment and the push bar must
be pressed fi rmly together. If necessary, turn the
quick-release lever on the right-hand side in a
clockwise direction a little after fl ipping it back into
the closed position.
Fitting the push bar
Use the quick-tightening screws (Fig. 2/Item 15)
to fasten the push bar (Fig. 4/Item 13) to the teeth
of the handlebar adjustment. If necessary, turn
the quick-tightening screw back suffi ciently on
the thread so that the quick-release lever (Fig. 4/
Item 16) can then still be fl ipped down towards
the back.
You can adjust the angle of the long handle as a
whole by fl ipping up the two quick-release levers
(Fig. 5/Item 16), with three settings available for
the angle (Fig. 5). Only these three positions are
available. As you do this, make sure that both
sides are set to the same position. To secure the
push bar again, fl ip the two quick-release levers
back into the closed position.
You can adjust the angle of the upper push bar
by fl ipping up the two upper quick-release levers
(Fig. 6/Item 16), with three settings available for
the angle (Fig. 7). As you do this, make sure that
both sides are set to the same position. To secure
the push bar again, fl ip the two quick-release
levers back into the closed position.
Fitting the catch basket
Finally, press the carry-handle (Fig. 8/Item 7)
onto the top part of the housing of the catch
basket. During assembly, make sure that there
is an audible click when you fi t the individual
parts of the housing together. Before you fi t the
catch basket you must ensure that the motor is
switched off and the blade is not rotating. Lift the
ejector fl ap (Fig. 9/Item 9) with one hand. Using
the other hand, grab onto the basket by the
handle and hang it in from the top.
Filling level indicator of the catch basket
The catch basket is equipped with a fi lling level
indicator (Fig. 10/Item 12), which is opened by
the airfl ow that the lawn mower generates during
operation. If the fl ap closes during mowing, the
catch basket/collection bag is full and must be
emptied. To ensure the proper functioning of the
fi lling level indicator, the holes under the fl ap must
always be kept clean and passable.
Anl_Rasarro_36_42_SPK7_USA.indb 14Anl_Rasarro_36_42_SPK7_USA.indb 14 15.12.2022 08:52:2415.12.2022 08:52:24