GB
9
앬 Switch the appliance off at the ON/OFF switch
(1)
Every second link in the chain must be sharpened in
this way. To know when every second link in the
entire chain has been sharpened, mark the first link
(e.g. with chalk). Once all cutting links on one side
have been sharpened, the grinding angle must be
set to the same number of degrees on the other side.
You can then begin to sharpen the links of the other
side(without having to make any further adjust-
ments).
7. Set the depth limiter spacing (Fig. 12/13)
Once the chain has been fully sharpened, you must
make sure that the depth limiter spacing is kept (the
depth limiters (1) must be lower than the cutting links
(2). You may need to file the depth limiters (1) to the
specifications for your chain using a file (3) (not
included in delivery).
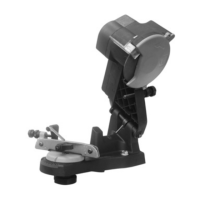
6. Technical data
Rated voltage: 230V ~ 50Hz
Power input: 85 watts
Idle speed: 4800 min
-1
Adjustment angle: 35º to the left and right
Grinding wheel Ø (inside): 23 mm
Grinding wheel Ø (outside): max. 108 mm
Grinding wheel thickness: 3.2 mm
Lpa noise level: 80 dB (A)
Lwa peak noise level: 93 dB (A)
Totally insulated: II /
Weight: 2.15 kg
7. Changing the grinding wheel
Important! Always switch the appliance off and
unplug the power plug before carrying out any main-
tenance.
1. Remove the grinding wheel (Figs. 14-16)
2. Fit a new grinding wheel
3. Assemble in reverse order
Do not use grinding wheels that are worn, broken,
cracked or otherwise damaged.
Use only genuine grinding wheels.
8. Cleaning, maintenance and ordering
of spare parts
Always pull out the mains power plug before starting
any cleaning work.
8.1 Cleaning
Keep all safety devices, air vents and the motor
housing free of dirt and dust as far as possible. Wipe
the equipment with a clean cloth or blow it with com-
pressed air at low pressure.
We recommend that you clean the tool immediately
after you use it.
Clean the equipment regularly with a moist cloth and
some soft soap. Do not use cleaning agents or sol-
vents; these may be aggressive to the toolʼs plastic
parts. Ensure that no water can get into the interior of
the tool.
8.2 Maintenance
There are no parts inside the equipment which
require additional maintenance.
8.3 Ordering replacement parts
Please provide the following information on all orders
for spare parts:
앬 Model/type of tool
앬 Article number of the tool
앬 ID number of the tool
앬 Number of the required spare part
For our latest prices and information please go to
www.isc-gmbh.info