GB
- 28 -
The specifi ed vibration value can be used for initi-
al assessment of a harmful eff ect.
Keep the noise emissions and vibrations to a
minimum.
•
Only use appliances which are in perfect wor-
king order.
•
Service and clean the appliance regularly.
•
Adapt your working style to suit the appliance.
•
Do not overload the appliance.
•
Have the appliance serviced whenever ne-
cessary.
•
Switch the appliance off when it is not in use.
•
Wear protective gloves.
Residual risks
Even if you use this electric power tool in
accordance with instructions, certain resi-
dual risks cannot be rules out. The following
hazards may arise in connection with the
equipment’s construction and layout:
1. Lung damage if no suitable protective dust
mask is used.
2. Damage to hearing if no suitable ear protec-
tion is used.
3. Health damage caused by hand-arm vib-
rations if the equipment is used over a pro-
longed period or is not properly guided and
maintained.
5. Before starting the equipment
Before you connect the equipment to the mains
supply make sure that the data on the rating plate
are identical to the mains data.
Always pull the power plug before making
adjustments to the equipment.
Pull the power plug before doing any mainte-
nance or assembly work on the equipment.
•
The machine must be set up so that it stands
firmly, i.e. it must be securely screwed to a
work bench or similar.
•
All covers and safety devices have to be pro-
perly fitted before the machine is switched on.
•
It must be possible for the grinding wheel to
run freely.
•
Check that the voltage on the rating plate is
the same as your supply voltage before you
connect the machine to the power supply.
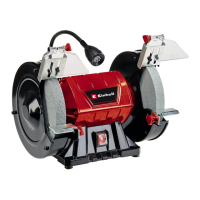
5.1 Fitting the spark refl ector
(Fig. 2-4 / Item 3)
Fit the spark refl ector (3) to the double wheel grin-
der/sander using the adjusting screw (10).
5.2 Adjusting the spark refl ector
(Fig. 5 / Item 3)
•
Adjust the spark deflector (3) using the adjus-
ting screw (10) so that the distance between
the dry grinding wheel (5) and the spark de-
flector (3) is as small as possible and certain-
ly does not exceed 2 mm.
•
Adjust the spark deflector (3) periodically to
compensate for wear on the wheel.
5.3 Fitting the workpiece supports
(Fig. 6 / Item 7)
Undo the fastening screws (6). Secure the work-
piece supports (7) to the double wheel grinder/
sander using the fastening screws (6).
5.4 Adjusting the workpiece supports
(Fig. 7 / Item 7)
•
Adjust the workpiece supports (7) using the
fastening screws (6) so that the distance
between the dry grinding wheel (5) and the
workpiece support (7) is as small as possible
and certainly does not exceed 2 mm.
•
Adjust the workpiece supports (7) periodically
to compensate for wear on the dry grinding
wheel.
5.5 Changing the grinding wheel (Figs. 8-9)
Remove the 3 screws (A) holding the side section
of the safety hood (B) and remove the safety
hood. Undo the nut (D) (Important: The left
grinding wheel is fastened with a left-handed
thread and the right grinding wheel with a
right-handed thread), by holding the nut of
the grinding wheel mount on the opposite side.
Remove the fl ange (C). and replace the grinding
wheel (5). The grinding wheel is mounted with
the help of a rag. Mount the fl ange (C) on the
shaft and screw on the nut (D) hand-tight. To tigh-
ten the nut (D), hold the grinding wheel (5) with a
rag and tighten the nut (D).
5.6 Adjust the switch (E)
on the rear panel of the device, to the mains
voltage situation of your power supply company
(127V or 220V) before turning on the device. (Fi-
gure 10a) You might use a screwdriver or similar.
(Figure 10b)
Anl_SA_TC_BG_175_SPK8.indb 28Anl_SA_TC_BG_175_SPK8.indb 28 05.02.2018 08:58:5305.02.2018 08:58:53