GB
- 22 -
•
Connect a wet and dry vacuum cleaner to
the outlet of the vacuum extractor angle (25)
(refer to the technical data for the diameter).
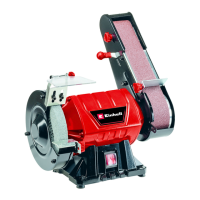
5.3 Adjusting the position of the grinding/
sanding belt (Fig. 10/11)
•
The grinding/sanding belt (5) can be used in
both a horizontal and a position.
•
Undo the two nuts (26) using the wrench (21).
•
Move the grinding/sanding belt (5) up.
•
Retighten the nuts (26) to secure the position.
•
In this position you can use the grinding/san-
ding table (3) to support the workpiece
•
To do so, you have to remove the stop rail (7)
(see 5.2).
•
Remove the grinding/sanding table (3) from
the mount (19) and the screw (20).
•
Fit the screw (20) to the mount (27).
•
Push the grinding/sanding table (3) into the
mount (27). Secure it by tightening the screw
(20) using the wrench (21).
•
Caution! Ensure that the distance between
the grinding/sanding table (3) and the grin-
ding/sanding belt (5) is as small as possible.
By doing this you will reduce the risk of work-
pieces getting jammed.
•
Caution! The grinding/sanding belt (5) must
be able to run freely.
•
To move the grinding/sanding belt (5) back
to the horizontal position, proceed in reverse
order. Important! Position the housing of the
grinding/sanding belt so that it rests on the
foot (28).
5.4 Changing the grinding/sanding belt
(Fig. 12/13)
•
Pull out the power plug!
•
Adjust the grinding/sanding belt (5) to the ver-
tical position (see 5.3).
•
Remove the 4 recessed head screws (29).
•
Undo the recessed head screw (30).
•
Remove the grinding/sanding belt guard (31).
•
Pull the clamping lever (10) outwards to re-
lease the grinding/sanding belt (5).
•
Remove the grinding/sanding belt (5) to the
rear.
•
Mount and the new grinding/sanding belt in
reverse order.
•
Caution! Note the running direction: Arrow
on the housing and on the inside of the grin-
ding/sanding belt!
5.5 Adjusting the grinding/sanding belt
(Figs. 14-16)
•
Warning! Before adjusting the grinding/san-
ding belt: Pull out the power plug!
•
The grinding/sanding belt should run centrally
on the rollers (see Fig. 14).
•
After changing the grinding/sanding belt (5),
turn the grinding/sanding belt (5) by hand
until the grinding/sanding belt has settled in a
certain position.
•
If necessary, you can use the adjustment
knob (32) to adjust the lateral displacement.
•
Important! While you are adjusting the lateral
displacement using the adjustment knob (32),
turn the grinding/sanding belt (5) by hand at
the same time or in between.
•
To move the grinding/sanding belt to the right,
turn the adjustment knob (32) clockwise (see
Fig. 15).
•
To move the grinding/sanding belt to the left,
turn the adjustment knob (32) counterclock-
wise (see Fig. 16).
5.6 Replacing the abrasive paper on the grin-
ding/sanding disk (Fig. 6)
Remove the front cover (16) by removing the
screws (17) and then taking off the cover (16).
Pull the abrasive paper off the sanding/grinding
disk (6) and attach the new sheet of abrasive pa-
per (hook-and-loop fastening system).
6. Operation
6.1 ON/OFF switch (1)
To switch on the equipment set the On/Off switch
(1) to position I.
Move the ON/OFF switch (1) to position 0 to
switch off the equipment.
After switching on the equipment wait for the
equipment to reach its maximum speed of rotati-
on before commencing with the sanding/grinding
work.
6.2 Grinding/sanding
•
Always hold the workpiece firmly during grin-
ding/sanding.
•
Do not exert excessive pressure.
•
To prevent the abrasive paper from becoming
worn on one side, the workpiece should be
moved to and fro on the grinding/sanding belt
or grinding/sanding plate as you grind/sand.
•
Important! Pieces of wood should always
Anl_TC_US_380_SPK9.indb 22Anl_TC_US_380_SPK9.indb 22 19.10.2021 15:42:3619.10.2021 15:42:36

 Loading...