5
Installation
13
Checking Door Alignment -
Échelon Models
The unit’s door is aligned at the factory before shipment.
However, its alignment could have been disturbed during
shipment or during door panel installation.
IMPORTANTIMPORTANT
Properly aligned, the door should be 1/8" below the
top of the unit’s cabinet, NOT flush with the top
(Figure 5).
Figure 5
1. Compare the top edge of the door to the top edge of
the cabinet.
2. If the door edge is 1/8" below and parallel to the top of
the cabinet, it is adjusted correctly. If it is not, note
whether the side opposite the hinge needs to be moved
UP or DOWN, and use the following procedure.
Échelon Full Overlay
NOTE: If door is adjusted correctly, but panel is not square
with the adjacent cabinets, slight adjustments can be
made by drilling the holes in the vinyl-coated steel panel
slightly oversized (Figure 6).
Figure 6
Adjusting Door Alignment
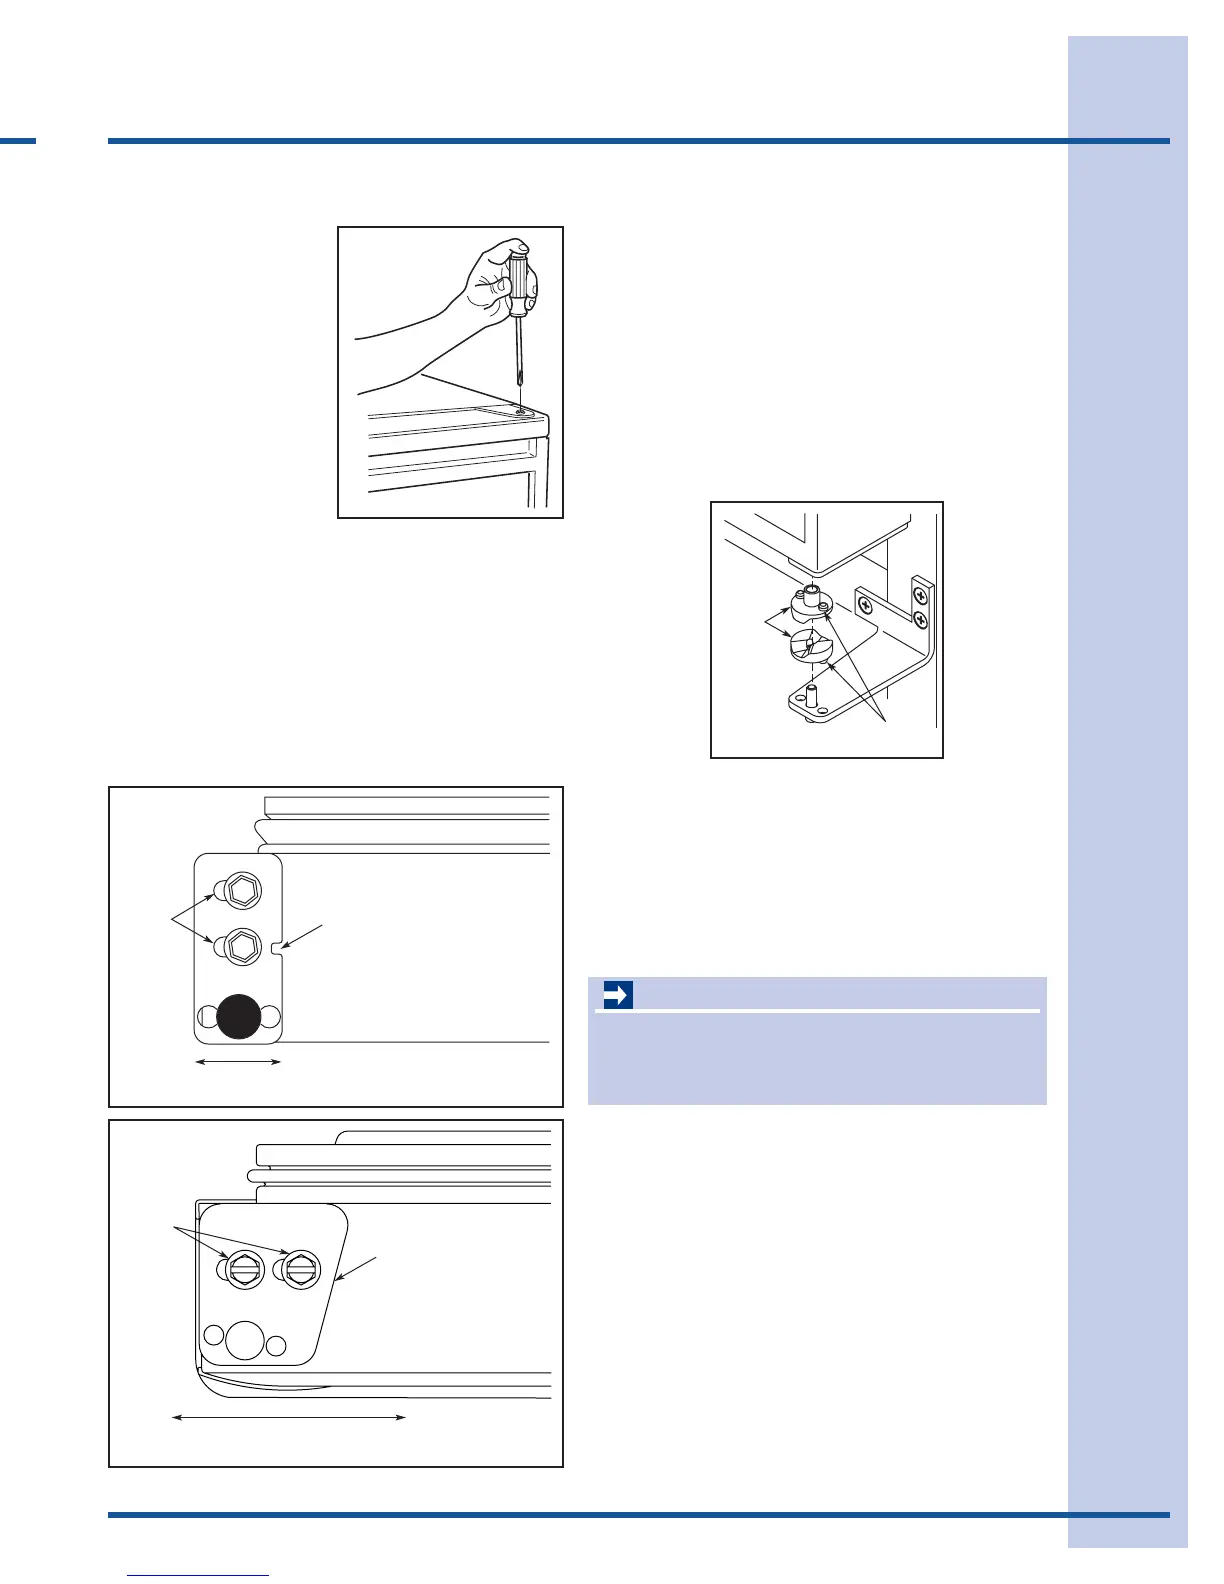
1. Remove top hinge screw pin using a Phillips
screwdriver (Figure 7). Remove door by tilting
forward and lifting off bottom hinge pin.
Figure 7
2. With door upside-down, loosen but do not remove the
two screws on the door’s bottom hinge plate.
6 Adjust Door
1/8"
ULIN_0295_A
Drill 5/32"
x
3/8" Deep for use
with #10
x
5/8" Wood Screw
and Nylon Spacer –
6 Places
1"
±
1/8"
1"
±
1/32"1"
±
1/32"
14-5/16"
±
1/4"
27"
±
1/4"
Rear View
of
Wood Panel
ULIN_0310_A
ULIN_0133_A
Figure 5
2 Withdoorupsidedown,loosenbutdonot
removethetwoscrewsonthedoor’sbottom
hingeplate.
3 See Figures 6 and 7.Ifthetopfaredgeof
thedoorneedstomoveUP,movethehinge
platetowardtheoutsideofthedoor,then
retightenscrews.Ifthetopfaredgeofthe
doorneedstomoveDOWN,movethehinge
platetowardtheinsideofthedood,then
retightenscrews.
14
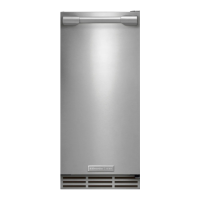
Figure 8
3. See
Figure 8
and
Figure 9
. If the top far edge of the
door needs to move UP, move the hinge plate toward
the outside of the door and retighten screws. If the top
far edge of the door needs to move DOWN, move the
hinge plate toward the inside of the door and retighten
screws.
Figure 9
4. Mount the door to recheck alignment and repeat steps
2 and 3 if further adjustment is necessary.
5. When top edge of door is parallel to top edge of
cabinet, remove the door and ensure the two screws
are secure.
6. Remove the door closers from the bottom hinge, clean
thoroughly and lubricate the mating surfaces with
petroleum jelly.
7. Reinstall the closers, lining up the bosses with holes in
hinge and hinge plate
(Figure 10)
.
Figure 10
8. Mount the door, install top hinge pivot pin.
Checking Door Alignment -
Origins Models
The unit’s door is aligned at the factory before shipment.
However, its alignment could have been disturbed during
shipment or during door panel installation.
IMPORTANTIMPORTANT
Properly aligned, the door’s gasket should be firmly
in contact with the cabinet all the way around the
door (no gaps).
1. Carefully examine the door’s gasket to assure that it is
firmly in contact with the cabinet.
2. If the door is properly aligned, no further adjustment is
necessary. If it is not, use the following procedure.
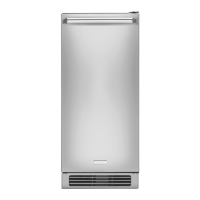
Notch
Slotted
Mounting
Holes
Raise
Outside
Door Edge
Lower
Outside
Door Edge
ULIN_0297_A
Angled Edge
Towards Center
of Door
Slotted
Mounting
Holes
Raise
Outside
Door Edge
Lower
Outside
Door Edge
ULIN_0311_A
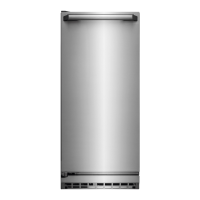
2115WC, 2115WCOL, 2175WC, 2175WCOL Only
Door
Closer
Inserts
Boss
ULIN_0298a_A
Figure 6
Adjusting Door Alignment
14
Figure 8
3. See
Figure 8
and
Figure 9
. If the top far edge of the
door needs to move UP, move the hinge plate toward
the outside of the door and retighten screws. If the top
far edge of the door needs to move DOWN, move the
hinge plate toward the inside of the door and retighten
screws.
Figure 9
4. Mount the door to recheck alignment and repeat steps
2 and 3 if further adjustment is necessary.
5. When top edge of door is parallel to top edge of
cabinet, remove the door and ensure the two screws
are secure.
6. Remove the door closers from the bottom hinge, clean
thoroughly and lubricate the mating surfaces with
petroleum jelly.
7. Reinstall the closers, lining up the bosses with holes in
hinge and hinge plate
(Figure 10)
.
Figure 10
8. Mount the door, install top hinge pivot pin.
Checking Door Alignment -
Origins Models
The unit’s door is aligned at the factory before shipment.
However, its alignment could have been disturbed during
shipment or during door panel installation.
IMPORTANTIMPORTANT
Properly aligned, the door’s gasket should be firmly
in contact with the cabinet all the way around the
door (no gaps).
1. Carefully examine the door’s gasket to assure that it is
firmly in contact with the cabinet.
2. If the door is properly aligned, no further adjustment is
necessary. If it is not, use the following procedure.
Notch
Slotted
Mounting
Holes
Raise
Outside
Door Edge
Lower
Outside
Door Edge
ULIN_0297_A
Angled Edge
Towards Center
of Door
Slotted
Mounting
Holes
Raise
Outside
Door Edge
Lower
Outside
Door Edge
ULIN_0311_A
2115WC, 2115WCOL, 2175WC, 2175WCOL Only
Door
Closer
Inserts
Boss
ULIN_0298a_A
Figure 7
1 Removetop
hingescrewpin
usingaPhillips
serewdriver
(Figure 5).
Removedoorby
tiltingforwardand
liftingoffbottom
hingepin.
4 Mountthedoortorecheckalignmentand
repeatsteps2and3iffurtheradjustmentis
necessary.
5 Whentopedgeofdoorisparalleltotopedge
ofcabinet,removethedoorandensurethe
twoscrewsaresecure.
6 Removethedoorclosersfromthebottom
hinge,cleanthoroughlyandlubricatethe
matingsurfaceswithpetroleumjelly.
7 Reinstalltheclosers,liningupthebosses
withholesinhingeandhingeplate(Figure
8).
14
Figure 8
3. See
Figure 8
and
Figure 9
. If the top far edge of the
door needs to move UP, move the hinge plate toward
the outside of the door and retighten screws. If the top
far edge of the door needs to move DOWN, move the
hinge plate toward the inside of the door and retighten
screws.
Figure 9
4. Mount the door to recheck alignment and repeat steps
2 and 3 if further adjustment is necessary.
5. When top edge of door is parallel to top edge of
cabinet, remove the door and ensure the two screws
are secure.
6. Remove the door closers from the bottom hinge, clean
thoroughly and lubricate the mating surfaces with
petroleum jelly.
7. Reinstall the closers, lining up the bosses with holes in
hinge and hinge plate
(Figure 10)
.
Figure 10
8. Mount the door, install top hinge pivot pin.
Checking Door Alignment -
Origins Models
The unit’s door is aligned at the factory before shipment.
However, its alignment could have been disturbed during
shipment or during door panel installation.
IMPORTANTIMPORTANT
Properly aligned, the door’s gasket should be firmly
in contact with the cabinet all the way around the
door (no gaps).
1. Carefully examine the door’s gasket to assure that it is
firmly in contact with the cabinet.
2. If the door is properly aligned, no further adjustment is
necessary. If it is not, use the following procedure.
Notch
Slotted
Mounting
Holes
Raise
Outside
Door Edge
Lower
Outside
Door Edge
ULIN_0297_A
Angled Edge
Towards Center
of Door
Slotted
Mounting
Holes
Raise
Outside
Door Edge
Lower
Outside
Door Edge
ULIN_0311_A
2115WC, 2115WCOL, 2175WC, 2175WCOL Only
Door
Closer
Inserts
Boss
ULIN_0298a_A
Figure 8
8 Mountthedoorandinstalltophingepivot
pin.
Checking Door Alignment
Theunit’sdoorisalignedatthefoctorybefore
shipment.However,itsalignmentcouldhavebeen
disturbedduringshipmentorduringdoorpanel
installation.
IMPORTANT
Properlyaligned,thedoor’sgasketshouldbe
rmlyincontactwiththecabinetalltheway
aroundthedoor(nogaps).
1 Carefullyexaminethedoor’sgasketto
ensurethatitisrmlyincontactwiththe
cabinet.
2 Ifthedoorisproperlyaligned,nofurther
adjustmentisnecessary.Ifitisnot,usethe
followingprocedure: