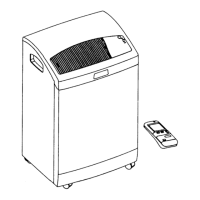
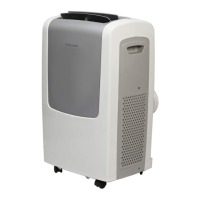
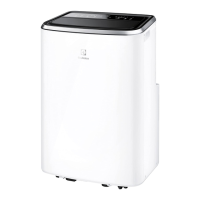
This document provides installation and operating instructions for the EPM-800 and EPT-800 portable air conditioners.
Function Description
This portable air conditioner is designed for versatile applications, including:
- Cooling air in the summer: Provides relief from heat during warm months.
- Improving cooling effect by dehumidifying the air at high humidity conditions: Enhances comfort by reducing moisture in the air, especially in humid environments.
- Heating: Offers warmth during colder periods.
- Dehumidifying damp environments (basements, laundry rooms etc.) by using most of its energy to remove moisture from the room's space: Specifically designed to tackle high humidity, making it suitable for areas prone to dampness.
Important Technical Specifications
The air conditioner offers a range of specifications for its various modes:
- Cooling capacity: 2100-7200 W-Btu/hr
- Heating capacity: 1500 W
- Power consumption (cooling): 850 W
- Power consumption (heating): 1550 W
- Power consumption ("dry" mode): 1550 W
- Dehumidification in "cooling" mode: 1.0 l/hr
- Dehumidification in "dry" mode: 1.4 l/hr
- Air delivery: 340-200 m³/hr-cfm
- Indoor fan speeds: 2
- Flexible discharge hose length: 1100 mm
- Electrical supply: 220-240V/1/50Hz
- Fuse rating: 10A (delayed action)
- Dimensions (HxWxD): 800x470x340 mm
- Weight: 46 Kg
Capacity based on test conditions:
- Indoor: 27°C/80°F DB - 19°C/67°F WB
- At entering air of 30°C/86°F and 80% RH
Actual cooling capacity may vary according to local environmental conditions.
Optimal operating temperatures: Indoor: 15-36°C/59-97°F.
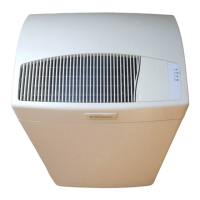
Usage Features
The unit features an on-unit control and display panel for easy operation. To ensure maximum comfort and economy, users should:
- Keep doors and windows of the room to be conditioned closed.
- Ensure the unit's outlet and inlet openings are obstruction-free.
- Shade the room from direct sun-rays and avoid excessive heat sources.
Controls:
- Selector-switch knob (A): Used to select operating modes (Off, Fan only - high/low, Cooling - high/low, Heating - high/low, Dry).
- Temperature control knob (B): Adjusts the desired room temperature.
- Timer - option (C): For setting timed operations.
- Timer switch - option (D): Controls timer functionality (Timer OFF, Air conditioner OFF, Timer ON).
- Indicators panel (E): Displays operational status.
Operating Procedure:
- Power On: When connected to power, the Power ON indicator (9) lights up. Move the Timer switch (D) to D1 position.
- Turning on the air conditioner: Turn the selector-switch knob (A) from OFF to any desired position.
- Fan only operation (Ventilating): Select High fan (A2) or Low fan (A3).
- Cooling operation: Select High cooling (A4) for fast temperature drop or Low cooling (A5) for normal-quiet operation. The Cooling/Dry indicator (10) lights up.
- Heating operation: Select High heating (A6) or Low heating (A7). The Heating indicator (11) lights up.
- Selecting the temperature: Turn the temperature control knob (B) clockwise to increase the desired temperature or counterclockwise to decrease it.
- "Dry" operation (Dehumidifying): Turn the selector-switch (A) to the "dry" position (A8). The Cooling/Dry indicator (10) lights up. In this mode, the fan runs at low speed, the compressor runs continuously, and temperature is regulated automatically. The exhaust air is discharged into the room. For prolonged dehumidification, the unit must be connected to a permanent drain. Expect a rise in room temperature during prolonged dehumidification.
- Water overflow protection: If the water basin fills up during cooling or "dry" mode, the Overflow warning indicator (12) will turn on, and the unit will stop. The unit must be turned off, the water basin drained (by removing the drain tube plug and placing a pan underneath), and then restarted.
- Turning off the air conditioner: Turn the selector-switch (A) to OFF position (A1). The power indicator (9) remains on.
- Restart warning: Wait 5 minutes before restarting cooling or dry modes, or selecting a suitable temperature setting.
Timer (Optional):
- The timer operates when the unit is plugged in and the power indicator (9) is lit.
- D1 position (Timer OFF): Timer cannot be operated; the unit runs directly via the selector switch (A).
- D2 position (Air conditioner OFF): The air conditioner is turned OFF and cannot be turned ON by switch A or the timer.
- D3 position (Timer ON): The unit is turned ON and OFF by the timer.
- The timer is a "real time" type with 48 switching pins (30-minute intervals). To set, turn the timer wheel clockwise until the current time matches the timer arrow. Pulling pins up causes the timer to turn on the unit at the indicated times.
Installation:
- Fixed Installation: Requires installing a sleeve (1, Fig. 3) through a wall, partition, or window (Fig. 4). A 110 mm diameter outlet hole is needed. Apply waterproof sealant to the sleeve flange and ensure an airtight connection with the exhaust hose (Fig. 5).
- Provisional Installation: Does not require a permanent opening. The exhaust hose is inserted through a slightly opened door or window. Fit the window nozzle (4, Fig. 3) on the hose end and use suction pads (3, Fig. 3) to hold the window in place (Fig. 6).
- Warning: Ensure the unit is level for both installation types.
Maintenance Features
- Cleaning the air filter: The air filter (6, Fig. 2) is located at the rear of the air conditioner. Slide the filter up by pulling on the filter handle (5). Rinse the filter with tap water, dry it, and re-install it. Clean at least once during the season or as necessary.
Precautions
- This air conditioner is for domestic use only.
- Do not obstruct air discharge and inlet.
- Do not make changes or alterations to the unit.
- Contact an authorized service center for repairs.
- For adult use only; do not allow children to play with it.
- Always ground the unit.
- Ensure the unit is installed level.
- Disconnect the plug from the socket before cleaning or maintenance.
- Do not apply strain on the power cord when moving the unit.
- Do not install where the atmosphere contains combustible gases, oil, sulphur, or near heat sources.
- Do not place hot or heavy objects on the unit.
- Transport the unit in an upright position. Wait at least one hour after transport before switching it on.
- Move the unit with caution over carpets and rugs.
- In fixed installations, ensure the room is not airtight after exhausting air through the hose.
- If the red overflow indicator lights up, drain the water before restarting.
- Damaged power cords must be replaced or repaired by an authorized technician.