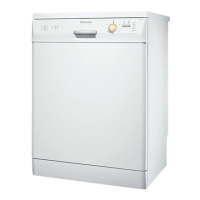
Secure the dishwasher by screwing it
firmly in position under the bench or to
the cupboard beside it. Use the angular
brackets supplied which are fitted into
the slots on the top of the dishwasher
(see fig.). Tighten the machine in position
(upwards or sideways) by using the
screws supplied (3.5 x 16 mm). Tighten
the screws so that the dishwasher can-
not tip forward and cause damage when
the door is open and loaded. The
dishwasher must be secured to the un-
derside of the worktop or to adjacent
units by using the brackets supplied.
Neglect to do this can cause injury or
damage. Under no circumstances may
holes be drilled through the sides of the
dishwasher since this could damage the
hydraulic components.
The dishwasher must be secured to
the underside of the worktop or to
adjacent units by using the brackets
supplied. Neglect to do this can
cause injury or damage. Under no
circumstances may holes be drilled
through the sides of the dishwasher
since this could damage the
hydraulic components.
Water supply connections
This dishwasher may be fed with either
hot (max. 60°) or cold water. Neverthe-
less we advise you a cold water supply.
A hot water supply is not always efficient
with very soiled crockery as it shortens
the washing programmes a lot.
For making the connection itself, the
coupling nut fitted to the machine’s sup-
ply hose is designed to screw onto a
3/4" gas thread spout or to a purpose
made quick-coupling tap such as the
Press-block.
The water pressure must be within the
limits given in the "Technical specifica-
tions". Your local Water Authority will ad-
vise you on the average mains pressure
in your area.
The water inlet hose must not be kinked,
crushed, or entangled when it is being
connected.
The dishwasher features fill and drain
hoses which can be turned either to the
left or the right to suit the installation by
means of the locknut.
The locknut must be correctly fitted
to avoid water leaks.
(Attention! NOT all models of dishwash-
ers have fill and drain hoses provided
with locknut. In this case, this kind of
facility is not possible). If the machine is
connected to new pipes or pipes which
have not been used for a long time, you
should run the water for a few minutes
before connecting the inlet hose.
installation electrolux 33