Do you have a question about the Electrolux RM2200 and is the answer not in the manual?
Report transit damage without delay, no later than seven days after delivery.
Inspect the refrigerator for damage and check the data plate for the correct model.
Read warnings carefully before installing or using the appliance. Adults only, keep children away.
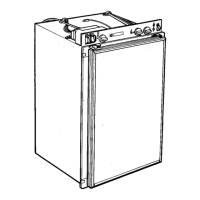
Description of the control panel and switches for power supply and temperature selection.
Steps for starting the refrigerator, including LP gas operation.
Detailed procedure for operating the refrigerator using LP gas.
How to adjust the thermostat knob to control the refrigerator temperature.
How to use the travel catch to secure the door during transit or for airing.
Advice on storing food, including containers, hot food, and frozen food compartments.
Steps for defrosting the refrigerator, including checking frost and cleaning.
How to clean the inside and exterior of the refrigerator using appropriate materials.
Steps to turn off the refrigerator when not in use for some time.
Checks to perform if the refrigerator fails to work or is not cold enough.
Practical advice for optimal refrigerator use and maintenance.
How to test couplings for leaks and recommend annual service checks.
Guidance on obtaining service from dealers or Electrolux Service Centres.
Specifications including dimensions, capacities, and energy consumption for various models.
Details on the product guarantee, terms, and conditions.
Guidance on recess dimensions, leveling, and securing the refrigerator during installation.
Instructions for mounting specific refrigerator models using screws.
Requirements for proper ventilation of the cooling unit for adequate performance.
Procedure for installing the flue kit to exhaust gases safely.
Guidelines for connecting the LP gas supply, referencing BS standards.
Details on connecting the gas supply pipe, union gas cocks, and ensuring accessibility.
Guidelines for proper electrical installation, earthing, and wiring codes.
Instructions for connecting the electronic igniter to a 12 V DC supply.
Advice on connecting the refrigerator to the vehicle battery or alternator.
This document is an operating and installation manual for Electrolux RM2200, RM2260, RM2262, RM2266, RM2267, RM2268, RM2290, RM2291, and RM2292 refrigerators, designed for built-in installation in caravans and motor caravans. The refrigerator can operate on Propane or Butane Gas, or on 240V and 12V electricity.
The Electrolux refrigerator is designed for the storage of edible foodstuffs. It features a cooling unit that can be powered by LP gas, 240V AC, or 12V DC, offering flexibility for various travel and camping scenarios. The refrigerator is not designed for free-standing use and must be built into a recess.
For LP gas operation, the refrigerator utilizes a gas burner system. Models RM2262, RM2268, and RM2292 feature a manual piezo-electric igniter, where pressing a button generates sparks to light the burner. Models RM2200, RM2260, RM2267, and RM2291 employ an electronic igniter that automatically lights and relights the gas flame if necessary, indicated by a flashing lamp in the switch. Models RM2266 and RM2290 also use an electronic igniter with a selector switch for gas, 240V, or 12V operation. A flame failure device is incorporated to automatically shut off the gas supply if the flame is extinguished, enhancing safety.
For 240V AC operation, the refrigerator is controlled by a thermostat, allowing users to regulate the internal temperature. Similarly, for LP gas operation, a gas thermostat knob controls the temperature. When operating on 12V DC, the refrigerator runs continuously without thermostat control.
The refrigerator includes a frozen food compartment, intended for storing frozen food and making ice. It is a 2-star compartment, meaning it is suitable for short-term storage of pre-frozen items but not for freezing fresh food.
To start the refrigerator on LP gas, users must first open the gas bottle's shut-off valve and any on-board shut-off valves. For models with a manual igniter, the gas supply knob is pressed and turned to the 'on' position, the thermostat knob is set to the highest setting, and the piezo-electric igniter button is rapidly pressed multiple times. The gas supply knob must be held for 10-15 seconds after the flame lights to activate the flame failure device. For models with electronic ignition, a toggle switch is set to 'on', and the gas supply knob is pressed and turned to the 'on' position, holding it for 10-15 seconds after the flame lights. The flame can be observed through a sight glass inside the refrigerator.
For 240V operation, users switch off gas or 12V operation and set the 240V rocker switch to 'on'. A green light indicates power supply. For models RM2266 and RM2290, a selector switch is used.
For 12V operation, the refrigerator should only be used when the vehicle engine is running to prevent battery discharge. It is recommended to pre-cool the refrigerator on bottled gas or 240V for a few hours before switching to 12V for a journey. Users switch off gas operation and set the 12V rocker switch to 'on'.
Temperature regulation is achieved via a thermostat knob for 240V operation and a gas thermostat knob for LP gas operation. A higher setting on the thermostat typically results in a colder temperature. During 12V operation, the refrigerator operates continuously.
The refrigerator features a travel catch on the door, which can be set in two positions: one to hold the door tightly shut during travel and another to secure it ajar for airing when not in use.
For food storage, it is advised to keep food in closed containers and allow hot food to cool before placing it in the refrigerator. Items that might give off flammable gases should not be stored inside. The temperature in the compartments can be affected by ambient temperature, location, and door opening frequency, necessitating thermostat adjustments. Frozen food storage guidelines on individual packings should be followed. Carbonated or fizzy drinks should not be placed in the freezer compartment.
Regular defrosting is essential to maintain refrigerator performance. Frost accumulation of about 3 mm thick necessitates defrosting. To defrost, the refrigerator is turned off, and all food items and the ice tray are removed. Frozen foods should be wrapped in newspaper to minimize thawing. Defrosting can be accelerated by placing hot water in the ice tray within the frozen food compartment. Sharp instruments or heating appliances should not be used to remove ice, as this can damage the plastic surfaces. After defrosting, the compartments should be wiped dry, and the door left ajar for airing before restarting.
Cleaning the refrigerator regularly ensures hygiene. The interior and fittings can be cleaned with a solution of bicarbonate of soda and warm water. Strong detergents, scouring powder, or wax polish should be avoided as they can damage surfaces and leave odors. The exterior can be cleaned with a damp cloth and mild detergent, but the door gasket should only be cleaned with soap and water and then thoroughly dried. The cooling unit at the rear of the refrigerator should be cleaned with a brush periodically, ensuring the appliance is switched off beforehand.
When the refrigerator is not in use for an extended period, it should be turned off (both LP gas and electric power), emptied, defrosted, cleaned, and dried, with the door left ajar and secured by the travel catch.
The manual also provides troubleshooting steps for common issues, such as the refrigerator failing to work on gas, 12V, or 240V, or not being cold enough. It advises checking gas supply, fuses, switches, ventilation, frost buildup, thermostat settings, and food loading. Users are cautioned against attempting repairs themselves and should contact an authorized service center, insisting on genuine Electrolux spare parts.
Couplings can be tested for leaks using a soap solution, but an open flame should never be used. An annual check by a service engineer is recommended.
| Type | Freestanding |
|---|---|
| Capacity | 12 place settings |
| Energy Rating | A |
| Delay Start | Yes |
| Dimensions (H x W x D) | 850 x 600 x 600 mm |