EasyManua.ls Logo

Electrolux WTB3100 - User Manual

Electrolux WTB3100
16 pages
Print Icon
To Next Page IconTo Next Page
Loading...
STM3900, STM4200, SBM3800, SBM4300,
WTM2800, WTM3000, WTM3300, WTM3900,
WTM4200, WTM4400, WTM5200, WTE4200,
WTE5200, WTB2300, WTB2500, WTB2800,
WTB3400, WTB3700, WBM3700, WBM3800,
WBM4000, WBM4300, WBM5100, WBE4300,
WBE5100, WRM3700, WRM4300, WFM3000,
WFM3600, KTM2800, KTM3000, KTM3300,
KTM3600, KTM3900, KTM4200, KTM4400,
KTM5200, KBM3800, KBM4300, KBM5100,
WTB3100, WTB3400, WBB3100,WBB3400.
IK010 Integration kit
Installation manual
EN
Refrigeration
Question and Answer IconNeed help?

Do you have a question about the Electrolux WTB3100 and is the answer not in the manual?

Overview

This document is an installation manual for the Electrolux IK010 Integration Kit, designed for various Electrolux refrigeration models. The manual provides comprehensive instructions for integrating a refrigerator into kitchen cabinetry, ensuring proper fit, airflow, and functionality.

Function Description

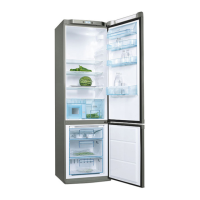
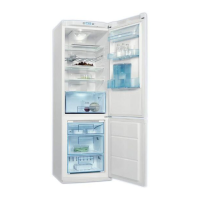
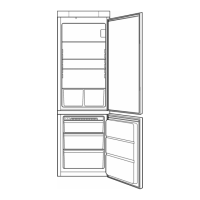
The Electrolux IK010 Integration Kit facilitates the seamless integration of a freestanding refrigerator into custom kitchen cabinetry. This kit allows the refrigerator to be concealed behind a matching cupboard door, providing a built-in aesthetic. The installation process involves attaching various brackets, housings, and slide-bars to both the refrigerator and the cupboard, enabling the cupboard door to open and close in conjunction with the refrigerator door. The kit is compatible with both curved and flat refrigerator door designs.

Important Technical Specifications

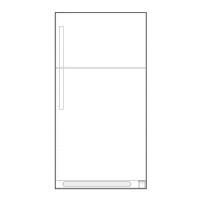
The manual provides detailed cupboard dimensions crucial for proper installation. These dimensions are given in millimeters and are categorized by refrigerator model (2-door top freezer, 2-door bottom freezer, and single door models). Key dimensions include:

  • Dim 'A' (minimum): Overall height of the cupboard.
  • Dim 'B': Width of the cupboard.
  • Dim 'C': Depth of the cupboard.
  • Dim 'D': Refrigerator depth from the front of the cabinet.
  • Dim 'E': Airflow clearance dimensions for front, bottom rear, and top rear cut-outs.
  • Dim 'G': Width of the top hinge bracket.
  • Dim 'H': Depth of the top hinge bracket.
  • Dim 'I': Calculated dimension based on Dim 'A' and Dim 'D' for specific models.

The kit includes specific components with their part numbers and quantities:

  • Top hinge bracket (PN° 1433129): 1 for single door, 1 for two-door models.
  • Slide-housing (Curve door) (PN° 1445132): 1 for single door, 2 for two-door models.
  • Slide-housing (Flat door) (PN° 228098602): 1 for single door, 2 for two-door models.
  • Slide-bar (PN° 1421620): 1 for single door, 2 for two-door models.
  • Location bracket front footing (PN° 1444993): 1 for single door, 1 for two-door models.
  • Refrigerator screws (PN° 741249): 4 for single door, 8 for two-door models.
  • Cupboard screws (PN° 1445422): 8 for single door, 12 for two-door models.
  • 120° hinge (PN° 1457832): 3 for single door, 5 (3+2) for two-door models.
  • Mounting plate for hinge (PN° 1458211): 3 for single door, 5 (3+2) for two-door models.
  • Self tapping wood screws (PN° 1400212): 12 for single door, 20 for two-door models.
  • Z-bracket IK foot location (PN° 808958001): 0 for single door, 1 for two-door models.

The manual emphasizes the use of 120° opening hinges for cupboard doors and recommends three hinges for cupboard doors higher than 1000mm.

Usage Features

The integration kit is designed to provide a cohesive look for the kitchen by concealing the refrigerator. The slide-bar mechanism ensures that the cupboard door opens and closes in sync with the refrigerator door, maintaining ease of access. The installation process is detailed step-by-step, covering:

  1. Preparation: Unpacking, removing foam packing, laying the refrigerator down, removing door stoppers, adjusting rollers, and standing upright.
  2. Attaching Top Hinge Bracket: Securing the top hinge cover and bracket to the refrigerator, ensuring proper alignment with the top of the cabinet.
  3. Attaching Slide-Housing to Refrigerator Doors: Positioning the slide-housing squarely on the refrigerator door, with specific measurements (e.g., 70mm from the protruding edge, 235mm from the top/bottom of the door) provided for different door types (curve door, flat door) and refrigerator configurations (2-door bottom freezer, 2-door top freezer, single door). The slide-housing is secured with self-tapping screws.
  4. Placing Refrigerator in Cupboard: Ensuring the cupboard is level and square, carefully placing the refrigerator inside, and inserting slide bars into slide-housings.
  5. Refrigerator Alignment: Positioning the refrigerator so that the top hinge bracket is against the cupboard wall (approximately 68mm space between cupboard and refrigerator side), the front of the refrigerator cabinet is parallel to and approximately 87mm from the front of the cupboard (with doors open), and the bottom location bracket is correctly positioned with the adjustable foot.
  6. Securing Refrigerator in Cupboard: Screwing the top hinge bracket to the cupboard wall and the foot bracket to the cupboard floor using provided screws. Pilot holes (2mm) are recommended for easy screw insertion.
  7. Attaching Slide-Bar to Cupboard Door: Fully opening the cupboard door and refrigerator door, positioning the slide-bar in the slide-housing, rotating it for alignment, removing it, drawing a line to indicate the central alignment, replacing the slide-bar, and screwing it to the cupboard door. Fine adjustments can be made to ensure smooth operation and a good gasket seal.

Maintenance Features

The manual highlights the importance of adequate air ventilation for the refrigerator when installed. Clearances (Dim 'E') are specified for front, bottom rear, and top rear airflow cut-outs in the cabinetry. A decorative grill can be fitted to the front airflow cut-out, provided it does not obstruct airflow and is removable for cleaning.

For service, customers are advised that it is their responsibility to remove the refrigerator from the cupboard, as this is not covered by warranty. This implies that the installation should allow for eventual removal if necessary, though the removal process itself is not detailed as a maintenance feature of the kit. The manual also advises keeping the instruction booklet for future reference and passing it on to any future owners.

Electrolux WTB3100 Specifications

General IconGeneral
BrandElectrolux
ModelWTB3100
CategoryRefrigerator
LanguageEnglish

Related product manuals