EasyManua.ls Logo

ELEVATE CC-1223 User Manual

ELEVATE CC-1223
7 pages
To Next Page IconTo Next Page
Page #1 background imageLoading...
Page #1 background image
Page 1Rev. 031720
1-888-651-3431
General Guidelines
It is the user’s responsibility to read and follow all instructions.
Keep these instructions with the product at all times and review before each use.
It is the responsibility of this product’s owner to furnish the instructions to any person that borrows or purchases the
product.
Inspect the product before use to ensure it is assembled properly and all parts are in safe working order and free of
defects.
Never modify this product in any way.
All circumstances cannot be addressed in these instructions. Please use common sense and practice general safety
measures when using this product.
Parts and/or instructions are subject to change without notice.
Safety
Never exceed the 500 lb. capacity.
For use with 2” Class III and IV hitch receivers. If installed on a Class II receiver, total weight, including carrier, is limit-
ed by the hitch tongue weight rating.
Never exceed the maximum trailer hitch tongue weight rating of your trailer hitch.
Make sure the carrier is properly secured on the trailer hitch mount and all cargo is properly secured.
Always check local DOT ordinances regarding the use of hitch carriers. In some regions it may be illegal to cover or
obscure the license plate and tail lights. Always follow local tra󰀩c rules.
Always inspect your hitch carrier for loose bolts, damage, or rusting before use. DO NOT USE carrier if damaged.
Replace or repair damaged or worn parts immediately.
This carrier is designed for temporary use only. Remove when not in use or before going through a car wash.
Never block or impede vehicle exhaust. Do not use if vehicle exhaust is pointing towards the carrier. This can be a re
hazard and damage personal property and the vehicle.
Distribute loads evenly and secure with tie down straps or bungee cords (sold separately). Uneven loads may cause
tipping, resulting in damage and injury.
This carrier is not to be used for carrying people or animals.
Never place items directly on top of the fencing, as this could result in damage to the cargo carrier or your items.
Be aware of dynamic loading. Sudden dropping or bouncing a load can create an excess load which can result in dam-
age to the product or personal injury.
Do not exceed 65 MPH while the carrier is attached. Avoid excessive speed, sharp turns, and sudden braking when
using the carrier.
Periodically recheck the carrier and load during travel, especially during bad weather, heavy tra󰀩c, or when driving at
high speeds.
DO NOT use on tow-behind trailers or RVs, including 5th wheel and camping trailers.
NOT recommended for hitches less than 12" from the ground to the bottom of the hitch without the use of a riser
adapter.
Keep children and bystanders away while assembling, installing, or removing the carrier. Keep the work area clean,
free of clutter, and well lit. When not in use, store in a safe, clean location out of the reach of children.
Failure to follow these instructions can lead to serious injury and property damage and will void the warranty.
Cargo Hauler with Basket
Instructions for Part # CC-1223
Question and Answer IconNeed help?

Do you have a question about the ELEVATE CC-1223 and is the answer not in the manual?

ELEVATE CC-1223 Specifications

General IconGeneral
BrandELEVATE
ModelCC-1223
CategoryAutomobile Accessories
LanguageEnglish

Summary

General Guidelines and Safety Precautions

General Guidelines

User responsibility for instructions, product inspection, modification restrictions, and common sense usage.

Safety Warnings and Usage

Adherence to capacity limits, hitch compatibility, load security, local laws, and avoiding hazards.

Diagram and Parts List

Assembly Instructions

Step 1: Connect Supporting Frames

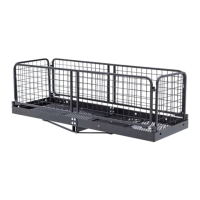
Connect two supporting frames with connecting pieces using carriage bolts and lock nuts.

Step 2: Attach Tie Plate and Support Braces

Place tie plate and frame over tube assembly and secure with bolts and lock nuts.

Step 3: Secure Support Braces and Stiffeners

Attach support braces and stiffeners to the frame using carriage bolts and lock nuts.

Step 4: Align and Tighten Frame

Ensure frame sides align horizontally and tighten all bolts and nuts.

Step 5: Install Side Fences

Insert cylindrical pins of side fences into corner fixtures of supporting frames.

Step 6: Assemble Front Fences

Connect and assemble front left and right fences onto corner fixtures.

Step 7: Assemble Back Fences

Connect and assemble back left and right fences onto corner fixtures.

Step 8: Secure Hinges with Pin and Clip

Align hinge holes, insert pin, and secure with clip.

Operation and Maintenance

Operation Guidelines

Proper load centering, tie-down use, capacity limits, hitch weight, and compliance with traffic laws.

Maintenance Recommendations

Regular examination of carrier condition, tightening of nuts and bolts, and addressing vibrations.

Product Warranty and Liability

Related product manuals