Instruction Manual
D101957X012
V150 and V300 Valves
February 2011
3
WARNING
Always wear protective gloves, clothing, and eyewear when performing any maintenance operations to avoid personal
injury.
Personal injury or equipment damage caused by sudden release of pressure may result if the valve assembly is installed
where service conditions could exceed either the valve body rating or the mating pipe flange joint rating. To avoid such
injury or damage, provide a relief valve for overpressure protection as required by government or accepted industry codes
and good engineering practices.
Check with your process or safety engineer for any additional measures that must be taken to protect against process
media.
CAUTION
When ordered, the valve configuration and construction materials were selected to meet particular pressure, temperature,
pressure drop and controlled fluid conditions. Responsibility for the safety of process media and compatibility of valve
materials with process media rests solely with the purchaser and end‐user. Since some valve body/trim material
combinations are limited in their pressure drop and temperature ranges, do not apply any other conditions to the valve
without first contacting your Emerson Process Management sales office.
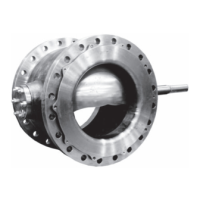
Install the valve with the drive shaft in the horizontal position as shown in figure 1.
WARNING
Do not allow the valve to be installed in the pipeline with the drive shaft in the vertical position because of excessive wear to
component valve parts.
1. If the valve is to be stored before installation, protect the flange mating surfaces and keep the valve cavity dry and
free of foreign material.
2. Install a three‐valve bypass around the control valve assembly if continuous operation will be necessary during
inspection and maintenance of the valve.
3. Mounting the Actuator:
a. The valve is normally shipped as part of a control valve assembly, with the actuator mounted on the valve. The
factory makes actuator/valve adjustments before the valve is shipped.
b. If the valve and actuator have been purchased separately or if the actuator has been removed, mount the
actuator according to the Actuator Mounting section of this manual.
4. Be certain the valve and adjacent pipelines are free of any foreign material that could damage the valve seating
surfaces.
5. Be sure the mating line flanges are aligned. Provide standard flat sheet flange gaskets (or spiral wound gaskets with
compression‐controlling centering rings) that are compatible with the process fluid.
Refer to figure 2 for required clearance for valve installation and stud length. Lubricate the studs with anti-seize
lubricant.
6. Install the valve using studs and nuts to connect the valve flanges to the pipeline flanges. The seal protector ring
(key 3) end of the valve requires longer line flange studs than standard (see figure 2).
 Loading...


